Yamaha AW2400 Owner's Manual - Page 200
Connecting to External Equipment, Synchronizing the AW2400 With External MIDI Devices
 |
View all Yamaha AW2400 manuals
Add to My Manuals
Save this manual to your list of manuals |
Page 200 highlights
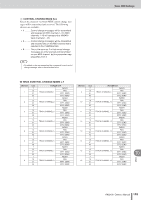
Connecting to External Equipment Connecting to External Equipment This section will provide some examples of how the AW2400 can be connected to and used with external MIDI devices. Synchronizing the AW2400 With External MIDI Devices Using MTC AW2400 song playback and recording can be synchronized to external MIDI devices such as a computer-based sequencer application or a workstation type synthesizer with a built-in sequencer. Furthermore, MMC can be used to allow remote control of the AW2400 transport functions from the external MIDI device. 1 Refer to the following diagram, and connect the AW2400 to your workstation synthesizer or computer. ● Example settings for synchronization using MTC and MMC MIDI AW2400 MIDI OUT/ THRU MTC MIDI IN Workstation synthesizer with a built-in sequencer MIDI IN MMC or MIDI OUT MTC/MMC MY16-mLAN USB cable or MTC/MMC Computer-based sequencer application IEEE1394 cable 2 Use the Work Navigate section [MIDI] key to access the MIDI screen Setting 1 page. Select the connector(s)/port(s) to be used for MIDI message transmission and reception in the PORT field. 3 Use the Work Navigate section [MIDI] key to access the MIDI screen Setting 2 page. Turn on the MASTER button in the MTC field, and turn on the MTC button in the SYNC OUT field. This sets the AW2400 to function as MTC master. 20 4 Turn on the SLAVE button in the MMC field. This sets the AW2400 to function as MMC slave. 5 Move the cursor to the DEVICE No. field, and set the value to match the device number of the external MIDI device. When using MMC, you must set the AW2400 and the external MIDI device to the same MMC device number. For details on the device numbers that your MIDI device can use, refer to its owner's manual. 6 Use the Work Navigate section [SONG] key to access the SONG screen Setting page. Select a frame rate. Frame rate HINT • When using MTC with an external device be sure to set both the AW2400 and the external device to the same frame rate. • The frame rate you specify here will affect not only synchronization with the external device, but also the time code that is displayed in the counter, etc. 7 Set the external MIDI device to function as MMC master and MTC slave, and set its MMC device number and MTC frame rate to the same settings as the AW2400. For details on how to make these settings, refer to the owner's manual provided with the device. 200 AW2400 Owner's Manual
-
 1
1 -
2
-
3
-
4
-
5
-
6
-
7
-
8
-
9
-
10
-
11
-
12
-
13
-
14
-
15
-
16
-
17
-
18
-
19
-
20
-
21
-
22
-
23
-
24
-
25
-
26
-
27
-
28
-
29
-
30
-
31
-
32
-
33
-
34
-
35
-
36
-
37
-
38
-
39
-
40
-
41
-
42
-
43
-
44
-
45
-
46
-
47
-
48
-
49
-
50
-
51
-
52
-
53
-
54
-
55
-
56
-
57
-
58
-
59
-
60
-
61
-
62
-
63
-
64
-
65
-
66
-
67
-
68
-
69
-
70
-
71
-
72
-
73
-
74
-
75
-
76
-
77
-
78
-
79
-
80
-
81
-
82
-
83
-
84
-
85
-
86
-
87
-
88
-
89
-
90
-
91
-
92
-
93
-
94
-
95
-
96
-
97
-
98
-
99
-
100
-
101
-
102
-
103
-
104
-
105
-
106
-
107
-
108
-
109
-
110
-
111
-
112
-
113
-
114
-
115
-
116
-
117
-
118
-
119
-
120
-
121
-
122
-
123
-
124
-
125
-
126
-
127
-
128
-
129
-
130
-
131
-
132
-
133
-
134
-
135
-
136
-
137
-
138
-
139
-
140
-
141
-
142
-
143
-
144
-
145
-
146
-
147
-
148
-
149
-
150
-
151
-
152
-
153
-
154
-
155
-
156
-
157
-
158
-
159
-
160
-
161
-
162
-
163
-
164
-
165
-
166
-
167
-
168
-
169
-
170
-
171
-
172
-
173
-
174
-
175
-
176
-
177
-
178
-
179
-
180
-
181
-
182
-
183
-
184
-
185
-
186
-
187
-
188
-
189
-
190
-
191
-
192
-
193
-
194
-
 195
195 -
 196
196 -
 197
197 -
 198
198 -
 199
199 -
 200
200 -
 201
201 -
 202
202 -
 203
203 -
 204
204 -
 205
205 -
206
-
207
-
208
-
209
-
210
-
211
-
212
-
213
-
214
-
215
-
216
-
217
-
218
-
219
-
220
-
221
-
222
-
223
-
224
-
225
-
226
-
227
-
228
-
229
-
230
-
231
-
232
-
233
-
234
-
235
-
236
-
237
-
238
-
239
-
240
-
241
-
242
-
243
-
244
-
245
-
246
-
247
-
248
-
249
-
250
-
251
-
252
-
253
-
254
-
255
-
256
-
257
-
258
-
259
-
260
-
261
-
262
-
263
-
264
-
265
-
266
-
267
-
268
-
269
-
270
-
271
-
272
-
273
-
274
-
275
-
276
-
277
-
278
-
279
-
280
-
281
-
282
-
283
-
284
-
285
-
286
-
287
-
288
 |
 |
