Yamaha AW2400 Owner's Manual - Page 186
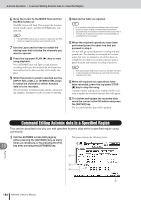
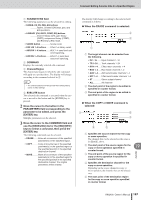
Command Editing Automix data In a Specified Region
 |
View all Yamaha AW2400 manuals
Add to My Manuals
Save this manual to your list of manuals |
Page 186 highlights
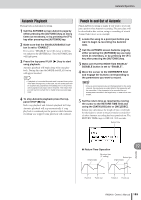
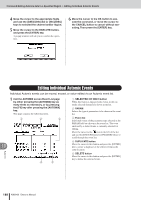
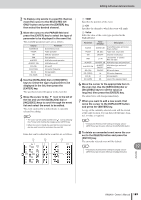
Automix Operation • Command Editing Automix data In a Specified Region 6 Move the cursor to the MODE field and turn the REC button on. The REC button will flash. This engages the Automix record standby mode, and the [AUTOMIX] key will flash red. HINT • The AUTOREC button can be turned on rather than the REC button to engage the Automix record standby mode. 7 Use the Layer section keys to select the mixing layer that includes the channels you want to operate. 8 Press the top-panel PLAY [ ] key to start song playback. The [AUTOMIX] key will light red and Automix recording will begin. But at this point no channel has been selected so no data recording will actually take place. 9 When the punch-in point is reached use the [INPUT SEL], [SEL], or [STEREO SEL] keys to select the channel for which Automix data is to be recorded. The selected key will flash orange and the corresponding channel's parameters can be recorded to Automix. 10 Operate the fader as required. HINT • If no operations are performed between the punch-in and punch-out points all data corresponding to the selected parameter data in the selected channel will be erased. This is a handy way to erase all occurrences of specified data in a specified punch-in/out region. 11 When the required operations have been performed press the same key that you pressed in step 9. The key will go out and Automix recording will stop (punch out). The Automix record mode will remain active, but since no channel is selected no data can actually be recorded (you can press the key again to punch in again and continue recording if desired). HINT • After punching the fader move in and out, the fader will return to the previously-recorded level at a rate determined by the specified return time. 12 When all required mix operations have been recorded, press the top-panel STOP [■] key to stop the song. A popup window asking you to confirm whether you want to update the recorded Automix data will appear. 13 To confirm and update the recorded data move the cursor to the OK button and press the [ENTER] key. The recorded Automix data will be updated. Command Editing Automix data In a Specified Region This section describes how you can edit specified Automix data within a specified region using commands. 1 Call the AUTOMIX screen Edit page by either pressing the [AUTOMIX] key as many times as necessary, or by pressing the [F2] 19 key after pressing the [AUTOMIX] key. This page contains the following items. Automix A B C D 186 AW2400 Owner's Manual
-
 1
1 -
2
-
3
-
4
-
5
-
6
-
7
-
8
-
9
-
10
-
11
-
12
-
13
-
14
-
15
-
16
-
17
-
18
-
19
-
20
-
21
-
22
-
23
-
24
-
25
-
26
-
27
-
28
-
29
-
30
-
31
-
32
-
33
-
34
-
35
-
36
-
37
-
38
-
39
-
40
-
41
-
42
-
43
-
44
-
45
-
46
-
47
-
48
-
49
-
50
-
51
-
52
-
53
-
54
-
55
-
56
-
57
-
58
-
59
-
60
-
61
-
62
-
63
-
64
-
65
-
66
-
67
-
68
-
69
-
70
-
71
-
72
-
73
-
74
-
75
-
76
-
77
-
78
-
79
-
80
-
81
-
82
-
83
-
84
-
85
-
86
-
87
-
88
-
89
-
90
-
91
-
92
-
93
-
94
-
95
-
96
-
97
-
98
-
99
-
100
-
101
-
102
-
103
-
104
-
105
-
106
-
107
-
108
-
109
-
110
-
111
-
112
-
113
-
114
-
115
-
116
-
117
-
118
-
119
-
120
-
121
-
122
-
123
-
124
-
125
-
126
-
127
-
128
-
129
-
130
-
131
-
132
-
133
-
134
-
135
-
136
-
137
-
138
-
139
-
140
-
141
-
142
-
143
-
144
-
145
-
146
-
147
-
148
-
149
-
150
-
151
-
152
-
153
-
154
-
155
-
156
-
157
-
158
-
159
-
160
-
161
-
162
-
163
-
164
-
165
-
166
-
167
-
168
-
169
-
170
-
171
-
172
-
173
-
174
-
175
-
176
-
177
-
178
-
179
-
180
-
 181
181 -
 182
182 -
 183
183 -
 184
184 -
 185
185 -
 186
186 -
 187
187 -
 188
188 -
 189
189 -
 190
190 -
 191
191 -
192
-
193
-
194
-
195
-
196
-
197
-
198
-
199
-
200
-
201
-
202
-
203
-
204
-
205
-
206
-
207
-
208
-
209
-
210
-
211
-
212
-
213
-
214
-
215
-
216
-
217
-
218
-
219
-
220
-
221
-
222
-
223
-
224
-
225
-
226
-
227
-
228
-
229
-
230
-
231
-
232
-
233
-
234
-
235
-
236
-
237
-
238
-
239
-
240
-
241
-
242
-
243
-
244
-
245
-
246
-
247
-
248
-
249
-
250
-
251
-
252
-
253
-
254
-
255
-
256
-
257
-
258
-
259
-
260
-
261
-
262
-
263
-
264
-
265
-
266
-
267
-
268
-
269
-
270
-
271
-
272
-
273
-
274
-
275
-
276
-
277
-
278
-
279
-
280
-
281
-
282
-
283
-
284
-
285
-
286
-
287
-
288
 |
 |
