Yamaha AW2400 Owner's Manual - Page 202
Recording/playing AW2400 mix operations on an external sequencer, Transmit program
 |
View all Yamaha AW2400 manuals
Add to My Manuals
Save this manual to your list of manuals |
Page 202 highlights
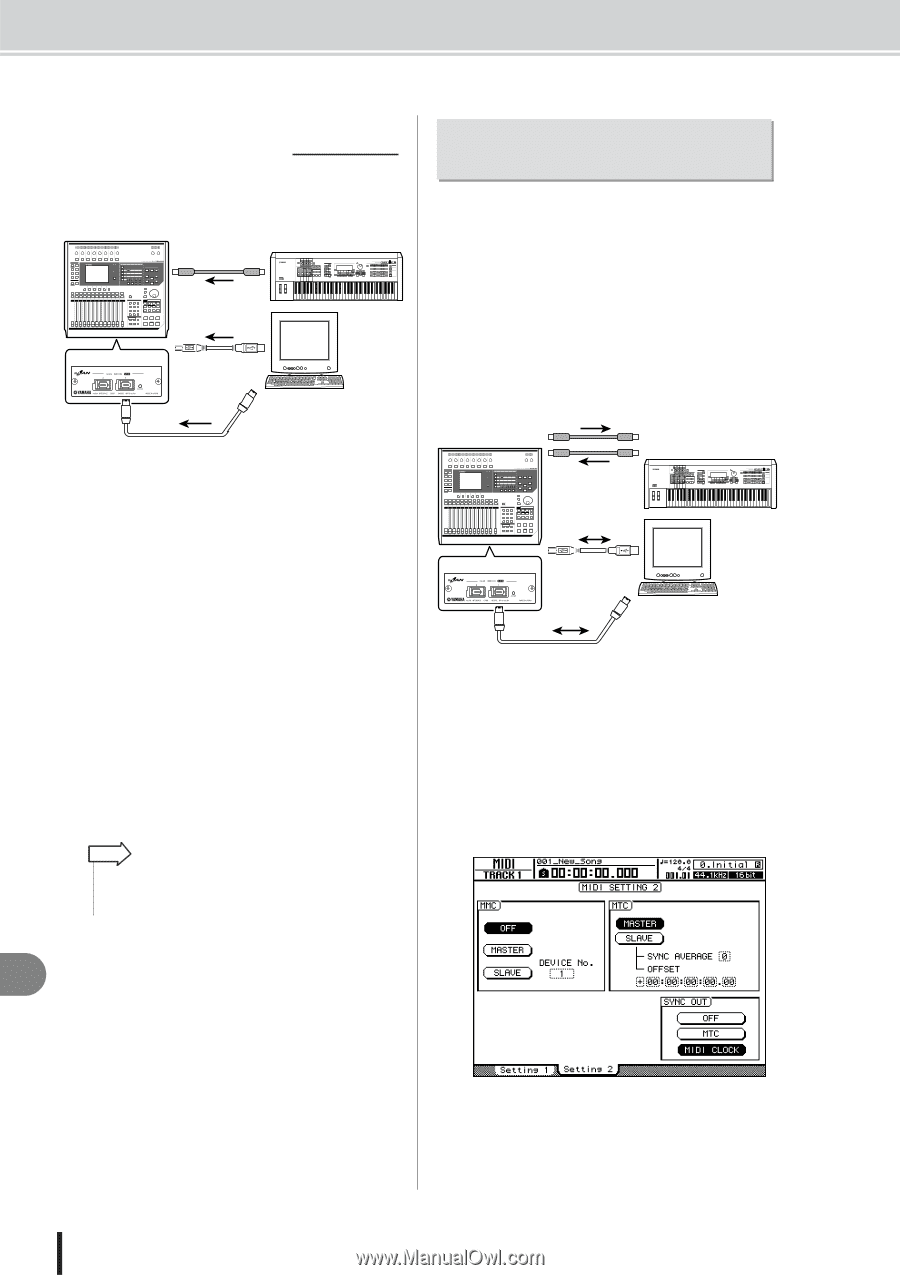
Connecting to External Equipment ■ Transmit program changes to switch scenes 1 Connect the AW2400 and your sequencer as shown in the diagram below. AW2400 Program changes Workstation synthesizer with a built-in sequencer MIDI IN MIDI OUT or MY16-mLAN USB cable or Computer-based sequencer application IEEE1394 cable 2 Use the Work Navigate section [MIDI] key to access the MIDI screen Setting 1 page. 3 Set the connector/port and channel to be used for program change message reception in the RX PORT and CHANNEL fields. 4 Turn the PROGRAM CHANGE (RX) field ON/ OFF button on. If you want to receive program change messages on all channels regardless of the MIDI receive channel setting, also turn the OMNI (RX) button on. This sets up the AW2400 to receive MIDI program change messages. 5 Transmit a program change message from your sequencer to the AW2400 on the MIDI channel that you selected. The scene assigned to that program change number will be recalled. HINT • If you insert program changes into the appropriate locations of your sequencer track, scenes will be recalled automatically as the AW2400 and your sequencer run in synchronization. Recording/playing AW2400 mix operations on an external sequencer Here's how you can synchronize the AW2400 and your external sequencer, and use the sequencer to record/play the fader and pan operations you perform on the AW2400. Since operating the AW2400's mix parameters will cause a large number of control change messages to be transmitted, we will use MIDI Clock (which uses less data) as the synchronization signal rather than MTC. 1 Connect the AW2400 and your sequencer as shown in the following diagram. AW2400 MIDI Clock Control changes MIDI OUT/ MIDI THRU IN Workstation synthesizer with a built-in sequencer MIDI MIDI IN Control OUT changes or MY16-mLAN USB cable or Computer-based sequencer application IEEE1394 cable 2 Use the Work Navigate section [MIDI] key to access the MIDI screen Setting 2 page. Turn on the MASTER button in the MTC field, and turn on the MIDI CLOCK button in the SYNC OUT field. ● Example settings for synchronization using MIDI Clock and Start/Stop/Continue 20 MIDI 202 AW2400 Owner's Manual
-
 1
1 -
2
-
3
-
4
-
5
-
6
-
7
-
8
-
9
-
10
-
11
-
12
-
13
-
14
-
15
-
16
-
17
-
18
-
19
-
20
-
21
-
22
-
23
-
24
-
25
-
26
-
27
-
28
-
29
-
30
-
31
-
32
-
33
-
34
-
35
-
36
-
37
-
38
-
39
-
40
-
41
-
42
-
43
-
44
-
45
-
46
-
47
-
48
-
49
-
50
-
51
-
52
-
53
-
54
-
55
-
56
-
57
-
58
-
59
-
60
-
61
-
62
-
63
-
64
-
65
-
66
-
67
-
68
-
69
-
70
-
71
-
72
-
73
-
74
-
75
-
76
-
77
-
78
-
79
-
80
-
81
-
82
-
83
-
84
-
85
-
86
-
87
-
88
-
89
-
90
-
91
-
92
-
93
-
94
-
95
-
96
-
97
-
98
-
99
-
100
-
101
-
102
-
103
-
104
-
105
-
106
-
107
-
108
-
109
-
110
-
111
-
112
-
113
-
114
-
115
-
116
-
117
-
118
-
119
-
120
-
121
-
122
-
123
-
124
-
125
-
126
-
127
-
128
-
129
-
130
-
131
-
132
-
133
-
134
-
135
-
136
-
137
-
138
-
139
-
140
-
141
-
142
-
143
-
144
-
145
-
146
-
147
-
148
-
149
-
150
-
151
-
152
-
153
-
154
-
155
-
156
-
157
-
158
-
159
-
160
-
161
-
162
-
163
-
164
-
165
-
166
-
167
-
168
-
169
-
170
-
171
-
172
-
173
-
174
-
175
-
176
-
177
-
178
-
179
-
180
-
181
-
182
-
183
-
184
-
185
-
186
-
187
-
188
-
189
-
190
-
191
-
192
-
193
-
194
-
195
-
196
-
 197
197 -
 198
198 -
 199
199 -
 200
200 -
 201
201 -
 202
202 -
 203
203 -
 204
204 -
 205
205 -
 206
206 -
 207
207 -
208
-
209
-
210
-
211
-
212
-
213
-
214
-
215
-
216
-
217
-
218
-
219
-
220
-
221
-
222
-
223
-
224
-
225
-
226
-
227
-
228
-
229
-
230
-
231
-
232
-
233
-
234
-
235
-
236
-
237
-
238
-
239
-
240
-
241
-
242
-
243
-
244
-
245
-
246
-
247
-
248
-
249
-
250
-
251
-
252
-
253
-
254
-
255
-
256
-
257
-
258
-
259
-
260
-
261
-
262
-
263
-
264
-
265
-
266
-
267
-
268
-
269
-
270
-
271
-
272
-
273
-
274
-
275
-
276
-
277
-
278
-
279
-
280
-
281
-
282
-
283
-
284
-
285
-
286
-
287
-
288
 |
 |