Yamaha AW2400 Owner's Manual - Page 112
Adjusting AUX send levels via, the Selected Channel Use the Layer keys, [INPUT SEL]
 |
View all Yamaha AW2400 manuals
Add to My Manuals
Save this manual to your list of manuals |
Page 112 highlights
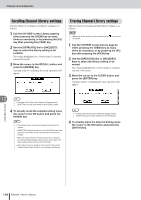
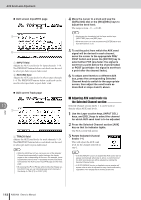
AUX Send Level Adjustment AUX ● AUX screen Input/RTN page A B 1 INPUT field Adjusts the AUX send levels for input channels 1-16. The PRE/POST buttons below each knob can be used to select pre-fader or post-fader send. B RETURN field Adjusts the AUX send levels for effect return channels 1-4. The PRE/POST buttons below each knob can be used to select pre-fader or post-fader send. ● AUX screen Track page 13 A 1 TRACK field Adjusts the AUX send levels for track channels 1-24. The PRE/POST buttons below each knob can be used to select pre-fader or post-fader send. HINT • While the [AUX] key is lit you can press one of the Selected Channel knobs repeatedly to switch between the display pages for the corresponding AUX screen. For example, pressing Selected Channel knob 1 repeatedly will switch back and forth between the AUX1 screen Input/RTN page and the Track page. • By pressing the [F1] or [F2] key while holding the Display section [SHIFT] key you can simultaneously set all channels in the display to PRE ([F1]) or POST ([F2]). 4 Move the cursor to a knob and use the [DATA/JOG] dial or the [INC]/[DEC] keys to adjust the send level. The range is from - ∞ - +10 dB. HINT • Knobs can also be selected via the Layer section keys, [INPUT SEL] keys, and [SEL] keys. • Move the cursor to a knob and press the [ENTER] key to turn that AUX send on or off. 5 To set the point from which the AUX send signal will be derived in each channel, move the cursor to the appropriate PRE/ POST button and press the [ENTER] key to select either PRE (pre-fader: the signal is sent from a point before the channel fader) or POST (post-fader: the signal is sent from a point after the channel fader). 6 To adjust send levels to a different AUX bus, press the corresponding Selected Channel knob to switch to the appropriate screen, then adjust the send levels as described in steps 4 and 5, above. ■ Adjusting AUX send levels via the Selected Channel section Selected Channel section knobs 1-4 can be used to directly adjust AUX send levels. 1 Use the Layer section keys, [INPUT SEL] keys, and [SEL] keys to select the channel for which AUX send level is to be adjusted. 2 Press the Selected Channel section [AUX] key so that its indicator lights. The AUX screen will appear. 3 Rotate Selected Channel knobs 1-4. This will adjust the AUX send level for the channel selected in step 1. HINT • If AUTO DISPLAY function is disabled the AUX screen will not appear automatically when step 2, above, is performed, but the AUX send levels can still be adjusted by rotating the Selected Channel knobs. • If AUTO DISPLAY function is disabled a popup window will appear when a value is adjusted for easy visual confirmation, regardless of the display that is showing at the time. 112 AW2400 Owner's Manual
-
 1
1 -
2
-
3
-
4
-
5
-
6
-
7
-
8
-
9
-
10
-
11
-
12
-
13
-
14
-
15
-
16
-
17
-
18
-
19
-
20
-
21
-
22
-
23
-
24
-
25
-
26
-
27
-
28
-
29
-
30
-
31
-
32
-
33
-
34
-
35
-
36
-
37
-
38
-
39
-
40
-
41
-
42
-
43
-
44
-
45
-
46
-
47
-
48
-
49
-
50
-
51
-
52
-
53
-
54
-
55
-
56
-
57
-
58
-
59
-
60
-
61
-
62
-
63
-
64
-
65
-
66
-
67
-
68
-
69
-
70
-
71
-
72
-
73
-
74
-
75
-
76
-
77
-
78
-
79
-
80
-
81
-
82
-
83
-
84
-
85
-
86
-
87
-
88
-
89
-
90
-
91
-
92
-
93
-
94
-
95
-
96
-
97
-
98
-
99
-
100
-
101
-
102
-
103
-
104
-
105
-
106
-
 107
107 -
 108
108 -
 109
109 -
 110
110 -
 111
111 -
 112
112 -
 113
113 -
 114
114 -
 115
115 -
 116
116 -
 117
117 -
118
-
119
-
120
-
121
-
122
-
123
-
124
-
125
-
126
-
127
-
128
-
129
-
130
-
131
-
132
-
133
-
134
-
135
-
136
-
137
-
138
-
139
-
140
-
141
-
142
-
143
-
144
-
145
-
146
-
147
-
148
-
149
-
150
-
151
-
152
-
153
-
154
-
155
-
156
-
157
-
158
-
159
-
160
-
161
-
162
-
163
-
164
-
165
-
166
-
167
-
168
-
169
-
170
-
171
-
172
-
173
-
174
-
175
-
176
-
177
-
178
-
179
-
180
-
181
-
182
-
183
-
184
-
185
-
186
-
187
-
188
-
189
-
190
-
191
-
192
-
193
-
194
-
195
-
196
-
197
-
198
-
199
-
200
-
201
-
202
-
203
-
204
-
205
-
206
-
207
-
208
-
209
-
210
-
211
-
212
-
213
-
214
-
215
-
216
-
217
-
218
-
219
-
220
-
221
-
222
-
223
-
224
-
225
-
226
-
227
-
228
-
229
-
230
-
231
-
232
-
233
-
234
-
235
-
236
-
237
-
238
-
239
-
240
-
241
-
242
-
243
-
244
-
245
-
246
-
247
-
248
-
249
-
250
-
251
-
252
-
253
-
254
-
255
-
256
-
257
-
258
-
259
-
260
-
261
-
262
-
263
-
264
-
265
-
266
-
267
-
268
-
269
-
270
-
271
-
272
-
273
-
274
-
275
-
276
-
277
-
278
-
279
-
280
-
281
-
282
-
283
-
284
-
285
-
286
-
287
-
288
 |
 |
