Yamaha AW2400 Owner's Manual - Page 103
desired recording-destination track,
 |
View all Yamaha AW2400 manuals
Add to My Manuals
Save this manual to your list of manuals |
Page 103 highlights
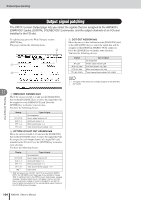
Input signal patching HINT • You can also perform steps 3-4 by repeatedly pressing the [INPUT SEL] key (or the input channel's [SEL] key). • The [INPUT SEL] keys always control input channels 1-8, regardless of the settings of the Layer section. • If an input channel is selected as a recording-source, its assignment to the stereo bus will automatically be turned off, and it will be connected via bus 1 or bus 2 so that it can be monitored by the track channel. 5 In the same way, select other input channels as recording-sources. 6 Move the cursor to the symbol for the desired recording-destination track, and press the [ENTER] key. A popup window will appear, asking you to confirm whether you want to initialize the channel parameters. A Connected to Bus 1 L B Connected to Bus 2 L C No Connection 7 Move the cursor to the OK button and press the [ENTER] key. You can select up to four tracks as recording-destinations. Bus 1L/bus 2L can be connected to odd-numbered tracks, and bus 1R/bus 2R can be connected to even-numbered tracks. The [SEL] key of the connected track channels will blink red, indicating that they are in record-ready mode. You can select the bus signal to be input by repeatedly pressing the [ENTER] key in the same way as for the input channels. For example if you move the cursor to the symbol for track 1 and repeatedly press the [ENTER] key, the screen will change as follows. To A HINT • You can also perform this operation by repeatedly pressing the track channel's [SEL] key. • EQ and dynamics setting will be set to a flat state for track channels corresponding to tracks that are selected as a record destination. • When a single track is selected as the record destination the pan of the corresponding track channel will automatically be set to center. When paired tracks are selected as the record destination the pan settings of the odd- and even-numbered tracks will automatically be set to left and right, respectively. • To cancel all connections, move the cursor to the SAFE button and press the [ENTER] key. NOTE • The track numbers of muted tracks will be displayed as (mute), but you can still record to muted tracks. • Since 24-bit songs can have a maximum of 12 play tracks (→ p. 165), tracks 13-24 are muted and will not play back. 8 Proceed with recording. For details on recording, refer to "Track recording" (→ p. 47). Patching and signal flow 11 AW2400 Owner's Manual 103
-
 1
1 -
2
-
3
-
4
-
5
-
6
-
7
-
8
-
9
-
10
-
11
-
12
-
13
-
14
-
15
-
16
-
17
-
18
-
19
-
20
-
21
-
22
-
23
-
24
-
25
-
26
-
27
-
28
-
29
-
30
-
31
-
32
-
33
-
34
-
35
-
36
-
37
-
38
-
39
-
40
-
41
-
42
-
43
-
44
-
45
-
46
-
47
-
48
-
49
-
50
-
51
-
52
-
53
-
54
-
55
-
56
-
57
-
58
-
59
-
60
-
61
-
62
-
63
-
64
-
65
-
66
-
67
-
68
-
69
-
70
-
71
-
72
-
73
-
74
-
75
-
76
-
77
-
78
-
79
-
80
-
81
-
82
-
83
-
84
-
85
-
86
-
87
-
88
-
89
-
90
-
91
-
92
-
93
-
94
-
95
-
96
-
97
-
 98
98 -
 99
99 -
 100
100 -
 101
101 -
 102
102 -
 103
103 -
 104
104 -
 105
105 -
 106
106 -
 107
107 -
 108
108 -
109
-
110
-
111
-
112
-
113
-
114
-
115
-
116
-
117
-
118
-
119
-
120
-
121
-
122
-
123
-
124
-
125
-
126
-
127
-
128
-
129
-
130
-
131
-
132
-
133
-
134
-
135
-
136
-
137
-
138
-
139
-
140
-
141
-
142
-
143
-
144
-
145
-
146
-
147
-
148
-
149
-
150
-
151
-
152
-
153
-
154
-
155
-
156
-
157
-
158
-
159
-
160
-
161
-
162
-
163
-
164
-
165
-
166
-
167
-
168
-
169
-
170
-
171
-
172
-
173
-
174
-
175
-
176
-
177
-
178
-
179
-
180
-
181
-
182
-
183
-
184
-
185
-
186
-
187
-
188
-
189
-
190
-
191
-
192
-
193
-
194
-
195
-
196
-
197
-
198
-
199
-
200
-
201
-
202
-
203
-
204
-
205
-
206
-
207
-
208
-
209
-
210
-
211
-
212
-
213
-
214
-
215
-
216
-
217
-
218
-
219
-
220
-
221
-
222
-
223
-
224
-
225
-
226
-
227
-
228
-
229
-
230
-
231
-
232
-
233
-
234
-
235
-
236
-
237
-
238
-
239
-
240
-
241
-
242
-
243
-
244
-
245
-
246
-
247
-
248
-
249
-
250
-
251
-
252
-
253
-
254
-
255
-
256
-
257
-
258
-
259
-
260
-
261
-
262
-
263
-
264
-
265
-
266
-
267
-
268
-
269
-
270
-
271
-
272
-
273
-
274
-
275
-
276
-
277
-
278
-
279
-
280
-
281
-
282
-
283
-
284
-
285
-
286
-
287
-
288
 |
 |
