HP Neoware e90 User Manual for Neoware Appliances Running Windows CE - Page 109
Changing printer properties, printer, attached to the thin client appliance on a different port, click
 |
View all HP Neoware e90 manuals
Add to My Manuals
Save this manual to your list of manuals |
Page 109 highlights
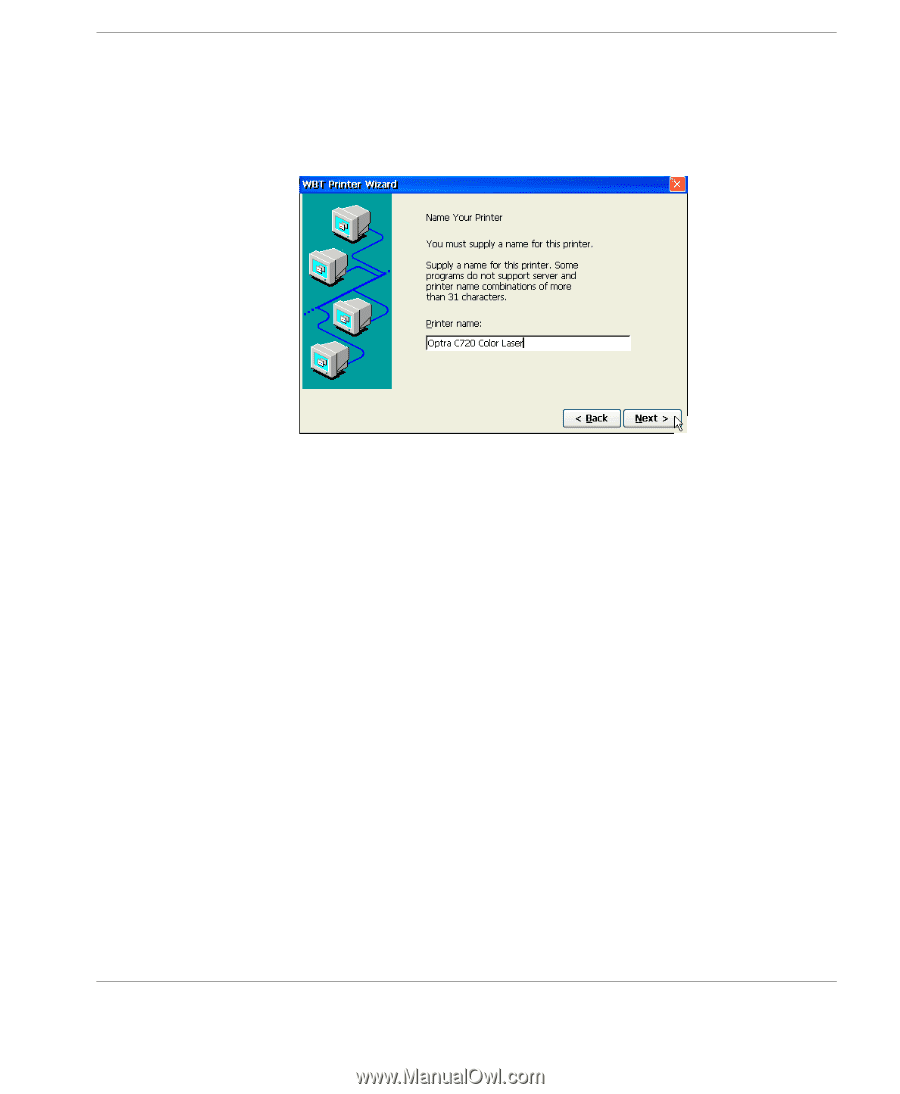
Changing Appliance Properties 7 Name Your Printer. If you selected from the pre-defined list of RDP printers, a default Printer Name will appear. Only change this name if instructed to do so by your System Administrator. Changing printer properties 8 Set default printer. If only a single RDP printer is defined, it will automatically be configured as the default printer. The default printer will receive all RDP print jobs, unless you specify a different printer. If you define more than one RDP printer, use this screen and answer "No" for all printers except the one that is to be the default. Configure another printer? If you need to add another RDP printer, attached to the thin client appliance on a different port, click Yes to repeat the steps described above. Click No if you are not configuring any additional RDP printers. Then click Finish to complete the process. Each RDP printer should appear on the Printers tab with its defined name. Once a printer is defined, you can change printer properties by either highlighting the printer icon and clicking Properties, or by right- RDP Printers icon 109 Creating Connections
-
 1
1 -
2
-
3
-
4
-
5
-
6
-
7
-
8
-
9
-
10
-
11
-
12
-
13
-
14
-
15
-
16
-
17
-
18
-
19
-
20
-
21
-
22
-
23
-
24
-
25
-
26
-
27
-
28
-
29
-
30
-
31
-
32
-
33
-
34
-
35
-
36
-
37
-
38
-
39
-
40
-
41
-
42
-
43
-
44
-
45
-
46
-
47
-
48
-
49
-
50
-
51
-
52
-
53
-
54
-
55
-
56
-
57
-
58
-
59
-
60
-
61
-
62
-
63
-
64
-
65
-
66
-
67
-
68
-
69
-
70
-
71
-
72
-
73
-
74
-
75
-
76
-
77
-
78
-
79
-
80
-
81
-
82
-
83
-
84
-
85
-
86
-
87
-
88
-
89
-
90
-
91
-
92
-
93
-
94
-
95
-
96
-
97
-
98
-
99
-
100
-
101
-
102
-
103
-
 104
104 -
 105
105 -
 106
106 -
 107
107 -
 108
108 -
 109
109 -
 110
110 -
 111
111 -
 112
112 -
 113
113 -
 114
114 -
115
-
116
-
117
-
118
-
119
-
120
-
121
-
122
-
123
-
124
-
125
-
126
-
127
-
128
-
129
-
130
-
131
-
132
-
133
-
134
-
135
-
136
-
137
-
138
-
139
-
140
-
141
-
142
-
143
-
144
-
145
-
146
-
147
-
148
-
149
-
150
-
151
-
152
-
153
-
154
 |
 |