HP Neoware e90 User Manual for Neoware Appliances Running Windows CE - Page 142
Configuring the appliance for LPR/LPD printing, When the Neoware Connection Manager appears
 |
View all HP Neoware e90 manuals
Add to My Manuals
Save this manual to your list of manuals |
Page 142 highlights
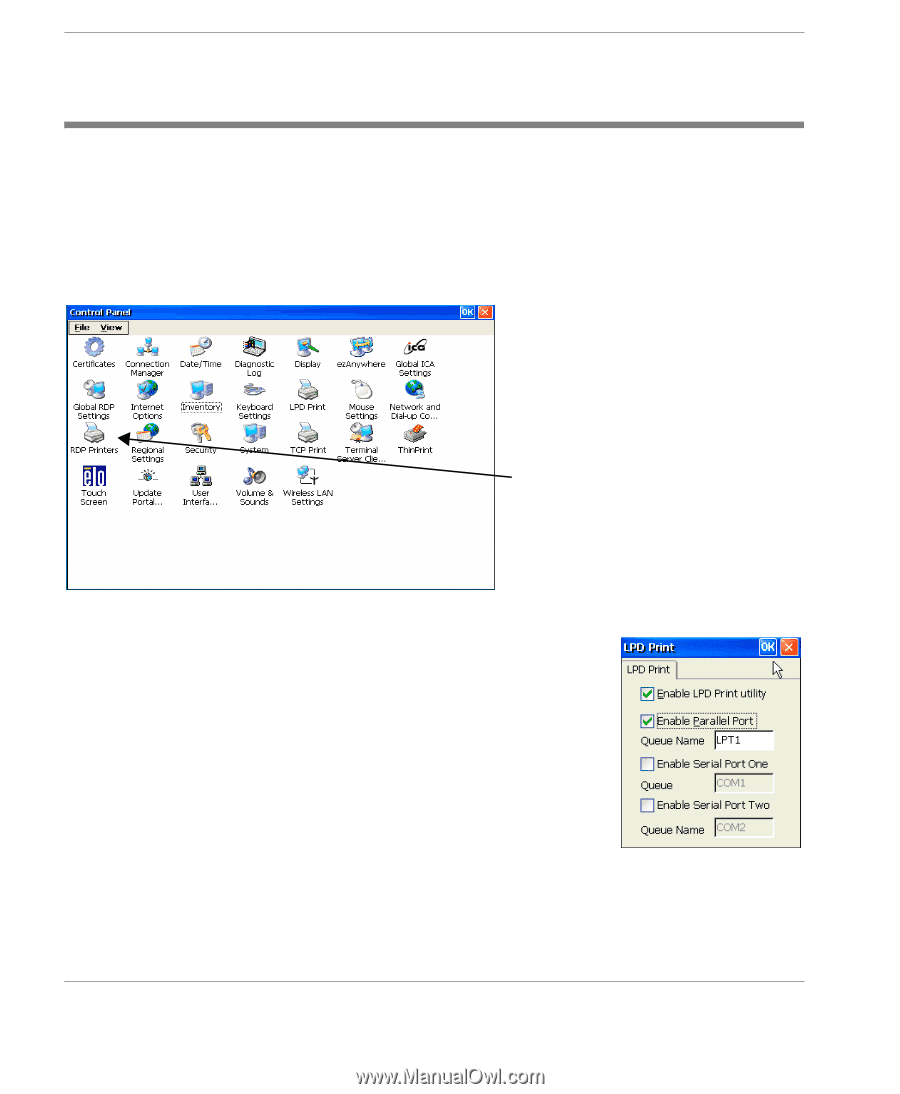
Using LPR/LPD Printing Configuring the appliance for LPR/LPD printing 1 Power off the thin client appliance. 2 Connect the printer that is to be networked to a parallel or serial port. 3 Power on the thin client appliance. 4 When the Neoware Connection Manager appears, press F2 to access the Control Panel. Click on LPD Print 5 Click on LPD Print 6 Check to ensure that LPD is enabled to the port where you connected the printer. (Click the Enable LPD Print Utility checkbox if not checked.) Click OK to close the LPD Print Utility dialog. 7 Click on Inventory icon in the Control Panel. 8 In the Network Inventory tab, note the IP address of the thin client appliance. 140 Configuring the appliance for LPR/LPD printing
-
 1
1 -
2
-
3
-
4
-
5
-
6
-
7
-
8
-
9
-
10
-
11
-
12
-
13
-
14
-
15
-
16
-
17
-
18
-
19
-
20
-
21
-
22
-
23
-
24
-
25
-
26
-
27
-
28
-
29
-
30
-
31
-
32
-
33
-
34
-
35
-
36
-
37
-
38
-
39
-
40
-
41
-
42
-
43
-
44
-
45
-
46
-
47
-
48
-
49
-
50
-
51
-
52
-
53
-
54
-
55
-
56
-
57
-
58
-
59
-
60
-
61
-
62
-
63
-
64
-
65
-
66
-
67
-
68
-
69
-
70
-
71
-
72
-
73
-
74
-
75
-
76
-
77
-
78
-
79
-
80
-
81
-
82
-
83
-
84
-
85
-
86
-
87
-
88
-
89
-
90
-
91
-
92
-
93
-
94
-
95
-
96
-
97
-
98
-
99
-
100
-
101
-
102
-
103
-
104
-
105
-
106
-
107
-
108
-
109
-
110
-
111
-
112
-
113
-
114
-
115
-
116
-
117
-
118
-
119
-
120
-
121
-
122
-
123
-
124
-
125
-
126
-
127
-
128
-
129
-
130
-
131
-
132
-
133
-
134
-
135
-
136
-
 137
137 -
 138
138 -
 139
139 -
 140
140 -
 141
141 -
 142
142 -
 143
143 -
 144
144 -
 145
145 -
 146
146 -
 147
147 -
148
-
149
-
150
-
151
-
152
-
153
-
154
 |
 |
Using LPR/LPD Printing
140
Configuring the appliance for LPR/LPD printing
Configuring the appliance for LPR/LPD printing
1
Power off the thin client appliance.
2
Connect the printer that is to be networked to a parallel or serial
port.
3
Power on the thin client appliance.
4
When the Neoware Connection Manager appears, press F2 to
access the Control Panel.
5
Click on LPD Print
6
Check to ensure that LPD is enabled to
the port where you connected the
printer. (Click the Enable LPD Print
Utility checkbox if not checked.) Click
OK to close the LPD Print Utility dia-
log.
7
Click on Inventory icon in the Control
Panel.
8
In the Network Inventory tab, note the
IP address of the thin client appliance.
Click on LPD
Print