HP Neoware e90 User Manual for Neoware Appliances Running Windows CE - Page 62
printer using LPR select the Use Network Printer LPR
 |
View all HP Neoware e90 manuals
Add to My Manuals
Save this manual to your list of manuals |
Page 62 highlights
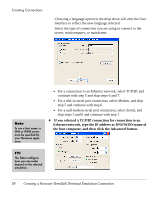
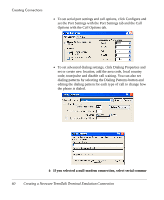
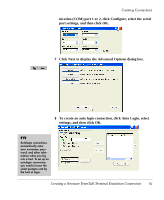
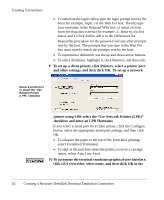
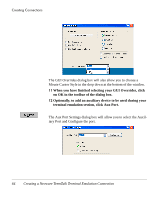
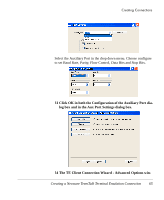
Creating Connections • To automate the login: a)first type the login prompt sent by the host (for example, login:) in the Wait For box. Then b) type your username in the Respond With box, c) select an item from the drop-down menu (for example, C. Return), d) click Insert, and e) click Add to add it to the Definitions list. Repeat this procedure for the password and any other prompts sent by the host. The prompts that you type in the Wait For box must exactly match the prompts sent by the host. • To reposition a definition, use the up and down arrow buttons. • To edit a definition, highlight it, click Remove, and then edit. 9 To set up a client printer, click Printers, select a printer port and other settings, and then click OK. To set up a network Select a printer port or select the "Use Network Printer (LPR)" checkbox printer using LPR select the "Use Network Printer (LPR)" checkbox and enter an LPD Hostname. If you select a serial port for a client printer, click the Configure button, select the appropriate serial port settings, and then click OK. • To advance the paper to the top of the form after printing, select FormFeed Terminator. • To start at the next line when the printer receives a carriage return, select Auto Line Feed. 10 To customize the terminal emulation graphical user interface, click GUI Overrides, select items, and then click OK in the 62 Creating a Neoware TeemTalk Terminal Emulation Connection
-
 1
1 -
2
-
3
-
4
-
5
-
6
-
7
-
8
-
9
-
10
-
11
-
12
-
13
-
14
-
15
-
16
-
17
-
18
-
19
-
20
-
21
-
22
-
23
-
24
-
25
-
26
-
27
-
28
-
29
-
30
-
31
-
32
-
33
-
34
-
35
-
36
-
37
-
38
-
39
-
40
-
41
-
42
-
43
-
44
-
45
-
46
-
47
-
48
-
49
-
50
-
51
-
52
-
53
-
54
-
55
-
56
-
 57
57 -
 58
58 -
 59
59 -
 60
60 -
 61
61 -
 62
62 -
 63
63 -
 64
64 -
 65
65 -
 66
66 -
 67
67 -
68
-
69
-
70
-
71
-
72
-
73
-
74
-
75
-
76
-
77
-
78
-
79
-
80
-
81
-
82
-
83
-
84
-
85
-
86
-
87
-
88
-
89
-
90
-
91
-
92
-
93
-
94
-
95
-
96
-
97
-
98
-
99
-
100
-
101
-
102
-
103
-
104
-
105
-
106
-
107
-
108
-
109
-
110
-
111
-
112
-
113
-
114
-
115
-
116
-
117
-
118
-
119
-
120
-
121
-
122
-
123
-
124
-
125
-
126
-
127
-
128
-
129
-
130
-
131
-
132
-
133
-
134
-
135
-
136
-
137
-
138
-
139
-
140
-
141
-
142
-
143
-
144
-
145
-
146
-
147
-
148
-
149
-
150
-
151
-
152
-
153
-
154
 |
 |