HP Neoware e90 User Manual for Neoware Appliances Running Windows CE - Page 144
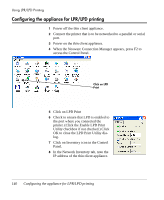
Linux/UNIX LPR/LPD printing to the appliance, Select LPR Port. Click New Port.
 |
View all HP Neoware e90 manuals
Add to My Manuals
Save this manual to your list of manuals |
Page 144 highlights
Using LPR/LPD Printing 6 Select LPR Port. Click New Port. 7 A dialog will appear. On the top line (Name or address of server providing lpd), enter the IP address of the thin client appliance. 8 In the bottom line (Name of printer on that machine), enter the Queue Name of the port where you attached the printer. For example, if you attached the printer to the parallel port, you would enter the Queue Name "LPT1" (without any punctuation). 9 Click OK. 10 The rest of the printer installation is the same as for any other Windows printer. Linux/UNIX LPR/LPD printing to the appliance 1 On the Linux/UNIX server, first log in as administrator (root). 2 Edit the /etc/printcap file and add the following section with the appropriate values: :\ :sd=/var/spool/lpd/:\ :mx#0:\ :sh:\ :rm=:\ :rp=: As an example: For a printer to be named "hp5si," attached to thin client at IP address "10.10.100.13," connected to the parallel port (Queue Name "LPT1"), the entry would be: 142 Linux/UNIX LPR/LPD printing to the appliance
-
 1
1 -
2
-
3
-
4
-
5
-
6
-
7
-
8
-
9
-
10
-
11
-
12
-
13
-
14
-
15
-
16
-
17
-
18
-
19
-
20
-
21
-
22
-
23
-
24
-
25
-
26
-
27
-
28
-
29
-
30
-
31
-
32
-
33
-
34
-
35
-
36
-
37
-
38
-
39
-
40
-
41
-
42
-
43
-
44
-
45
-
46
-
47
-
48
-
49
-
50
-
51
-
52
-
53
-
54
-
55
-
56
-
57
-
58
-
59
-
60
-
61
-
62
-
63
-
64
-
65
-
66
-
67
-
68
-
69
-
70
-
71
-
72
-
73
-
74
-
75
-
76
-
77
-
78
-
79
-
80
-
81
-
82
-
83
-
84
-
85
-
86
-
87
-
88
-
89
-
90
-
91
-
92
-
93
-
94
-
95
-
96
-
97
-
98
-
99
-
100
-
101
-
102
-
103
-
104
-
105
-
106
-
107
-
108
-
109
-
110
-
111
-
112
-
113
-
114
-
115
-
116
-
117
-
118
-
119
-
120
-
121
-
122
-
123
-
124
-
125
-
126
-
127
-
128
-
129
-
130
-
131
-
132
-
133
-
134
-
135
-
136
-
137
-
138
-
 139
139 -
 140
140 -
 141
141 -
 142
142 -
 143
143 -
 144
144 -
 145
145 -
 146
146 -
 147
147 -
 148
148 -
 149
149 -
150
-
151
-
152
-
153
-
154
 |
 |