Ricoh Aficio SP 3400SF User Guide - Page 299
Changing the Printer Driver Settings, Print Positions Do Not Match Display Positions
 |
View all Ricoh Aficio SP 3400SF manuals
Add to My Manuals
Save this manual to your list of manuals |
Page 299 highlights
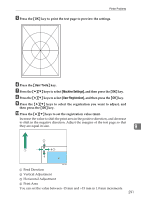
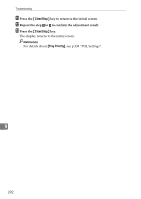
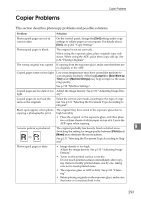
Printer Problems Problem Prints do not stack properly. The whole printout is blurred. Printed envelopes come out creased. Solution • Paper is damp. Use paper that has been stored properly. See p.56 "Paper and Other Media". • Raise the stop fence. See p.30 "Unpacking" . • Paper is damp. Use paper that has been stored properly. See p.56 "Paper and Other Media". • If you enable [Toner Saver Mode] under [Machine Settings], printing is generally less dense. • Toner is almost depleted. If "Near End Print Cartridge" appears on the screen, replace the print cartridge. • Condensation may have collected. If rapid change in temperature or humidity occurs, use this machine only after it has acclimatized. Check if the green levers found inside the rear cover are properly set. Changing the Printer Driver Settings You may eliminate certain problems by changing the printer driver settings as described below. Possible Cause Solution Cannot print properly when us- • Increase the print quality settings. ing a certain application, or can- • Adjust the image density. not print image data properly. • Set the document to print in gray-scale. Some characters are printed faintly or not printed. • Increase the print quality settings. • Set the document to print in gray-scale. Print Positions Do Not Match Display Positions 9 If the position of items on the printed page differs from the position displayed on the computer screen, the cause may be one of the following. Possible Cause Page layout settings have not been configured. The paper size setting does not match the paper loaded. Solution Check that the page layout settings are properly configured in the application. Make sure the paper size selected in the printer properties dialog box matches the size of the paper loaded. For details, see the printer driver Help. The printable area has been changed. Set the printable area to maximum. For details, see the printer driver Help. 289
-
 1
1 -
2
-
3
-
4
-
5
-
6
-
7
-
8
-
9
-
10
-
11
-
12
-
13
-
14
-
15
-
16
-
17
-
18
-
19
-
20
-
21
-
22
-
23
-
24
-
25
-
26
-
27
-
28
-
29
-
30
-
31
-
32
-
33
-
34
-
35
-
36
-
37
-
38
-
39
-
40
-
41
-
42
-
43
-
44
-
45
-
46
-
47
-
48
-
49
-
50
-
51
-
52
-
53
-
54
-
55
-
56
-
57
-
58
-
59
-
60
-
61
-
62
-
63
-
64
-
65
-
66
-
67
-
68
-
69
-
70
-
71
-
72
-
73
-
74
-
75
-
76
-
77
-
78
-
79
-
80
-
81
-
82
-
83
-
84
-
85
-
86
-
87
-
88
-
89
-
90
-
91
-
92
-
93
-
94
-
95
-
96
-
97
-
98
-
99
-
100
-
101
-
102
-
103
-
104
-
105
-
106
-
107
-
108
-
109
-
110
-
111
-
112
-
113
-
114
-
115
-
116
-
117
-
118
-
119
-
120
-
121
-
122
-
123
-
124
-
125
-
126
-
127
-
128
-
129
-
130
-
131
-
132
-
133
-
134
-
135
-
136
-
137
-
138
-
139
-
140
-
141
-
142
-
143
-
144
-
145
-
146
-
147
-
148
-
149
-
150
-
151
-
152
-
153
-
154
-
155
-
156
-
157
-
158
-
159
-
160
-
161
-
162
-
163
-
164
-
165
-
166
-
167
-
168
-
169
-
170
-
171
-
172
-
173
-
174
-
175
-
176
-
177
-
178
-
179
-
180
-
181
-
182
-
183
-
184
-
185
-
186
-
187
-
188
-
189
-
190
-
191
-
192
-
193
-
194
-
195
-
196
-
197
-
198
-
199
-
200
-
201
-
202
-
203
-
204
-
205
-
206
-
207
-
208
-
209
-
210
-
211
-
212
-
213
-
214
-
215
-
216
-
217
-
218
-
219
-
220
-
221
-
222
-
223
-
224
-
225
-
226
-
227
-
228
-
229
-
230
-
231
-
232
-
233
-
234
-
235
-
236
-
237
-
238
-
239
-
240
-
241
-
242
-
243
-
244
-
245
-
246
-
247
-
248
-
249
-
250
-
251
-
252
-
253
-
254
-
255
-
256
-
257
-
258
-
259
-
260
-
261
-
262
-
263
-
264
-
265
-
266
-
267
-
268
-
269
-
270
-
271
-
272
-
273
-
274
-
275
-
276
-
277
-
278
-
279
-
280
-
281
-
282
-
283
-
284
-
285
-
286
-
287
-
288
-
289
-
290
-
291
-
292
-
293
-
 294
294 -
 295
295 -
 296
296 -
 297
297 -
 298
298 -
 299
299 -
 300
300 -
 301
301 -
 302
302 -
 303
303 -
 304
304 -
305
-
306
-
307
-
308
-
309
-
310
-
311
-
312
-
313
-
314
-
315
-
316
-
317
-
318
-
319
-
320
-
321
-
322
-
323
-
324
-
325
-
326
-
327
-
328
-
329
-
330
-
331
-
332
-
333
-
334
-
335
-
336
-
337
-
338
-
339
-
340
-
341
-
342
-
343
-
344
-
345
-
346
-
347
-
348
-
349
-
350
-
351
-
352
-
353
-
354
-
355
-
356
-
357
-
358
-
359
-
360
-
361
-
362
 |
 |
