Samsung SGH-T959V User Manual (user Manual) (ver.f4) (English) - Page 118
Applications, Gallery, Set as, Contact icon, Send to My Album Online, Set Default Destination, Details
 |
View all Samsung SGH-T959V manuals
Add to My Manuals
Save this manual to your list of manuals |
Page 118 highlights
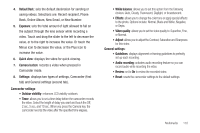
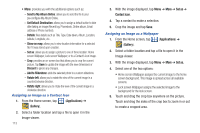
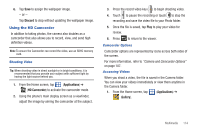
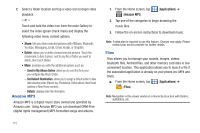
• More: provides you with the additional options such as: - Send to My Album Online: allows you to send the file to your pre-configure My Album Online. - Set Default Destination: allows you to assign a default action to take after taking an image (Recent log, Phonebook, Online album, Email address or Phone number). - Details: files details such as Title, Type, Date taken, Album, Location, latitude, Longitude, etc.. - Show on map: allows you to view location information for a selected file if it was stored upon creation. - Set as: allows you to assign a picture to one of three location: Home screen Wallpaper, Lock screen Wallpaper, or to a Contact's icon image. - Crop: provides an on-screen box that allows you to crop the current picture. Tap Save to update the image with the new dimensions or Discard to ignore any changes. - Add to Slideshow: adds the selected photo to a custom slideshow. - Rotate left: allows you to rotate the view of the current image in a counterclockwise direction. - Rotate right: allows you to rotate the view of the current image in a clockwise direction. Assigning an Image as a Contact Icon 1. From the Home screen, tap (Applications) ➔ (Gallery). 2. Select a folder location and tap a file to open it in the Image viewer. 113 3. With the image displayed, tap Menu ➔ More ➔ Set as ➔ Contact icon. 4. Tap a contact to make a selection. 5. Crop the image and tap Save. Assigning an Image as a Wallpaper 1. From the Home screen, tap (Applications) ➔ (Gallery). 2. Select a folder location and tap a file to open it in the Image viewer. 3. With the image displayed, tap Menu ➔ More ➔ Set as. 4. Select one of the two options: • Home screen Wallpaper assigns the current image to the home screen background. This image is spread across all available screens. • Lock screen Wallpaper assigns the selected image to the background for the lock screen. 5. Touch and drag the crop box anywhere on the picture. Touch and drag the sides of the crop box to zoom in or out to create a cropped area.
-
 1
1 -
2
-
3
-
4
-
5
-
6
-
7
-
8
-
9
-
10
-
11
-
12
-
13
-
14
-
15
-
16
-
17
-
18
-
19
-
20
-
21
-
22
-
23
-
24
-
25
-
26
-
27
-
28
-
29
-
30
-
31
-
32
-
33
-
34
-
35
-
36
-
37
-
38
-
39
-
40
-
41
-
42
-
43
-
44
-
45
-
46
-
47
-
48
-
49
-
50
-
51
-
52
-
53
-
54
-
55
-
56
-
57
-
58
-
59
-
60
-
61
-
62
-
63
-
64
-
65
-
66
-
67
-
68
-
69
-
70
-
71
-
72
-
73
-
74
-
75
-
76
-
77
-
78
-
79
-
80
-
81
-
82
-
83
-
84
-
85
-
86
-
87
-
88
-
89
-
90
-
91
-
92
-
93
-
94
-
95
-
96
-
97
-
98
-
99
-
100
-
101
-
102
-
103
-
104
-
105
-
106
-
107
-
108
-
109
-
110
-
111
-
112
-
 113
113 -
 114
114 -
 115
115 -
 116
116 -
 117
117 -
 118
118 -
 119
119 -
 120
120 -
 121
121 -
 122
122 -
 123
123 -
124
-
125
-
126
-
127
-
128
-
129
-
130
-
131
-
132
-
133
-
134
-
135
-
136
-
137
-
138
-
139
-
140
-
141
-
142
-
143
-
144
-
145
-
146
-
147
-
148
-
149
-
150
-
151
-
152
-
153
-
154
-
155
-
156
-
157
-
158
-
159
-
160
-
161
-
162
-
163
-
164
-
165
-
166
-
167
-
168
-
169
-
170
-
171
-
172
-
173
-
174
-
175
-
176
-
177
-
178
-
179
-
180
-
181
-
182
-
183
-
184
-
185
-
186
-
187
-
188
-
189
-
190
-
191
-
192
-
193
-
194
-
195
-
196
-
197
-
198
-
199
-
200
-
201
-
202
-
203
-
204
-
205
-
206
-
207
-
208
-
209
-
210
-
211
-
212
-
213
-
214
-
215
-
216
-
217
-
218
-
219
-
220
-
221
-
222
-
223
-
224
-
225
-
226
-
227
-
228
-
229
-
230
-
231
-
232
-
233
-
234
-
235
-
236
-
237
-
238
-
239
-
240
-
241
-
242
-
243
-
244
-
245
-
246
 |
 |
