Samsung SPH-M540 User Manual (user Manual) (ver.f5) (English) - Page 144
Getting Started With Data Services, Your User Name - sprint
 |
View all Samsung SPH-M540 manuals
Add to My Manuals
Save this manual to your list of manuals |
Page 144 highlights
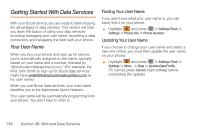
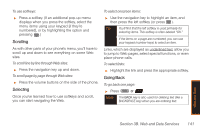
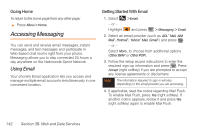
Getting Started With Data Services With your Boost service, you are ready to start enjoying the advantages of data services. This section will help you learn the basics of using your data services, including managing your user name, launching a data connection, and navigating the Web with your phone. Your User Name When you buy your phone and sign up for service, you're automatically assigned a user name, typically based on your name and a number, followed by "@myboostmobile.sprintpcs.com." (For example, the third John Smith to sign up for Boost data services might have [email protected] as his user name.) When you use Boost data services, your user name identifies you to the Nationwide Sprint Network. Your user name will be automatically programmed into your phone. You don't have to enter it. Finding Your User Name If you aren't sure what your user name is, you can easily find it on your phone. ᮣ Highlight and press > Settings/Tools > Settings > Phone Info > Phone Number. Updating Your User Name If you choose to change your user name and select a new one online, you must then update the user name on your phone. ᮣ Highlight and press > Settings/Tools > Settings > More... > Data > Update Data Profile. (To cancel, press Cancel [right softkey] before completing the update.) 138 Section 3B. Web and Data Services
-
 1
1 -
2
-
3
-
4
-
5
-
6
-
7
-
8
-
9
-
10
-
11
-
12
-
13
-
14
-
15
-
16
-
17
-
18
-
19
-
20
-
21
-
22
-
23
-
24
-
25
-
26
-
27
-
28
-
29
-
30
-
31
-
32
-
33
-
34
-
35
-
36
-
37
-
38
-
39
-
40
-
41
-
42
-
43
-
44
-
45
-
46
-
47
-
48
-
49
-
50
-
51
-
52
-
53
-
54
-
55
-
56
-
57
-
58
-
59
-
60
-
61
-
62
-
63
-
64
-
65
-
66
-
67
-
68
-
69
-
70
-
71
-
72
-
73
-
74
-
75
-
76
-
77
-
78
-
79
-
80
-
81
-
82
-
83
-
84
-
85
-
86
-
87
-
88
-
89
-
90
-
91
-
92
-
93
-
94
-
95
-
96
-
97
-
98
-
99
-
100
-
101
-
102
-
103
-
104
-
105
-
106
-
107
-
108
-
109
-
110
-
111
-
112
-
113
-
114
-
115
-
116
-
117
-
118
-
119
-
120
-
121
-
122
-
123
-
124
-
125
-
126
-
127
-
128
-
129
-
130
-
131
-
132
-
133
-
134
-
135
-
136
-
137
-
138
-
 139
139 -
 140
140 -
 141
141 -
 142
142 -
 143
143 -
 144
144 -
 145
145 -
 146
146 -
 147
147 -
 148
148 -
 149
149 -
150
-
151
-
152
-
153
-
154
-
155
-
156
-
157
-
158
-
159
-
160
-
161
-
162
-
163
-
164
-
165
-
166
-
167
-
168
-
169
-
170
-
171
-
172
-
173
-
174
-
175
-
176
-
177
-
178
-
179
-
180
-
181
-
182
-
183
-
184
-
185
 |
 |