HP 9500hdn HP Color LaserJet 9500n/9500hdn - User Reference Guide - Page 277
Solving printer problems, Printer hardware issues
 |
UPC - 808736429689
View all HP 9500hdn manuals
Add to My Manuals
Save this manual to your list of manuals |
Page 277 highlights
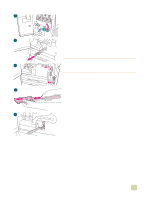
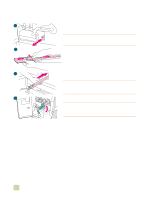
Solving printer problems Printer hardware issues Situation The printer makes a noticeable pop sound when it turns on. A printer door does not close. The control panel display is blank, and the internal fans are not running. The printer is turned on, but the internal fans are not running. The green lever does not rotate up. The printer does not print from tray 2, tray 3, or tray 4. Tray 4 does not work. Solution q This is normal. The sound results from the printer mechanism designed to improve print quality and facilitate the clearing of media jams. q Firmly close the printer doors. q Check to make sure that all of the levers and handles (colored blue and green) are in the correct position. q Make sure that the printer power is on. q Make sure that the printer is plugged into a working alternating current (ac) power outlet. q Press all of the buttons individually to see if one is stuck; contact your HP-authorized service representative if this does not work. q Make sure that the line voltage is correct for the printer power configuration. (See the plate next to the power receptacle on the back of your printer for the voltage requirements.) q If you are using a power strip and its voltage is not within specification, plug the printer directly into a working ac outlet. q Make sure that the image drums are completely inserted in the printer and the image-drum door is closed securely. q Make sure that the transfer cleaner is completely inserted in the printer and latched in place. q Make sure that the transfer roller is inserted completely in the printer. q Make sure that the image transfer belt is inserted completely in the printer. q Make sure that the media tray guides are adjusted correctly for the media size you are using. (See "Configure the input trays" on page 39.) q Select the correct tray in the printer driver. q Make sure that the optional trays are configured correctly on the Device Setting or Configuration tab in the printer driver. See "Configure the printer and the default settings" on page 54 q Make sure that the power cord is firmly plugged in to both the printer and the power receptacle. Remove and reconnect the power cord. q If the problem persists, you might need to replace the cable that connects the tray to the printer. q See "Printer does not print from tray 2, tray 3, or tray 4.". 7 Problem solving 275
-
 1
1 -
2
-
3
-
4
-
5
-
6
-
7
-
8
-
9
-
10
-
11
-
12
-
13
-
14
-
15
-
16
-
17
-
18
-
19
-
20
-
21
-
22
-
23
-
24
-
25
-
26
-
27
-
28
-
29
-
30
-
31
-
32
-
33
-
34
-
35
-
36
-
37
-
38
-
39
-
40
-
41
-
42
-
43
-
44
-
45
-
46
-
47
-
48
-
49
-
50
-
51
-
52
-
53
-
54
-
55
-
56
-
57
-
58
-
59
-
60
-
61
-
62
-
63
-
64
-
65
-
66
-
67
-
68
-
69
-
70
-
71
-
72
-
73
-
74
-
75
-
76
-
77
-
78
-
79
-
80
-
81
-
82
-
83
-
84
-
85
-
86
-
87
-
88
-
89
-
90
-
91
-
92
-
93
-
94
-
95
-
96
-
97
-
98
-
99
-
100
-
101
-
102
-
103
-
104
-
105
-
106
-
107
-
108
-
109
-
110
-
111
-
112
-
113
-
114
-
115
-
116
-
117
-
118
-
119
-
120
-
121
-
122
-
123
-
124
-
125
-
126
-
127
-
128
-
129
-
130
-
131
-
132
-
133
-
134
-
135
-
136
-
137
-
138
-
139
-
140
-
141
-
142
-
143
-
144
-
145
-
146
-
147
-
148
-
149
-
150
-
151
-
152
-
153
-
154
-
155
-
156
-
157
-
158
-
159
-
160
-
161
-
162
-
163
-
164
-
165
-
166
-
167
-
168
-
169
-
170
-
171
-
172
-
173
-
174
-
175
-
176
-
177
-
178
-
179
-
180
-
181
-
182
-
183
-
184
-
185
-
186
-
187
-
188
-
189
-
190
-
191
-
192
-
193
-
194
-
195
-
196
-
197
-
198
-
199
-
200
-
201
-
202
-
203
-
204
-
205
-
206
-
207
-
208
-
209
-
210
-
211
-
212
-
213
-
214
-
215
-
216
-
217
-
218
-
219
-
220
-
221
-
222
-
223
-
224
-
225
-
226
-
227
-
228
-
229
-
230
-
231
-
232
-
233
-
234
-
235
-
236
-
237
-
238
-
239
-
240
-
241
-
242
-
243
-
244
-
245
-
246
-
247
-
248
-
249
-
250
-
251
-
252
-
253
-
254
-
255
-
256
-
257
-
258
-
259
-
260
-
261
-
262
-
263
-
264
-
265
-
266
-
267
-
268
-
269
-
270
-
271
-
 272
272 -
 273
273 -
 274
274 -
 275
275 -
 276
276 -
 277
277 -
 278
278 -
 279
279 -
 280
280 -
 281
281 -
 282
282 -
283
-
284
-
285
-
286
-
287
-
288
-
289
-
290
-
291
-
292
-
293
-
294
-
295
-
296
-
297
-
298
-
299
-
300
-
301
-
302
-
303
-
304
-
305
-
306
-
307
-
308
-
309
-
310
-
311
-
312
-
313
-
314
-
315
-
316
-
317
-
318
-
319
-
320
-
321
-
322
-
323
-
324
-
325
-
326
-
327
-
328
-
329
-
330
-
331
-
332
-
333
-
334
-
335
-
336
-
337
-
338
-
339
-
340
-
341
-
342
-
343
-
344
-
345
-
346
-
347
-
348
-
349
-
350
 |
 |
