HP 9500hdn HP Color LaserJet 9500n/9500hdn - User Reference Guide - Page 41
Con the input trays, Configuring trays for standard-size media - laserjet printer
 |
UPC - 808736429689
View all HP 9500hdn manuals
Add to My Manuals
Save this manual to your list of manuals |
Page 41 highlights
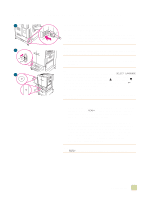
Note Note Configure the input trays You can configure the HP color LaserJet 9500 series printer input trays by type and size. You can load different media in the printer's input trays and then request media by type or size. If you have used previous HP LaserJet printers, you might be accustomed to configuring tray 1 to first mode or cassette mode. To duplicate the settings for first mode, configure tray 1 for Size = ANYSIZE and Type = ANY. To duplicate the settings for cassette mode, set either the size or type for tray 1 to a setting other than ANY. The following instructions are used to configure the trays at the printer control panel. You can also configure the trays from your computer by using the embedded Web server. For more information, see "Embedded Web server" on page 165. Configuring trays for standard-size media Setting a standard media size and type for tray 1 1 Press (SELECT) to open the menus. 2 Use (UP button) or (Select). (DOWN button) to scroll to PAPER HANDLING, and then press 3 Use (UP button) or (SELECT). (DOWN button) to scroll to TRAY 1 SIZE, and then press 4 Use (UP button) or (DOWN button) to scroll to the media size you want, and then press (SELECT). 5 The media type is set to Plain by default. If you want to change this setting, use (UP button) or (DOWN button) to scroll to TRAY 1 TYPE, and then press (SELECT). Use (UP button) or (DOWN button) to scroll to the media type you want, and then press (SELECT).For more information about media types, see "Supported types of media" on page 88. 6 Press PAUSE/RESUME to close the menus. Setting a standard media size and type for tray 2, tray 3, or tray 4 When you open and close tray 2, tray 3, or tray 4, the printer detects the media size for that tray, and the printer control panel prompts you to select the media type for that tray. If the printer cannot detect the media size, the printer control panel will prompt you to select a custom size and type. Follow these instructions to set the media size and type for tray 2, tray 3, or tray 4. 1 Open the tray. 2 Make sure that the paper guides rest against the stack of media in the tray. 3 Set the custom/standard switch to Standard if both guides are set to the same Standard marking. Otherwise, set the switch to Custom and use the instructions in the following section. If the media size is marked on the tray guide, it is a standard media size. If the media size is not marked on the tray guide, see "Configuring trays for custom size media" on page 40. 4 Close the tray. 1 Printer setup 39
-
 1
1 -
2
-
3
-
4
-
5
-
6
-
7
-
8
-
9
-
10
-
11
-
12
-
13
-
14
-
15
-
16
-
17
-
18
-
19
-
20
-
21
-
22
-
23
-
24
-
25
-
26
-
27
-
28
-
29
-
30
-
31
-
32
-
33
-
34
-
35
-
 36
36 -
 37
37 -
 38
38 -
 39
39 -
 40
40 -
 41
41 -
 42
42 -
 43
43 -
 44
44 -
 45
45 -
 46
46 -
47
-
48
-
49
-
50
-
51
-
52
-
53
-
54
-
55
-
56
-
57
-
58
-
59
-
60
-
61
-
62
-
63
-
64
-
65
-
66
-
67
-
68
-
69
-
70
-
71
-
72
-
73
-
74
-
75
-
76
-
77
-
78
-
79
-
80
-
81
-
82
-
83
-
84
-
85
-
86
-
87
-
88
-
89
-
90
-
91
-
92
-
93
-
94
-
95
-
96
-
97
-
98
-
99
-
100
-
101
-
102
-
103
-
104
-
105
-
106
-
107
-
108
-
109
-
110
-
111
-
112
-
113
-
114
-
115
-
116
-
117
-
118
-
119
-
120
-
121
-
122
-
123
-
124
-
125
-
126
-
127
-
128
-
129
-
130
-
131
-
132
-
133
-
134
-
135
-
136
-
137
-
138
-
139
-
140
-
141
-
142
-
143
-
144
-
145
-
146
-
147
-
148
-
149
-
150
-
151
-
152
-
153
-
154
-
155
-
156
-
157
-
158
-
159
-
160
-
161
-
162
-
163
-
164
-
165
-
166
-
167
-
168
-
169
-
170
-
171
-
172
-
173
-
174
-
175
-
176
-
177
-
178
-
179
-
180
-
181
-
182
-
183
-
184
-
185
-
186
-
187
-
188
-
189
-
190
-
191
-
192
-
193
-
194
-
195
-
196
-
197
-
198
-
199
-
200
-
201
-
202
-
203
-
204
-
205
-
206
-
207
-
208
-
209
-
210
-
211
-
212
-
213
-
214
-
215
-
216
-
217
-
218
-
219
-
220
-
221
-
222
-
223
-
224
-
225
-
226
-
227
-
228
-
229
-
230
-
231
-
232
-
233
-
234
-
235
-
236
-
237
-
238
-
239
-
240
-
241
-
242
-
243
-
244
-
245
-
246
-
247
-
248
-
249
-
250
-
251
-
252
-
253
-
254
-
255
-
256
-
257
-
258
-
259
-
260
-
261
-
262
-
263
-
264
-
265
-
266
-
267
-
268
-
269
-
270
-
271
-
272
-
273
-
274
-
275
-
276
-
277
-
278
-
279
-
280
-
281
-
282
-
283
-
284
-
285
-
286
-
287
-
288
-
289
-
290
-
291
-
292
-
293
-
294
-
295
-
296
-
297
-
298
-
299
-
300
-
301
-
302
-
303
-
304
-
305
-
306
-
307
-
308
-
309
-
310
-
311
-
312
-
313
-
314
-
315
-
316
-
317
-
318
-
319
-
320
-
321
-
322
-
323
-
324
-
325
-
326
-
327
-
328
-
329
-
330
-
331
-
332
-
333
-
334
-
335
-
336
-
337
-
338
-
339
-
340
-
341
-
342
-
343
-
344
-
345
-
346
-
347
-
348
-
349
-
350
 |
 |
