HP 9500hdn HP Color LaserJet 9500n/9500hdn - User Reference Guide - Page 317
Print Quality submenu, application settings override control-panel settings. For more information, see
 |
UPC - 808736429689
View all HP 9500hdn manuals
Add to My Manuals
Save this manual to your list of manuals |
Page 317 highlights
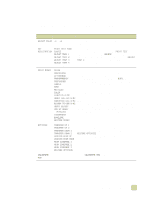
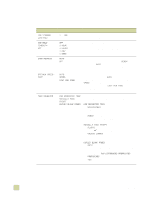
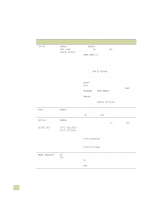
Print Quality submenu Some items in the Print Quality submenu can be opened in a software application, or in the printer driver (if the appropriate printer driver is installed). Printer-driver and softwareapplication settings override control-panel settings. For more information, see "Using the printer driver" on page 119. Item Values Explanation ADJUST COLOR -6 to +6 Modify high-density and low-density halftone settings for each color. SET REGISTRATION PRINT TEST PAGE SOURCE ADJUST TRAY 1 ADJUST TRAY 2 ADJUST TRAY 3 ADJUST TRAY 4 (if installed) Use this item to set the printed image at the center of a single-page or duplexed print job. The PRINT TEST option prints a test page. Use the SOURCE option to print a test page from all trays or from specified trays. Use the ADJUST TRAY X options to adjust the image alignment using values between -20 and +20. PRINT MODES PLAIN PREPRINTED LETTERHEAD TRANSPARENCY PREPUNCHED LABELS BOND RECYCLED COLOR LIGHT164 G/M2 GLOSSY 75-105 G/M2 HEAVY GLOSSY NON HP HEAVY HVYGLOSS TOUGHPAPER ENVELOPE RESTORE MODES Use this item to associate modes with individual media types in order to optimize print quality. The print mode can only be changed in this menu option at the control panel. The default value for each media type is AUTO, which utilizes the optimum mode for each media type. For more information about print modes, see "Print modes" on page 108. For a complete list of supported media types, see "Selecting and using media" on page 77. NOTE If you change the print mode, be sure to change it back to the default when you are done printing in that mode. Some settings shorten the life of some supplies, such as the fuser, and might cause other failures or jams. OPTIMIZE TRANSFER UP 1 TRANSFER UP 2 TRANSFER DOWN 1 TRANSFER DOWN 2 LEADING EDGE UP LEADING EDGE DOWN HIGH COVERAGE 1 HIGH COVERAGE 2 HIGH COVERAGE 3 RESTORE OPTIMIZE Use this item to optimize a number of engine parameters for all jobs rather than by media type. Each item can be set to OFF or ON. The default value of each item is OFF. The RESTORE OPTIMIZE option resets all options to the factory default position (OFF). For more information about optimize values, see "Optimize" on page 111. CALIBRATE NOW Select CALIBRATE NOW to start a printer calibration. B Control panel menus 315
-
 1
1 -
2
-
3
-
4
-
5
-
6
-
7
-
8
-
9
-
10
-
11
-
12
-
13
-
14
-
15
-
16
-
17
-
18
-
19
-
20
-
21
-
22
-
23
-
24
-
25
-
26
-
27
-
28
-
29
-
30
-
31
-
32
-
33
-
34
-
35
-
36
-
37
-
38
-
39
-
40
-
41
-
42
-
43
-
44
-
45
-
46
-
47
-
48
-
49
-
50
-
51
-
52
-
53
-
54
-
55
-
56
-
57
-
58
-
59
-
60
-
61
-
62
-
63
-
64
-
65
-
66
-
67
-
68
-
69
-
70
-
71
-
72
-
73
-
74
-
75
-
76
-
77
-
78
-
79
-
80
-
81
-
82
-
83
-
84
-
85
-
86
-
87
-
88
-
89
-
90
-
91
-
92
-
93
-
94
-
95
-
96
-
97
-
98
-
99
-
100
-
101
-
102
-
103
-
104
-
105
-
106
-
107
-
108
-
109
-
110
-
111
-
112
-
113
-
114
-
115
-
116
-
117
-
118
-
119
-
120
-
121
-
122
-
123
-
124
-
125
-
126
-
127
-
128
-
129
-
130
-
131
-
132
-
133
-
134
-
135
-
136
-
137
-
138
-
139
-
140
-
141
-
142
-
143
-
144
-
145
-
146
-
147
-
148
-
149
-
150
-
151
-
152
-
153
-
154
-
155
-
156
-
157
-
158
-
159
-
160
-
161
-
162
-
163
-
164
-
165
-
166
-
167
-
168
-
169
-
170
-
171
-
172
-
173
-
174
-
175
-
176
-
177
-
178
-
179
-
180
-
181
-
182
-
183
-
184
-
185
-
186
-
187
-
188
-
189
-
190
-
191
-
192
-
193
-
194
-
195
-
196
-
197
-
198
-
199
-
200
-
201
-
202
-
203
-
204
-
205
-
206
-
207
-
208
-
209
-
210
-
211
-
212
-
213
-
214
-
215
-
216
-
217
-
218
-
219
-
220
-
221
-
222
-
223
-
224
-
225
-
226
-
227
-
228
-
229
-
230
-
231
-
232
-
233
-
234
-
235
-
236
-
237
-
238
-
239
-
240
-
241
-
242
-
243
-
244
-
245
-
246
-
247
-
248
-
249
-
250
-
251
-
252
-
253
-
254
-
255
-
256
-
257
-
258
-
259
-
260
-
261
-
262
-
263
-
264
-
265
-
266
-
267
-
268
-
269
-
270
-
271
-
272
-
273
-
274
-
275
-
276
-
277
-
278
-
279
-
280
-
281
-
282
-
283
-
284
-
285
-
286
-
287
-
288
-
289
-
290
-
291
-
292
-
293
-
294
-
295
-
296
-
297
-
298
-
299
-
300
-
301
-
302
-
303
-
304
-
305
-
306
-
307
-
308
-
309
-
310
-
311
-
 312
312 -
 313
313 -
 314
314 -
 315
315 -
 316
316 -
 317
317 -
 318
318 -
 319
319 -
 320
320 -
 321
321 -
 322
322 -
323
-
324
-
325
-
326
-
327
-
328
-
329
-
330
-
331
-
332
-
333
-
334
-
335
-
336
-
337
-
338
-
339
-
340
-
341
-
342
-
343
-
344
-
345
-
346
-
347
-
348
-
349
-
350
 |
 |
