HP Designjet 2800/3800cp Service Manual - Page 18
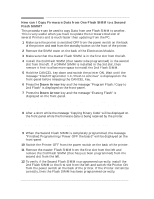
How can I Copy Firmware Data from One Flash SIMM to a Second, Flash SIMM?, Down Arrow
 |
View all HP Designjet 2800/3800cp manuals
Add to My Manuals
Save this manual to your list of manuals |
Page 18 highlights
How can I Copy Firmware Data from One Flash SIMM to a Second Flash SIMM? This procedure can be used to copy Data from one Flash SIMM to another. This is very useful when you have to update the Firmware Revision of several Printers and is much faster than updating from the PC. 1 Make sure the printer is switched OFF from the power switch on the back of the printer and not from the standby button on the front of the printer. 2 Remove the SIMM cover on the back of the Electronics Module. 3 Make sure that the master Flash SIMM is in the first slot from the left. 4 Install the 2nd Flash SIMM (that needs to be programmed) in the second slot from the left. If a DRAM SIMM is installed in the 3rd slot, then remove it first to allow more space to install the 2nd Flash SIMM. 5 Hold the CANCEL key down and switch the printer ON. Wait until the message "Flash Programmer 1.X / Push to continue" is displayed on the front-panel before releasing the CANCEL key. 6 Press the Down Arrow key and the message "Program Flash / Copy to 2nd Flash" is displayed on the front-panel. 7 Press the Down Arrow key and the message "Erasing Flash" is displayed on the front-panel. THE DATA ON THE SECOND FLASH SIMM IS BEING ERASED AT THIS POINT. DO NOT SWITCH OFF THE PRINTER BECAUSE IT WILL DAMAGE THE FLASH SIMM. 8 After a short while the message "Copying Binary Code" will be displayed on the front-panel while the firmware data is being received by the printer. THE DATA IS BEING DOWNLOADED ONTO THE SECOND FLASH SIMM AT THIS POINT. DO NOT SWITCH OFF THE PRINTER BECAUSE IT WILL DAMAGE THE FLASH SIMM. 9 When the Second Flash SIMM is completely programmed, the message "Finished Programming / Power OFF the board" will be displayed on the front-panel. 10 Switch the Printer OFF from the power switch on the back of the printer. 11 Remove the master Flash SIMM from the first slot from the left and remove the 2nd Flash SIMM (that has just been programmed) from the second slot from the left. 12 To verify if the Second Flash SIMM is programmed correctly, install the 2nd Flash SIMM in the first slot from the left and switch the Printer ON from the power switch on the back of the printer. If the Printer initializes correctly, then the Flash SIMM has been programmed correctly. 1-6 HP DesignJet CP Series Printers Troubleshooting
-
 1
1 -
2
-
3
-
4
-
5
-
6
-
7
-
8
-
9
-
10
-
11
-
12
-
 13
13 -
 14
14 -
 15
15 -
 16
16 -
 17
17 -
 18
18 -
 19
19 -
 20
20 -
 21
21 -
 22
22 -
 23
23 -
24
-
25
-
26
-
27
-
28
-
29
-
30
-
31
-
32
-
33
-
34
-
35
-
36
-
37
-
38
-
39
-
40
-
41
-
42
-
43
-
44
-
45
-
46
-
47
-
48
-
49
-
50
-
51
-
52
-
53
-
54
-
55
-
56
-
57
-
58
-
59
-
60
-
61
-
62
-
63
-
64
-
65
-
66
-
67
-
68
-
69
-
70
-
71
-
72
-
73
-
74
-
75
-
76
-
77
-
78
-
79
-
80
-
81
-
82
-
83
-
84
-
85
-
86
-
87
-
88
-
89
-
90
-
91
-
92
-
93
-
94
-
95
-
96
-
97
-
98
-
99
-
100
-
101
-
102
-
103
-
104
-
105
-
106
-
107
-
108
-
109
-
110
-
111
-
112
-
113
-
114
-
115
-
116
-
117
-
118
-
119
-
120
-
121
-
122
-
123
-
124
-
125
-
126
-
127
-
128
-
129
-
130
-
131
-
132
-
133
-
134
-
135
-
136
-
137
-
138
-
139
-
140
-
141
-
142
-
143
-
144
-
145
-
146
-
147
-
148
-
149
-
150
-
151
-
152
-
153
-
154
-
155
-
156
-
157
-
158
-
159
-
160
-
161
-
162
-
163
-
164
-
165
-
166
-
167
-
168
-
169
-
170
-
171
-
172
-
173
-
174
-
175
-
176
-
177
-
178
-
179
-
180
-
181
-
182
-
183
-
184
-
185
-
186
-
187
-
188
-
189
-
190
-
191
-
192
-
193
-
194
-
195
-
196
-
197
-
198
-
199
-
200
-
201
-
202
-
203
-
204
-
205
-
206
-
207
-
208
-
209
-
210
-
211
-
212
-
213
-
214
-
215
-
216
-
217
-
218
-
219
-
220
-
221
-
222
-
223
-
224
-
225
-
226
-
227
-
228
-
229
-
230
-
231
-
232
-
233
-
234
-
235
-
236
-
237
-
238
-
239
-
240
-
241
-
242
-
243
-
244
-
245
-
246
-
247
-
248
-
249
-
250
-
251
-
252
-
253
-
254
-
255
-
256
-
257
-
258
-
259
-
260
-
261
-
262
-
263
-
264
-
265
-
266
-
267
-
268
-
269
-
270
-
271
-
272
-
273
-
274
-
275
-
276
-
277
-
278
-
279
-
280
-
281
-
282
-
283
-
284
-
285
-
286
-
287
-
288
-
289
-
290
-
291
-
292
-
293
-
294
-
295
-
296
-
297
-
298
-
299
-
300
-
301
-
302
-
303
-
304
-
305
-
306
-
307
-
308
-
309
-
310
-
311
-
312
-
313
-
314
-
315
-
316
-
317
-
318
-
319
-
320
-
321
-
322
-
323
-
324
-
325
-
326
-
327
-
328
-
329
-
330
-
331
-
332
-
333
-
334
-
335
-
336
-
337
-
338
-
339
-
340
-
341
-
342
-
343
-
344
-
345
-
346
-
347
-
348
 |
 |
