HP Designjet 2800/3800cp Service Manual - Page 264
C06 Printheads Check, C07 Color Calibration
 |
View all HP Designjet 2800/3800cp manuals
Add to My Manuals
Save this manual to your list of manuals |
Page 264 highlights
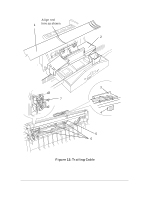
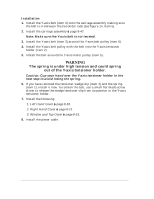
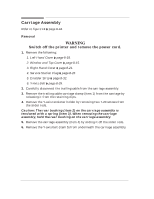
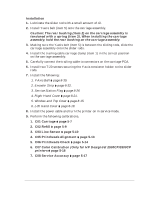
Installation 1. Lubricate the slider rod with a small amount of oil. 2. Install Y-axis belt (item 5) onto the carriage assembly. Caution: The rear bushing (item 2) on the carriage assembly is tensioned with a spring (item 3). When installing the carriage assembly, hold the rear bushing on the carriage assembly. 3. Making sure the Y-axis belt (item 5) is between the sliding rods, slide the carriage assembly onto the slider rods. 4. Install the trailing cable carriage clamp (item 1) in the correct position on the carriage assembly. 5. Carefully connect the trailing cable to connectors on the carriage PCA. 6. Install two T-20 screws securing the Y-axis tensioner holder to the slider rods. 7. Install the following: 1. Y-Axis Belt ' page 8-39. 2. Encoder Strip ' page 8-32. 3. Service Station Flag ' page 8-26 4. Right Hand Cover ' page 8-21. 5. Window and Top Cover ' page 8-15. 6. Left Hand Cover ' page 8-18. 8. Install the power cable and turn the printer on in service mode. 9. Perform the following calibrations. 1. C01 Carriage ' page 5-7 2. C02 Refill ' page 5-9 3. C03 Line Sensor ' page 5-10 4. C05 Printheads Alignment ' page 5-13 5. C06 Printheads Check ' page 5-14 6. C07 Color Calibration (Only for HP DesignJet 2500CP/3500CP printers ' page 5-16 7. C08 Service Accuracy ' page 5-17 Removal and Installation HP DesignJet CP Series Printers 8-43
-
 1
1 -
2
-
3
-
4
-
5
-
6
-
7
-
8
-
9
-
10
-
11
-
12
-
13
-
14
-
15
-
16
-
17
-
18
-
19
-
20
-
21
-
22
-
23
-
24
-
25
-
26
-
27
-
28
-
29
-
30
-
31
-
32
-
33
-
34
-
35
-
36
-
37
-
38
-
39
-
40
-
41
-
42
-
43
-
44
-
45
-
46
-
47
-
48
-
49
-
50
-
51
-
52
-
53
-
54
-
55
-
56
-
57
-
58
-
59
-
60
-
61
-
62
-
63
-
64
-
65
-
66
-
67
-
68
-
69
-
70
-
71
-
72
-
73
-
74
-
75
-
76
-
77
-
78
-
79
-
80
-
81
-
82
-
83
-
84
-
85
-
86
-
87
-
88
-
89
-
90
-
91
-
92
-
93
-
94
-
95
-
96
-
97
-
98
-
99
-
100
-
101
-
102
-
103
-
104
-
105
-
106
-
107
-
108
-
109
-
110
-
111
-
112
-
113
-
114
-
115
-
116
-
117
-
118
-
119
-
120
-
121
-
122
-
123
-
124
-
125
-
126
-
127
-
128
-
129
-
130
-
131
-
132
-
133
-
134
-
135
-
136
-
137
-
138
-
139
-
140
-
141
-
142
-
143
-
144
-
145
-
146
-
147
-
148
-
149
-
150
-
151
-
152
-
153
-
154
-
155
-
156
-
157
-
158
-
159
-
160
-
161
-
162
-
163
-
164
-
165
-
166
-
167
-
168
-
169
-
170
-
171
-
172
-
173
-
174
-
175
-
176
-
177
-
178
-
179
-
180
-
181
-
182
-
183
-
184
-
185
-
186
-
187
-
188
-
189
-
190
-
191
-
192
-
193
-
194
-
195
-
196
-
197
-
198
-
199
-
200
-
201
-
202
-
203
-
204
-
205
-
206
-
207
-
208
-
209
-
210
-
211
-
212
-
213
-
214
-
215
-
216
-
217
-
218
-
219
-
220
-
221
-
222
-
223
-
224
-
225
-
226
-
227
-
228
-
229
-
230
-
231
-
232
-
233
-
234
-
235
-
236
-
237
-
238
-
239
-
240
-
241
-
242
-
243
-
244
-
245
-
246
-
247
-
248
-
249
-
250
-
251
-
252
-
253
-
254
-
255
-
256
-
257
-
258
-
 259
259 -
 260
260 -
 261
261 -
 262
262 -
 263
263 -
 264
264 -
 265
265 -
 266
266 -
 267
267 -
 268
268 -
 269
269 -
270
-
271
-
272
-
273
-
274
-
275
-
276
-
277
-
278
-
279
-
280
-
281
-
282
-
283
-
284
-
285
-
286
-
287
-
288
-
289
-
290
-
291
-
292
-
293
-
294
-
295
-
296
-
297
-
298
-
299
-
300
-
301
-
302
-
303
-
304
-
305
-
306
-
307
-
308
-
309
-
310
-
311
-
312
-
313
-
314
-
315
-
316
-
317
-
318
-
319
-
320
-
321
-
322
-
323
-
324
-
325
-
326
-
327
-
328
-
329
-
330
-
331
-
332
-
333
-
334
-
335
-
336
-
337
-
338
-
339
-
340
-
341
-
342
-
343
-
344
-
345
-
346
-
347
-
348
 |
 |