Ricoh 3035 General Settings Guide - Page 121
Registering the Transfer Request
 |
View all Ricoh 3035 manuals
Add to My Manuals
Save this manual to your list of manuals |
Page 121 highlights
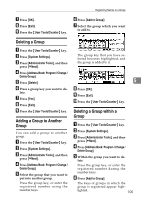
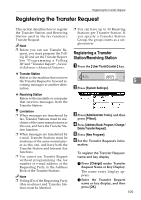
Registering the Transfer Request Registering the Transfer Request This section describes how to register the Transfer Station and Receiving Station used in the fax function's Transfer Request. Note ❒ Before you can use Transfer Re- quest, you must program the Polling ID and set the Transfer Report. See "Programming a Polling ID"and "Transfer Report", Facsimile Reference . ❖ Transfer Station Refers to the machine that receives the Transfer Request to forward incoming messages to another destination. ❖ Receiving Station Refers to the facsimile or computer that receives messages from the Transfer Station. Limitation ❒ When messages are transferred by fax, Transfer Stations must be machines of the same manufacturer as this one, and have the Transfer Station function. ❒ When messages are transferred by e-mail, Transfer Stations must be machines of the same manufacturer as this one, and have both the Transfer Station and Internet Fax functions. ❒ You cannot use Transfer Request without programming the fax number or e-mail address of the Requesting Party in the Address Book of the Transfer Stations. Note ❒ Polling IDs of the Requesting Party (this machine) and Transfer Stations must be identical. ❒ You can have up to 30 Receiving Stations per Transfer Station. If you specify a Transfer Station Group, the group counts as a single receiver. Registering a Transfer Station/Receiving Station A Press the {User Tools/Counter} key. 5 B Press [System Settings]. C Press [Administrator Tools], and then press [TNext]. D Press [Address Book: Program / Change / Delete Transfer Request]. E Press [New Program]. F Set the Transfer Request's infor- mation. To register the Transfer Request name and key display A Press [Change] under Transfer Request Name or Key Display. The name entry display appears. B Enter the Transfer Request name or key display, and then press [OK]. 109
-
 1
1 -
2
-
3
-
4
-
5
-
6
-
7
-
8
-
9
-
10
-
11
-
12
-
13
-
14
-
15
-
16
-
17
-
18
-
19
-
20
-
21
-
22
-
23
-
24
-
25
-
26
-
27
-
28
-
29
-
30
-
31
-
32
-
33
-
34
-
35
-
36
-
37
-
38
-
39
-
40
-
41
-
42
-
43
-
44
-
45
-
46
-
47
-
48
-
49
-
50
-
51
-
52
-
53
-
54
-
55
-
56
-
57
-
58
-
59
-
60
-
61
-
62
-
63
-
64
-
65
-
66
-
67
-
68
-
69
-
70
-
71
-
72
-
73
-
74
-
75
-
76
-
77
-
78
-
79
-
80
-
81
-
82
-
83
-
84
-
85
-
86
-
87
-
88
-
89
-
90
-
91
-
92
-
93
-
94
-
95
-
96
-
97
-
98
-
99
-
100
-
101
-
102
-
103
-
104
-
105
-
106
-
107
-
108
-
109
-
110
-
111
-
112
-
113
-
114
-
115
-
 116
116 -
 117
117 -
 118
118 -
 119
119 -
 120
120 -
 121
121 -
 122
122 -
 123
123 -
 124
124 -
 125
125 -
 126
126 -
127
-
128
-
129
-
130
-
131
-
132
-
133
-
134
-
135
-
136
-
137
-
138
-
139
-
140
-
141
-
142
-
143
-
144
-
145
-
146
-
147
-
148
-
149
-
150
-
151
-
152
-
153
-
154
-
155
-
156
-
157
-
158
-
159
-
160
-
161
-
162
-
163
-
164
-
165
-
166
-
167
-
168
-
169
-
170
-
171
-
172
-
173
-
174
-
175
-
176
-
177
-
178
-
179
-
180
-
181
-
182
-
183
-
184
-
185
-
186
-
187
-
188
-
189
-
190
-
191
-
192
-
193
-
194
-
195
-
196
 |
 |
