Ricoh 3035 General Settings Guide - Page 125
Registering Authentication
 |
View all Ricoh 3035 manuals
Add to My Manuals
Save this manual to your list of manuals |
Page 125 highlights
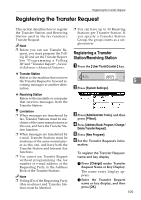
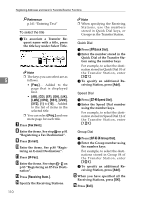
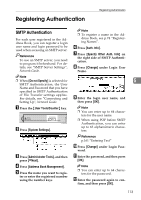
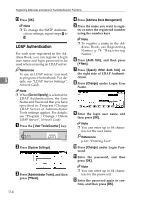
Registering Authentication Registering Authentication SMTP Authentication For each user registered in the Address Book, you can register a login user name and login password to be used when accessing an SMTP server. Reference To use an SMTP server, you need to program it beforehand. For details, see "SMTP Server Settings", Network Guide. Note ❒ To register a name in the Address Book, see p.74 "Registering Names". F Press [Auth. Info]. G Press [Specify Other Auth. Info] on the right side of SMTP Authentication. H Press [Change] under Login User Name. Note ❒ When [Do not Specify] is selected for 5 SMTP Authentication, the User Name and Password that you have specified in SMTP Authentication I of File Transfer settings applies. For details, see "Connecting and Enter the login user name, and Setting Up", Network Guide. then press [OK]. A Press the {User Tools/Counter} key. Note ❒ You can enter up to 64 characters for the user name. B Press [System Settings]. ❒ When using POP before SMTP Authentication, you can enter up to 63 alphanumeric characters. C Press [Administrator Tools], and then press [TNext]. D Press [Address Book Management]. E Press the name you want to regis- ter or enter the registered number using the number keys Reference p.161 "Entering Text" J Press [Change] under Login Pass- word. K Enter the password, and then press [OK]. Note ❒ You can enter up to 64 charac- ters for the password. L Enter the password again to con- firm, and then press [OK]. 113
-
 1
1 -
2
-
3
-
4
-
5
-
6
-
7
-
8
-
9
-
10
-
11
-
12
-
13
-
14
-
15
-
16
-
17
-
18
-
19
-
20
-
21
-
22
-
23
-
24
-
25
-
26
-
27
-
28
-
29
-
30
-
31
-
32
-
33
-
34
-
35
-
36
-
37
-
38
-
39
-
40
-
41
-
42
-
43
-
44
-
45
-
46
-
47
-
48
-
49
-
50
-
51
-
52
-
53
-
54
-
55
-
56
-
57
-
58
-
59
-
60
-
61
-
62
-
63
-
64
-
65
-
66
-
67
-
68
-
69
-
70
-
71
-
72
-
73
-
74
-
75
-
76
-
77
-
78
-
79
-
80
-
81
-
82
-
83
-
84
-
85
-
86
-
87
-
88
-
89
-
90
-
91
-
92
-
93
-
94
-
95
-
96
-
97
-
98
-
99
-
100
-
101
-
102
-
103
-
104
-
105
-
106
-
107
-
108
-
109
-
110
-
111
-
112
-
113
-
114
-
115
-
116
-
117
-
118
-
119
-
 120
120 -
 121
121 -
 122
122 -
 123
123 -
 124
124 -
 125
125 -
 126
126 -
 127
127 -
 128
128 -
 129
129 -
 130
130 -
131
-
132
-
133
-
134
-
135
-
136
-
137
-
138
-
139
-
140
-
141
-
142
-
143
-
144
-
145
-
146
-
147
-
148
-
149
-
150
-
151
-
152
-
153
-
154
-
155
-
156
-
157
-
158
-
159
-
160
-
161
-
162
-
163
-
164
-
165
-
166
-
167
-
168
-
169
-
170
-
171
-
172
-
173
-
174
-
175
-
176
-
177
-
178
-
179
-
180
-
181
-
182
-
183
-
184
-
185
-
186
-
187
-
188
-
189
-
190
-
191
-
192
-
193
-
194
-
195
-
196
 |
 |