Ricoh 3035 General Settings Guide - Page 52
Document Server, Scan Original, Start, Clear/Stop, tinue, Scanning, Finished
 |
View all Ricoh 3035 manuals
Add to My Manuals
Save this manual to your list of manuals |
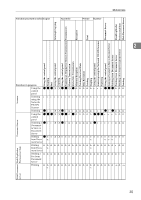
Page 52 highlights
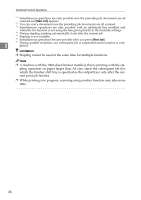
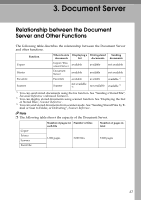
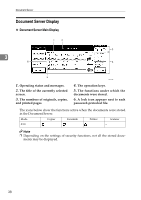
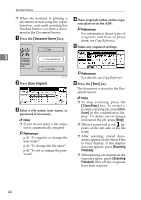
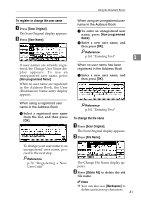
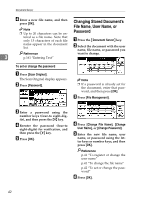
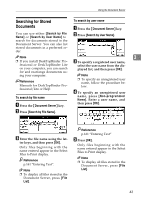
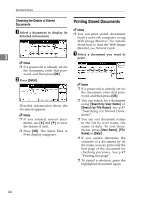
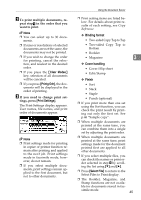
Document Server ❒ When the machine is printing a document stored using the copier function, wait until printing has finished before you store a document in the Document Server. A Press the {Document Server} key. D Place originals either on the expo- sure glass or in the ADF. Reference For information about types of originals and how to place them, see Copy Reference. E Make any required settings. 3 B Press [Scan Original]. C Enter a file name, user name, or password if necessary. Note ❒ If you do not enter a file name, one is automatically assigned. Reference p.41 "To register or change the user name" p.41 "To change the file name" p.42 "To set or change the password" Reference For details, see Copy Reference. F Press the {Start} key. The document is stored in the Document Server. Note ❒ To stop scanning, press the {Clear/Stop} key. To restart a paused scanning job, press [Continue] in the confirmation display. To delete saved images and cancel the job, press [Stop]. ❒ When a password is set, appears on the left side of the file name. ❒ After scanning, stored documents appear on the Select Files to Print display. If this display does not appear, press [Scanning Finished]. ❒ When placing an original on the exposure glass, press [Scanning Finished] after all the originals have been scanned. 40
-
 1
1 -
2
-
3
-
4
-
5
-
6
-
7
-
8
-
9
-
10
-
11
-
12
-
13
-
14
-
15
-
16
-
17
-
18
-
19
-
20
-
21
-
22
-
23
-
24
-
25
-
26
-
27
-
28
-
29
-
30
-
31
-
32
-
33
-
34
-
35
-
36
-
37
-
38
-
39
-
40
-
41
-
42
-
43
-
44
-
45
-
46
-
 47
47 -
 48
48 -
 49
49 -
 50
50 -
 51
51 -
 52
52 -
 53
53 -
 54
54 -
 55
55 -
 56
56 -
 57
57 -
58
-
59
-
60
-
61
-
62
-
63
-
64
-
65
-
66
-
67
-
68
-
69
-
70
-
71
-
72
-
73
-
74
-
75
-
76
-
77
-
78
-
79
-
80
-
81
-
82
-
83
-
84
-
85
-
86
-
87
-
88
-
89
-
90
-
91
-
92
-
93
-
94
-
95
-
96
-
97
-
98
-
99
-
100
-
101
-
102
-
103
-
104
-
105
-
106
-
107
-
108
-
109
-
110
-
111
-
112
-
113
-
114
-
115
-
116
-
117
-
118
-
119
-
120
-
121
-
122
-
123
-
124
-
125
-
126
-
127
-
128
-
129
-
130
-
131
-
132
-
133
-
134
-
135
-
136
-
137
-
138
-
139
-
140
-
141
-
142
-
143
-
144
-
145
-
146
-
147
-
148
-
149
-
150
-
151
-
152
-
153
-
154
-
155
-
156
-
157
-
158
-
159
-
160
-
161
-
162
-
163
-
164
-
165
-
166
-
167
-
168
-
169
-
170
-
171
-
172
-
173
-
174
-
175
-
176
-
177
-
178
-
179
-
180
-
181
-
182
-
183
-
184
-
185
-
186
-
187
-
188
-
189
-
190
-
191
-
192
-
193
-
194
-
195
-
196
 |
 |
