Samsung SPH-P500 User Manual Ver.li6_f7 (English(north America)) - Page 76
Add a Contact, Exchange ActiveSync
 |
View all Samsung SPH-P500 manuals
Add to My Manuals
Save this manual to your list of manuals |
Page 76 highlights
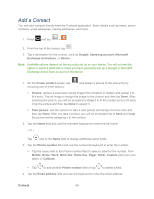
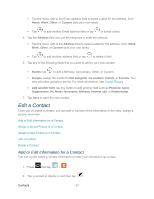
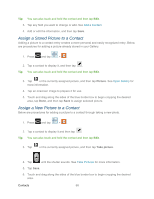
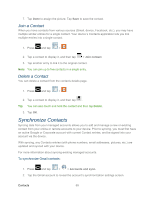
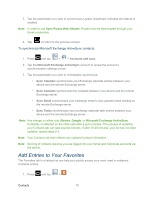
Add a Contact You can add contacts directly from the Contacts application. Enter details such as name, phone numbers, email addresses, mailing addresses, and more. 1. Press and tap > . 2. From the top of the screen, tap . 3. Tap a destination for the contact, such as Google, Samsung account, Microsoft Exchange ActiveSync, or Device. Note: Available options depend on the accounts set up on your device. You will not see the option to select a destination unless you have previously set up a Google or Microsoft Exchange Active Sync account on the device. 1. On the Create contact screen, tap choosing one of three options: and assign a picture to the new entry by Picture: retrieve a previously stored image from Dropbox or Gallery and assign it to this entry. Tap an image to assign the image to the contact and then tap Done. After selecting the picture, you will be prompted to Crop it to fit the contact picture ID area. Crop the picture and then tap Done to assign it. Take picture: use the camera to take a new picture and assign it to this entry and then tap Done. After you take a picture, you will be prompted first to Save and Crop the picture before assigning it to the contact. 2. Tap the Name field and use the onscreen keyboard to enter the full name. - or - Tap next to the Name field to display additional name fields. 3. Tap the Phone number field and use the numerical keyboard to enter the number. Tap the menu next to the Phone number field to select a label for the number, from Mobile, Home, Work, Work Fax, Home Fax, Pager, Other, Custom (add your own label), or Callback. Tap to add another Phone number field or tap to delete a field. 4. Tap the Email address field and use the keyboard to enter the email address. Contacts 66
-
 1
1 -
2
-
3
-
4
-
5
-
6
-
7
-
8
-
9
-
10
-
11
-
12
-
13
-
14
-
15
-
16
-
17
-
18
-
19
-
20
-
21
-
22
-
23
-
24
-
25
-
26
-
27
-
28
-
29
-
30
-
31
-
32
-
33
-
34
-
35
-
36
-
37
-
38
-
39
-
40
-
41
-
42
-
43
-
44
-
45
-
46
-
47
-
48
-
49
-
50
-
51
-
52
-
53
-
54
-
55
-
56
-
57
-
58
-
59
-
60
-
61
-
62
-
63
-
64
-
65
-
66
-
67
-
68
-
69
-
70
-
 71
71 -
 72
72 -
 73
73 -
 74
74 -
 75
75 -
 76
76 -
 77
77 -
 78
78 -
 79
79 -
 80
80 -
 81
81 -
82
-
83
-
84
-
85
-
86
-
87
-
88
-
89
-
90
-
91
-
92
-
93
-
94
-
95
-
96
-
97
-
98
-
99
-
100
-
101
-
102
-
103
-
104
-
105
-
106
-
107
-
108
-
109
-
110
-
111
-
112
-
113
-
114
-
115
-
116
-
117
-
118
-
119
-
120
-
121
-
122
-
123
-
124
-
125
-
126
-
127
-
128
-
129
-
130
-
131
-
132
-
133
-
134
-
135
-
136
-
137
-
138
-
139
-
140
-
141
-
142
-
143
-
144
-
145
-
146
-
147
-
148
-
149
-
150
-
151
-
152
-
153
-
154
-
155
-
156
-
157
-
158
-
159
-
160
-
161
-
162
-
163
-
164
-
165
-
166
-
167
 |
 |
