Compaq Armada e500s Armada E500 Series Quick Reference Guide - Page 111
WARNING, clips snap back into place.
 |
View all Compaq Armada e500s manuals
Add to My Manuals
Save this manual to your list of manuals |
Page 111 highlights
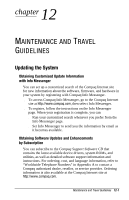
1 5. Insert the memory expansion board into the empty memory expansion slot at a 45-degree angle. Then slide it gently into place until it is seated while tilted. NOTE: A memory expansion board is asymmetrically keyed (notched) to ensure correct positioning. 2 6. Push the memory expansion board down until the retention clips snap back into place. ! WARNING: To reduce the risk of electrical shock, fire, or damage to the equipment, do not turn on the computer or reconnect any external cables during this step. 7. Replace the keyboard. 8. Reconnect external cables and turn on the computer. Upgrading the Computer 11-3
-
 1
1 -
2
-
3
-
4
-
5
-
6
-
7
-
8
-
9
-
10
-
11
-
12
-
13
-
14
-
15
-
16
-
17
-
18
-
19
-
20
-
21
-
22
-
23
-
24
-
25
-
26
-
27
-
28
-
29
-
30
-
31
-
32
-
33
-
34
-
35
-
36
-
37
-
38
-
39
-
40
-
41
-
42
-
43
-
44
-
45
-
46
-
47
-
48
-
49
-
50
-
51
-
52
-
53
-
54
-
55
-
56
-
57
-
58
-
59
-
60
-
61
-
62
-
63
-
64
-
65
-
66
-
67
-
68
-
69
-
70
-
71
-
72
-
73
-
74
-
75
-
76
-
77
-
78
-
79
-
80
-
81
-
82
-
83
-
84
-
85
-
86
-
87
-
88
-
89
-
90
-
91
-
92
-
93
-
94
-
95
-
96
-
97
-
98
-
99
-
100
-
101
-
102
-
103
-
104
-
105
-
 106
106 -
 107
107 -
 108
108 -
 109
109 -
 110
110 -
 111
111 -
 112
112 -
 113
113 -
 114
114 -
 115
115 -
 116
116 -
117
-
118
-
119
-
120
-
121
-
122
-
123
-
124
-
125
-
126
-
127
-
128
-
129
-
130
-
131
-
132
-
133
-
134
-
135
-
136
-
137
-
138
-
139
-
140
-
141
-
142
-
143
-
144
-
145
-
146
-
147
-
148
-
149
-
150
-
151
-
152
-
153
-
154
-
155
-
156
-
157
-
158
-
159
-
160
-
161
-
162
-
163
-
164
-
165
-
166
-
167
-
168
-
169
-
170
-
171
-
172
-
173
-
174
-
175
-
176
-
177
-
178
-
179
-
180
-
181
-
182
-
183
-
184
-
185
-
186
-
187
-
188
-
189
-
190
-
191
-
192
-
193
-
194
-
195
-
196
-
197
-
198
-
199
-
200
-
201
-
202
-
203
-
204
-
205
-
206
-
207
-
208
-
209
-
210
-
211
-
212
-
213
-
214
-
215
-
216
-
217
-
218
-
219
-
220
 |
 |
Upgrading the Computer
11-3
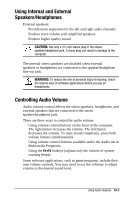
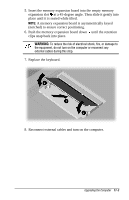
5. Insert the memory expansion board into the empty memory
expansion slot
at a 45-degree angle. Then slide it gently into
place until it is seated while tilted.
NOTE:
A memory expansion board is asymmetrically keyed
(notched) to ensure correct positioning.
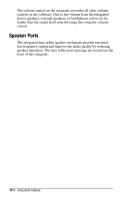
6. Push the memory expansion board down
until the retention
clips snap back into place.
!
WARNING:
To reduce the risk of electrical shock, fire, or damage to
the equipment, do not turn on the computer or reconnect any
external cables during this step.
7. Replace the keyboard.
8. Reconnect external cables and turn on the computer.