Compaq Armada e500s Armada E500 Series Quick Reference Guide - Page 131
Enabling and Disabling Devices, DriveLock Overview
 |
View all Compaq Armada e500s manuals
Add to My Manuals
Save this manual to your list of manuals |
Page 131 highlights
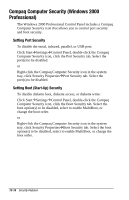
3. Enter your current password, followed by the appropriate syntax for your computer keyboard. For example, if you have a Belgian keyboard, you will type the following: current password= IMPORTANT: Type carefully. For security reasons, the characters you type do not appear on the screen. 4. The password is deleted. Enabling and Disabling Devices Several devices can be disabled to prevent the unauthorized transfer of data using these devices: s Diskette drive s Diskette drive boot ability s Serial port s Parallel port To disable or enable a device: 1. Run Computer Setup by turning on or restarting the computer (StartÅShut DownÅRestart). When the blinking cursor appears in the upper-right corner of the screen, press F10. 2. Select SecurityÅDevice Security, enter your preferences, then press F10. You will need to enter your setup password if it is set. 3. Select FileÅSave changes and Exit, then press Enter. 4. When prompted to confirm your action, press F10. Your Computer will restart with the new preferences. IMPORTANT: Devices disabled in Computer Setup cannot be enabled in the operating system. If you are disabling a device as a security measure, use Computer Setup Security Menu. DriveLock Overview DriveLock security prevents unauthorized access to hard drive applications and user data. DriveLock sets a user password and a master password for hard drives. The correct user password must be entered when the computer is turned on before a protected hard drive can be accessed. Protected hard drives remain protected even if removed and inserted into another computer. Security Features 13-11
-
 1
1 -
2
-
3
-
4
-
5
-
6
-
7
-
8
-
9
-
10
-
11
-
12
-
13
-
14
-
15
-
16
-
17
-
18
-
19
-
20
-
21
-
22
-
23
-
24
-
25
-
26
-
27
-
28
-
29
-
30
-
31
-
32
-
33
-
34
-
35
-
36
-
37
-
38
-
39
-
40
-
41
-
42
-
43
-
44
-
45
-
46
-
47
-
48
-
49
-
50
-
51
-
52
-
53
-
54
-
55
-
56
-
57
-
58
-
59
-
60
-
61
-
62
-
63
-
64
-
65
-
66
-
67
-
68
-
69
-
70
-
71
-
72
-
73
-
74
-
75
-
76
-
77
-
78
-
79
-
80
-
81
-
82
-
83
-
84
-
85
-
86
-
87
-
88
-
89
-
90
-
91
-
92
-
93
-
94
-
95
-
96
-
97
-
98
-
99
-
100
-
101
-
102
-
103
-
104
-
105
-
106
-
107
-
108
-
109
-
110
-
111
-
112
-
113
-
114
-
115
-
116
-
117
-
118
-
119
-
120
-
121
-
122
-
123
-
124
-
125
-
 126
126 -
 127
127 -
 128
128 -
 129
129 -
 130
130 -
 131
131 -
 132
132 -
 133
133 -
 134
134 -
 135
135 -
 136
136 -
137
-
138
-
139
-
140
-
141
-
142
-
143
-
144
-
145
-
146
-
147
-
148
-
149
-
150
-
151
-
152
-
153
-
154
-
155
-
156
-
157
-
158
-
159
-
160
-
161
-
162
-
163
-
164
-
165
-
166
-
167
-
168
-
169
-
170
-
171
-
172
-
173
-
174
-
175
-
176
-
177
-
178
-
179
-
180
-
181
-
182
-
183
-
184
-
185
-
186
-
187
-
188
-
189
-
190
-
191
-
192
-
193
-
194
-
195
-
196
-
197
-
198
-
199
-
200
-
201
-
202
-
203
-
204
-
205
-
206
-
207
-
208
-
209
-
210
-
211
-
212
-
213
-
214
-
215
-
216
-
217
-
218
-
219
-
220
 |
 |
