Gateway MX6452 8511385 - User Guide Gateway Notebook - Page 114
Select a Burning Task, Video, box to select the image
 |
View all Gateway MX6452 manuals
Add to My Manuals
Save this manual to your list of manuals |
Page 114 highlights
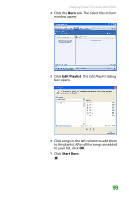
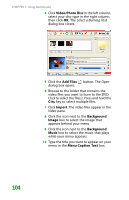
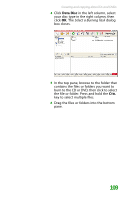
CHAPTER 7: Using Multimedia 4 Click Video/Photo Disc in the left column, select your disc type in the right column, then click OK. The Select a Burning Task dialog box closes. 5 Click the Add Files button. The Open dialog box opens. 6 Browse to the folder that contains the video files you want to burn to the DVD. Click to select the file(s). Press and hold the CTRL key to select multiple files. 7 Click Import. The video files appear in the Video pane. 8 Click the icon next to the Background Image box to select the image that appears behind your menu. 9 Click the icon next to the Background Music box to select the music that plays while your menu appears. 10 Type the title you want to appear on your menu in the Menu Caption Text box. 104
-
 1
1 -
2
-
3
-
4
-
5
-
6
-
7
-
8
-
9
-
10
-
11
-
12
-
13
-
14
-
15
-
16
-
17
-
18
-
19
-
20
-
21
-
22
-
23
-
24
-
25
-
26
-
27
-
28
-
29
-
30
-
31
-
32
-
33
-
34
-
35
-
36
-
37
-
38
-
39
-
40
-
41
-
42
-
43
-
44
-
45
-
46
-
47
-
48
-
49
-
50
-
51
-
52
-
53
-
54
-
55
-
56
-
57
-
58
-
59
-
60
-
61
-
62
-
63
-
64
-
65
-
66
-
67
-
68
-
69
-
70
-
71
-
72
-
73
-
74
-
75
-
76
-
77
-
78
-
79
-
80
-
81
-
82
-
83
-
84
-
85
-
86
-
87
-
88
-
89
-
90
-
91
-
92
-
93
-
94
-
95
-
96
-
97
-
98
-
99
-
100
-
101
-
102
-
103
-
104
-
105
-
106
-
107
-
108
-
 109
109 -
 110
110 -
 111
111 -
 112
112 -
 113
113 -
 114
114 -
 115
115 -
 116
116 -
 117
117 -
 118
118 -
 119
119 -
120
-
121
-
122
-
123
-
124
-
125
-
126
-
127
-
128
-
129
-
130
-
131
-
132
-
133
-
134
-
135
-
136
-
137
-
138
-
139
-
140
-
141
-
142
-
143
-
144
-
145
-
146
-
147
-
148
-
149
-
150
-
151
-
152
-
153
-
154
-
155
-
156
-
157
-
158
-
159
-
160
-
161
-
162
-
163
-
164
-
165
-
166
-
167
-
168
-
169
-
170
-
171
-
172
-
173
-
174
-
175
-
176
-
177
-
178
-
179
-
180
-
181
-
182
-
183
-
184
-
185
-
186
-
187
-
188
-
189
-
190
-
191
-
192
-
193
-
194
-
195
-
196
-
197
-
198
-
199
-
200
-
201
-
202
-
203
-
204
-
205
-
206
-
207
-
208
-
209
-
210
-
211
-
212
-
213
-
214
-
215
-
216
-
217
-
218
-
219
-
220
-
221
-
222
-
223
-
224
-
225
-
226
-
227
-
228
-
229
-
230
-
231
-
232
-
233
-
234
-
235
-
236
-
237
-
238
-
239
-
240
-
241
-
242
-
243
-
244
-
245
-
246
-
247
-
248
-
249
-
250
-
251
-
252
-
253
-
254
-
255
-
256
-
257
-
258
-
259
-
260
-
261
-
262
 |
 |

CHAPTER 7: Using Multimedia
104
4
Click
Video/Photo Disc
in the left column,
select your disc type in the right column,
then click
OK
. The
Select a Burning Task
dialog box closes.
5
Click the
Add Files
button. The
Open
dialog box opens.
6
Browse to the folder that contains the
video files you want to burn to the DVD.
Click to select the file(s). Press and hold the
C
TRL
key to select multiple files.
7
Click
Import
. The video files appear in the
Video
pane.
8
Click the icon next to the
Background
Image
box to select the image that
appears behind your menu.
9
Click the icon next to the
Background
Music
box to select the music that plays
while your menu appears.
10
Type the title you want to appear on your
menu in the
Menu Caption Text
box.