Gateway MX6452 8511385 - User Guide Gateway Notebook - Page 156
Cover template, Subject line, Finish, Unblock, Preparing the Cover Schedule
 |
View all Gateway MX6452 manuals
Add to My Manuals
Save this manual to your list of manuals |
Page 156 highlights
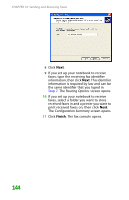
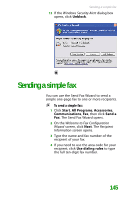
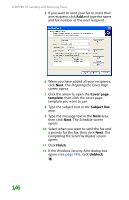
CHAPTER 10: Sending and Receiving Faxes 5 If you want to send your fax to more than one recipient, click Add and type the name and fax number of the next recipient. 6 When you have added all your recipients, click Next. The Preparing the Cover Page screen opens. 7 Click the arrow to open the Cover page template, then click the cover page template you want to use. 8 Type the subject text in the Subject line area. 9 Type the message text in the Note area, then click Next. The Schedule screen opens. 10 Select when you want to send the fax and a priority for the fax, then click Next. The Completing the Send Fax Wizard screen opens. 11 Click Finish. 12 If the Windows Security Alert dialog box opens (see page 145), click Unblock. 146
-
 1
1 -
2
-
3
-
4
-
5
-
6
-
7
-
8
-
9
-
10
-
11
-
12
-
13
-
14
-
15
-
16
-
17
-
18
-
19
-
20
-
21
-
22
-
23
-
24
-
25
-
26
-
27
-
28
-
29
-
30
-
31
-
32
-
33
-
34
-
35
-
36
-
37
-
38
-
39
-
40
-
41
-
42
-
43
-
44
-
45
-
46
-
47
-
48
-
49
-
50
-
51
-
52
-
53
-
54
-
55
-
56
-
57
-
58
-
59
-
60
-
61
-
62
-
63
-
64
-
65
-
66
-
67
-
68
-
69
-
70
-
71
-
72
-
73
-
74
-
75
-
76
-
77
-
78
-
79
-
80
-
81
-
82
-
83
-
84
-
85
-
86
-
87
-
88
-
89
-
90
-
91
-
92
-
93
-
94
-
95
-
96
-
97
-
98
-
99
-
100
-
101
-
102
-
103
-
104
-
105
-
106
-
107
-
108
-
109
-
110
-
111
-
112
-
113
-
114
-
115
-
116
-
117
-
118
-
119
-
120
-
121
-
122
-
123
-
124
-
125
-
126
-
127
-
128
-
129
-
130
-
131
-
132
-
133
-
134
-
135
-
136
-
137
-
138
-
139
-
140
-
141
-
142
-
143
-
144
-
145
-
146
-
147
-
148
-
149
-
150
-
 151
151 -
 152
152 -
 153
153 -
 154
154 -
 155
155 -
 156
156 -
 157
157 -
 158
158 -
 159
159 -
 160
160 -
 161
161 -
162
-
163
-
164
-
165
-
166
-
167
-
168
-
169
-
170
-
171
-
172
-
173
-
174
-
175
-
176
-
177
-
178
-
179
-
180
-
181
-
182
-
183
-
184
-
185
-
186
-
187
-
188
-
189
-
190
-
191
-
192
-
193
-
194
-
195
-
196
-
197
-
198
-
199
-
200
-
201
-
202
-
203
-
204
-
205
-
206
-
207
-
208
-
209
-
210
-
211
-
212
-
213
-
214
-
215
-
216
-
217
-
218
-
219
-
220
-
221
-
222
-
223
-
224
-
225
-
226
-
227
-
228
-
229
-
230
-
231
-
232
-
233
-
234
-
235
-
236
-
237
-
238
-
239
-
240
-
241
-
242
-
243
-
244
-
245
-
246
-
247
-
248
-
249
-
250
-
251
-
252
-
253
-
254
-
255
-
256
-
257
-
258
-
259
-
260
-
261
-
262
 |
 |

CHAPTER 10: Sending and Receiving Faxes
146
5
If you want to send your fax to more than
one recipient, click
Add
and type the name
and fax number of the next recipient.
6
When you have added all your recipients,
click
Next
. The
Preparing the Cover Page
screen opens.
7
Click the arrow to open the
Cover page
template
, then click the cover page
template you want to use.
8
Type the subject text in the
Subject line
area.
9
Type the message text in the
Note
area,
then click
Next
. The
Schedule
screen
opens.
10
Select when you want to send the fax and
a priority for the fax, then click
Next
. The
Completing the Send Fax Wizard
screen
opens.
11
Click
Finish
.
12
If the
Windows Security Alert
dialog box
opens (see
page 145
), click
Unblock
.