Gateway MX6452 8511385 - User Guide Gateway Notebook - Page 141
Setting up your notebook, Naming your computers and workgroup
 |
View all Gateway MX6452 manuals
Add to My Manuals
Save this manual to your list of manuals |
Page 141 highlights
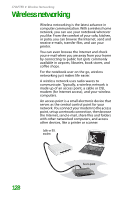
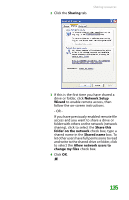
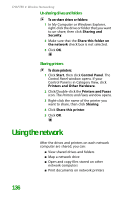
Setting up your wireless network The wizard will have you press the SecureEasySetup button on the front of your access point and click the SecureEasySetup button in the Wizard. The software automatically configures your access point and sets up a secure wireless connection. Setting up your notebook Important Each computer on your network needs a unique Computer Name. All the computers on your network need the same Workgroup Name. You may have already named your computer and workgroup the first time you turned on your notebook. Naming your computers and workgroup To identify this computer on the network: 1 Click Start, right-click My Computer, then click Properties. The System Properties dialog box opens. 2 Click Computer Name. 3 Click Change. The Computer Name Changes dialog box opens. 4 Type a unique computer name in the Computer name box. Use a computer name of up to 15 characters with no blank spaces. Make sure that your computer name is unique. Your computer name cannot be all numeric. It must contains some letters. 5 Type a name for your workgroup in the Workgroup box. Use a workgroup name of up to 15 characters with no blank spaces. The workgroup name must be the same for all computers on your home network, and the name must be different than any computer name on your network. 6 Click OK to close the Computer Name Changes dialog box. 131
-
 1
1 -
2
-
3
-
4
-
5
-
6
-
7
-
8
-
9
-
10
-
11
-
12
-
13
-
14
-
15
-
16
-
17
-
18
-
19
-
20
-
21
-
22
-
23
-
24
-
25
-
26
-
27
-
28
-
29
-
30
-
31
-
32
-
33
-
34
-
35
-
36
-
37
-
38
-
39
-
40
-
41
-
42
-
43
-
44
-
45
-
46
-
47
-
48
-
49
-
50
-
51
-
52
-
53
-
54
-
55
-
56
-
57
-
58
-
59
-
60
-
61
-
62
-
63
-
64
-
65
-
66
-
67
-
68
-
69
-
70
-
71
-
72
-
73
-
74
-
75
-
76
-
77
-
78
-
79
-
80
-
81
-
82
-
83
-
84
-
85
-
86
-
87
-
88
-
89
-
90
-
91
-
92
-
93
-
94
-
95
-
96
-
97
-
98
-
99
-
100
-
101
-
102
-
103
-
104
-
105
-
106
-
107
-
108
-
109
-
110
-
111
-
112
-
113
-
114
-
115
-
116
-
117
-
118
-
119
-
120
-
121
-
122
-
123
-
124
-
125
-
126
-
127
-
128
-
129
-
130
-
131
-
132
-
133
-
134
-
135
-
 136
136 -
 137
137 -
 138
138 -
 139
139 -
 140
140 -
 141
141 -
 142
142 -
 143
143 -
 144
144 -
 145
145 -
 146
146 -
147
-
148
-
149
-
150
-
151
-
152
-
153
-
154
-
155
-
156
-
157
-
158
-
159
-
160
-
161
-
162
-
163
-
164
-
165
-
166
-
167
-
168
-
169
-
170
-
171
-
172
-
173
-
174
-
175
-
176
-
177
-
178
-
179
-
180
-
181
-
182
-
183
-
184
-
185
-
186
-
187
-
188
-
189
-
190
-
191
-
192
-
193
-
194
-
195
-
196
-
197
-
198
-
199
-
200
-
201
-
202
-
203
-
204
-
205
-
206
-
207
-
208
-
209
-
210
-
211
-
212
-
213
-
214
-
215
-
216
-
217
-
218
-
219
-
220
-
221
-
222
-
223
-
224
-
225
-
226
-
227
-
228
-
229
-
230
-
231
-
232
-
233
-
234
-
235
-
236
-
237
-
238
-
239
-
240
-
241
-
242
-
243
-
244
-
245
-
246
-
247
-
248
-
249
-
250
-
251
-
252
-
253
-
254
-
255
-
256
-
257
-
258
-
259
-
260
-
261
-
262
 |
 |
