Gateway MX6452 8511385 - User Guide Gateway Notebook - Page 84
Viewing the display on a projector or monitor
 |
View all Gateway MX6452 manuals
Add to My Manuals
Save this manual to your list of manuals |
Page 84 highlights
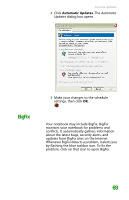
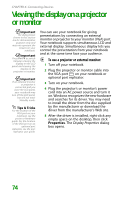
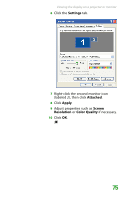
CHAPTER 6: Connecting Devices Viewing the display on a projector or monitor Important The dialog boxes shown in this section are for demonstrative purposes only and may not represent the screens on your notebook. Important Press FN+F4 to switch between viewing the display on the LCD panel and viewing the display on the projector or monitor. Important If an external monitor or projector is connected and you close the LCD panel, your notebook may turn off the LCD panel, but will not enter Standby mode. Tips & Tricks For the location of the VGA port on your notebook, see the poster or hardware guide. For the location of the VGA port on an optional port replicator, see the port replicator user guide. You can use your notebook for giving presentations by connecting an external monitor or projector to your monitor (VGA) port. Your notebook supports simultaneous LCD and external display. Simultaneous display lets you control the presentation from your notebook and at the same time face your audience. To use a projector or external monitor: 1 Turn off your notebook. 2 Plug the projector or monitor cable into the VGA port on your notebook or optional port replicator. 3 Turn on your notebook. 4 Plug the projector's or monitor's power cord into an AC power source and turn it on. Windows recognizes the new hardware and searches for its driver. You may need to install the driver from the disc supplied by the manufacturer or download the driver from the manufacturer's Web site. 5 After the driver is installed, right-click any empty space on the desktop, then click Properties. The Display Properties dialog box opens. 74
-
 1
1 -
2
-
3
-
4
-
5
-
6
-
7
-
8
-
9
-
10
-
11
-
12
-
13
-
14
-
15
-
16
-
17
-
18
-
19
-
20
-
21
-
22
-
23
-
24
-
25
-
26
-
27
-
28
-
29
-
30
-
31
-
32
-
33
-
34
-
35
-
36
-
37
-
38
-
39
-
40
-
41
-
42
-
43
-
44
-
45
-
46
-
47
-
48
-
49
-
50
-
51
-
52
-
53
-
54
-
55
-
56
-
57
-
58
-
59
-
60
-
61
-
62
-
63
-
64
-
65
-
66
-
67
-
68
-
69
-
70
-
71
-
72
-
73
-
74
-
75
-
76
-
77
-
78
-
 79
79 -
 80
80 -
 81
81 -
 82
82 -
 83
83 -
 84
84 -
 85
85 -
 86
86 -
 87
87 -
 88
88 -
 89
89 -
90
-
91
-
92
-
93
-
94
-
95
-
96
-
97
-
98
-
99
-
100
-
101
-
102
-
103
-
104
-
105
-
106
-
107
-
108
-
109
-
110
-
111
-
112
-
113
-
114
-
115
-
116
-
117
-
118
-
119
-
120
-
121
-
122
-
123
-
124
-
125
-
126
-
127
-
128
-
129
-
130
-
131
-
132
-
133
-
134
-
135
-
136
-
137
-
138
-
139
-
140
-
141
-
142
-
143
-
144
-
145
-
146
-
147
-
148
-
149
-
150
-
151
-
152
-
153
-
154
-
155
-
156
-
157
-
158
-
159
-
160
-
161
-
162
-
163
-
164
-
165
-
166
-
167
-
168
-
169
-
170
-
171
-
172
-
173
-
174
-
175
-
176
-
177
-
178
-
179
-
180
-
181
-
182
-
183
-
184
-
185
-
186
-
187
-
188
-
189
-
190
-
191
-
192
-
193
-
194
-
195
-
196
-
197
-
198
-
199
-
200
-
201
-
202
-
203
-
204
-
205
-
206
-
207
-
208
-
209
-
210
-
211
-
212
-
213
-
214
-
215
-
216
-
217
-
218
-
219
-
220
-
221
-
222
-
223
-
224
-
225
-
226
-
227
-
228
-
229
-
230
-
231
-
232
-
233
-
234
-
235
-
236
-
237
-
238
-
239
-
240
-
241
-
242
-
243
-
244
-
245
-
246
-
247
-
248
-
249
-
250
-
251
-
252
-
253
-
254
-
255
-
256
-
257
-
258
-
259
-
260
-
261
-
262
 |
 |
