HP 5500dn HP Designjet 5500 series printers - Quick Reference Pocket Guide
HP 5500dn - Color LaserJet Laser Printer Manual
 |
View all HP 5500dn manuals
Add to My Manuals
Save this manual to your list of manuals |
HP 5500dn manual content summary:
- HP 5500dn | HP Designjet 5500 series printers - Quick Reference Pocket Guide - Page 1
pocket.book Page 1 Friday, June 28, 2002 4:31 PM i pocket guide ? hp designjet 5500 series printers how do I... - HP 5500dn | HP Designjet 5500 series printers - Quick Reference Pocket Guide - Page 2
materials and their characteristics n Animations of loading materials and installing ink supplies n More about solving problems n Page formatting n Printer configuration and maintenance n Functional specifications n A glossary of terms and a comprehensive index There is also more information - HP 5500dn | HP Designjet 5500 series printers - Quick Reference Pocket Guide - Page 3
pocket.book Page 1 Friday, June 28, 2002 4:31 PM use the front panel 1 functional areas, 2 print mode selection, 8 internal prints, 11 front-panel menus, 14 navigation, 22 navigation examples, 24 USE THE FRONT PANEL - HP 5500dn | HP Designjet 5500 series printers - Quick Reference Pocket Guide - Page 4
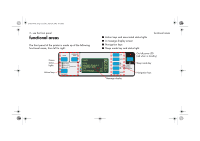
areas The front panel of the printer is made up of the following functional areas, from left to right: Green status lights Action keys I Action keys and associated status lights I A message display screen I Navigation keys I Sleep mode key and status light. functional areas On/off power LED - HP 5500dn | HP Designjet 5500 series printers - Quick Reference Pocket Guide - Page 5
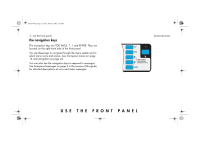
on page 22. You can also use the navigation keys to respond to messages. See front-panel messages on page 4 in the reverse of this guide, for detailed descriptions of error and status messages. functional areas USE THE FRONT PANEL - HP 5500dn | HP Designjet 5500 series printers - Quick Reference Pocket Guide - Page 6
menu is selected, the status of each of the ink cartridges is shown. If there is a problem with one or more of the ink cartridges, the front panel will display an action message or a error code, see frontpanel messages on page 4 in the reverse of this guide for more details. If you press Enter now - HP 5500dn | HP Designjet 5500 series printers - Quick Reference Pocket Guide - Page 7
a problem with one or more of the printheads, the front panel will display an action message or a error code see front-panel messages on page 4 in the reverse of this guide for more details. If you press Enter now, you will go to the Printhead Menu, see printhead menu on page 21. menus To configure - HP 5500dn | HP Designjet 5500 series printers - Quick Reference Pocket Guide - Page 8
/UNLOAD loads or unloads printing material. See loading a roll into the printer on page 34. I PRINT QUALITY selects the print mode, which may be Max Quality, Productivity, Production, or Max Speed. A green status light indicates the print mode you have selected. Two green lights indicate that you - HP 5500dn | HP Designjet 5500 series printers - Quick Reference Pocket Guide - Page 9
Page 7 Friday, June 28, 2002 4:31 PM 7 - use the front panel status lights The green status lights indicates what setting is currently active in the front panel. NOTE: In most cases, settings in your application software or printer driver will override the settings you make on the front panel of the - HP 5500dn | HP Designjet 5500 series printers - Quick Reference Pocket Guide - Page 10
quality is not very important. I Choose Production for fast printing with image quality good enough for some production purposes. Production mode is available only with dye-based inks and some specific paper types. print mode selection I Choose Productivity for a good combination of image quality - HP 5500dn | HP Designjet 5500 series printers - Quick Reference Pocket Guide - Page 11
not support Production mode, the printer will print in Productivity mode. If you decide to use a non-HP printing material, see using non-hp printing materials on page 60. selecting production mode using the front panel Press the Print Quality key repeatedly until you see two green lights, beside - HP 5500dn | HP Designjet 5500 series printers - Quick Reference Pocket Guide - Page 12
10 - use the front panel I Windows HP-GL/2 driver: print mode selection I Windows 2000 or XP PostScript driver: Click the More button above to obtain the Advanced Optimization Options box, below: I Windows 9x or NT PostScript driver: selecting production mode using webaccess Choose Submit Job and - HP 5500dn | HP Designjet 5500 series printers - Quick Reference Pocket Guide - Page 13
11 Friday, June 28, 2002 4:31 PM 11 - use the front panel internal prints print the configuration To request a Current Configuration Print from the front panel: 1. Make sure that a roll or a sheet is loaded into the printer. 2. Press the TOP key to select the main menu on the front panel. 3. Make - HP 5500dn | HP Designjet 5500 series printers - Quick Reference Pocket Guide - Page 14
can see the complete menu structure available on the printer by printing the Menu print. Alternatively, see front-panel menus on page 14. Use it to help you to navigate the menus. NOTE: The Menu print is printed in the size specified in the Page Format → Size settings in the front panel. However, if - HP 5500dn | HP Designjet 5500 series printers - Quick Reference Pocket Guide - Page 15
can be used to help diagnose whether the printer has image quality problems, and if problems exist, help determine their cause. See using the image quality print on page 31 in the reverse of this guide. palette print The HP-GL/2 Palette Print shows the color or grayscale definitions in the currently - HP 5500dn | HP Designjet 5500 series printers - Quick Reference Pocket Guide - Page 16
: 1. The items on a yellow background always appear on the Front Panel. 2. The items on a gray background appear in the front panel only when Utilities > Menu mode is set to Full. Full is the default. 3. The items on a blue background appear in the front panel only when the TUR is installed and - HP 5500dn | HP Designjet 5500 series printers - Quick Reference Pocket Guide - Page 17
→ Lang → Drying time → Pen check → Heater → Sleep mode → 2nd level TUR installed → Other accessories → On, Off On, Off CALS/G4, HP-GL/2, PostScript @, PDF @, TIFF, JPEG, Automatic Automatic None Manual → Optimized Manual → Next plot Automatic None Manual → 30, 60, 120, 150, 180, 210, 240 min - HP 5500dn | HP Designjet 5500 series printers - Quick Reference Pocket Guide - Page 18
→ Statistics → Default menu Display contrast → Clean platen → Lens maintenance HP-GL/2 config, Service config, Network card config, Usage report, Image quality print RAM present, Hard disk, Code rev, PS code rev @, PS font code @, Service ID, Num cycles, Boot ROM Up, Down Automatic clean → Clean - HP 5500dn | HP Designjet 5500 series printers - Quick Reference Pocket Guide - Page 19
processing Ink emulation → RGB → Native, sRGB, Apple RGB, Adobe RGB, ColorMatch RGB CMYK → Native, EuroScale, SWOP, Toyo, DIC, JMPA Color calibration → Off, On Align calibration → On, Off Black replacement → Off, On Scale → 100 ... 419%, Fit to page PS encoding @ → Software @, Binary - HP 5500dn | HP Designjet 5500 series printers - Quick Reference Pocket Guide - Page 20
hp-gl/2 settings 1st level 2nd level 3rd level 4th level 5th level Palette → Software page format front-panel menus 1st level 2nd level 3rd level Size → Inked Software Rotate → 0 to 270 Margins → Normal, Extended, Smaller Nest spacing → Automatic Manual → 0 to 30 mm Mirroring - HP 5500dn | HP Designjet 5500 series printers - Quick Reference Pocket Guide - Page 21
pocket.book Page 19 Friday, June 28, 2002 4:31 PM 19 - use the front panel setup menu: demos 1st level Samples PostScript fonts @ Palette Menu front-panel menus USE THE FRONT PANEL - HP 5500dn | HP Designjet 5500 series printers - Quick Reference Pocket Guide - Page 22
Canvas, More... Coated, → HW Coated, Photo, Fine Arts, Vinyl/Film, Backlit, Textile, Colored, CAD, More... 4th level Choose profile, Print sample Delete media → (list of downloaded media profiles; media profiles provided with the printer cannot be deleted) Move media TUR loaded → Yes, No Form - HP 5500dn | HP Designjet 5500 series printers - Quick Reference Pocket Guide - Page 23
HP No. 81/83 ink cartridge, Ink level, Capacity, Part number, Manufacture date Replace ink cartridge → Yes, No printhead menu 1st level 2nd level Printhead info → Light cyan info, Light magenta info, Yellow info, Cyan info, Magenta info, Black info Recover printheads → All printheads, Cyan - HP 5500dn | HP Designjet 5500 series printers - Quick Reference Pocket Guide - Page 24
the menus. navigation Press the Enter key to: a Select a menu and move to the next menu level, when in the menu system b Change the printer's configuration to the highlighted menu item indicated with a √ symbol. The ... characters in a menu box indicate that another level of menu is available. - HP 5500dn | HP Designjet 5500 series printers - Quick Reference Pocket Guide - Page 25
to change from the full menu to the short menu, see navigation examples on page 24. 3. Now you are in the Printer Setup menu, you can change the settings of your printer. Note: If the short menu is selected, the I/O setup menu will not be available. 4. To return to the top of - HP 5500dn | HP Designjet 5500 series printers - Quick Reference Pocket Guide - Page 26
PM 24 - use the front panel navigation examples changing menu mode The front panel displays two types of menu. One is the short menu. This menu only contains the settings for everyday use of the printer. The other menu is the full menu mode which contains all of the menus. 1. Make sure the front - HP 5500dn | HP Designjet 5500 series printers - Quick Reference Pocket Guide - Page 27
now display the printer setup options: 3. Press the ↓ key until "Page Format" is selected. Press the Enter key. 4. The correct menu is already highlighted. Press the Enter key to select "Size=". 5. Press the ↓ key until "Software" is selected. Press the Enter key. 6. 'Software - HP 5500dn | HP Designjet 5500 series printers - Quick Reference Pocket Guide - Page 28
to suit special printing conditions. See the 'Using Your Printer CD' for more details. 1. Make sure the front panel displays the Printer Setup menu icon. key. Then press the Enter key. 2. The front panel will now display the printer setup options: 3. Press the ↓ key until the "Device setup" menu is - HP 5500dn | HP Designjet 5500 series printers - Quick Reference Pocket Guide - Page 29
Top key. restoring the default menu navigation examples If you are unsure about the settings you have made, or if you prefer to reset the printer's default menu, go to the Utilities menu and select Default Menu. USE THE FRONT PANEL - HP 5500dn | HP Designjet 5500 series printers - Quick Reference Pocket Guide - Page 30
pocket.book Page 28 Friday, June 28, 2002 4:31 PM 28 - use the front panel navigation examples - HP 5500dn | HP Designjet 5500 series printers - Quick Reference Pocket Guide - Page 31
29 Friday, June 28, 2002 4:31 PM load and unload material 2 loading roll guidelines, 30 loading a roll onto the spindle, 32 loading a roll into the printer, 34 attaching the roll to the take-up reel, 42 unloading the roll from the take-up reel, 47 removing the roll from the - HP 5500dn | HP Designjet 5500 series printers - Quick Reference Pocket Guide - Page 32
core, check that the core adaptors supplied with the printer have been installed. See below using pre-loaded spindles If you are a regular user of different printing materials, you can change your printing material more quickly if you have more than one spindle loaded with material. Extra spindles - HP 5500dn | HP Designjet 5500 series printers - Quick Reference Pocket Guide - Page 33
-inch (1.57-m) printer the take-up reel is supplied as standard. For the 42-inch (1.07-m) printer it is an optional accessory which you can order, see the 'Using Your Printer CD'. help with loading When loading printing material there is information available from: I This Pocket Guide, installed at - HP 5500dn | HP Designjet 5500 series printers - Quick Reference Pocket Guide - Page 34
roll onto the spindle 1. Make sure the printer wheels are locked (the brake lever is pressed down) to prevent the printer from moving. 2. Remove the empty spindle by . 5. Slide the new roll onto the spindle. Make sure the printing material is oriented as shown. If it is not, remove the roll, - HP 5500dn | HP Designjet 5500 series printers - Quick Reference Pocket Guide - Page 35
and push it towards the end of the roll. 7. Ensure the spindle guide is pushed in as far as it will go, without using excessive force. the spindle into the printer left and then right as shown by the arrows A and B. loading a roll onto the spindle 9. The printing material should hang down from - HP 5500dn | HP Designjet 5500 series printers - Quick Reference Pocket Guide - Page 36
the spool. If it is not cut straight, continue with the next procedure. If the printing material is cut correctly, go to step 3. WARNING The knife used in the next step is sharp. Be sure the printer's wheels are locked. Keep fingers clear of the cutting path. Keep the knife away from - HP 5500dn | HP Designjet 5500 series printers - Quick Reference Pocket Guide - Page 37
Friday, June 28, 2002 4:31 PM 35 - load and unload material c Retract the blade and return the knife to its pocket. loading a roll into the printer 5. Press the LOAD/UNLOAD MEDIA key on the front panel. 3. Press the Top button to select the main menu on the front panel. 4. Make sure - HP 5500dn | HP Designjet 5500 series printers - Quick Reference Pocket Guide - Page 38
). NOTE: If you have loaded rolls before and you are an experienced user, you may want to leave the window down. Rolls can be loaded with the window up or down. 9. Lift the media load lever. loading a roll into the printer The front panel now displays: 10. Pull out approximately 1m (3 ft) of - HP 5500dn | HP Designjet 5500 series printers - Quick Reference Pocket Guide - Page 39
material as shown below. 13. The front panel displays: loading a roll into the printer 12. Continue inserting the material until it emerges from the printer as shown. 14. Take hold of the edges of the printing material now extending from the exit slot and pull the material toward you until taut - HP 5500dn | HP Designjet 5500 series printers - Quick Reference Pocket Guide - Page 40
open, the front panel displays: loading a roll into the printer 60-inch (1.52-m) printer only 18. If the printing material is correctly aligned, the printer will display: 16. Lower the window. 17. The printer checks the alignment of the printing material. 19. Select "Yes" and press the Enter key - HP 5500dn | HP Designjet 5500 series printers - Quick Reference Pocket Guide - Page 41
39 Friday, June 28, 2002 4:31 PM 39 - load and unload material 20. The front panel displays various vendors of printing materials if they have been downloaded. See the Using Your Printer CD for more details. Select the vendor of the material you are using. Press the Enter key. loading a roll into - HP 5500dn | HP Designjet 5500 series printers - Quick Reference Pocket Guide - Page 42
40 - load and unload material 24. Change the screen using the ↑ and ↓ keys to the amount printed on the end of the roll. Press the Enter key. loading a roll into the printer 42-inch (1.07-m) printer only 25. The front panel displays: NOTE: To turn on and off the media length tracking function - HP 5500dn | HP Designjet 5500 series printers - Quick Reference Pocket Guide - Page 43
pocket.book Page 41 Friday, June 28, 2002 4:31 PM 41 - load and unload material 42-inch (1.07-m) printer only The front panel displays the following and is ready to print. 60-inch (1.52-m) printer only The printer is ready to load the roll onto the take-up reel. Follow the procedure in the next - HP 5500dn | HP Designjet 5500 series printers - Quick Reference Pocket Guide - Page 44
-up reel. If you do not have one, you can order it as an optional accessory; see the 'Using Your Printer CD'. The first part of attaching a roll to the take-up reel is attaching the end of the roll (by tape) to the core tube supplied with the take-up reel. You can - HP 5500dn | HP Designjet 5500 series printers - Quick Reference Pocket Guide - Page 45
, 2002 4:31 PM 43 - load and unload material 2. Make sure the printing material passes in front of the deflector, as shown. 3. Move the adjustment levers on the left and right paper guides to the unlocked position. 4. The two spindle guides and core must be positioned on the take-up reel spindle so - HP 5500dn | HP Designjet 5500 series printers - Quick Reference Pocket Guide - Page 46
pocket.book Page 44 Friday, June 28, 2002 4:31 PM 44 - load and unload material 6. Pull the printing material taut to the position shown below. Do not attempt to pull more material out of the printer; if you need more, use the front panel. Use tape to secure the material to the core - HP 5500dn | HP Designjet 5500 series printers - Quick Reference Pocket Guide - Page 47
core. attaching the roll to the take-up reel It is important that the media weight is the same width as the printing material you are using. By matching color coded lengths of plastic tube, you can make a media weight for different widths of standard paper sizes. 9. Press the ↓ button on the front - HP 5500dn | HP Designjet 5500 series printers - Quick Reference Pocket Guide - Page 48
reel is in operation it is important to ensure that the take-up reel sensor is not blocked. 12. Shown below is how the printer will look when it is in operation. As printing material is fed from the printer, it drops down in a loop and up into the take-up reel spindle. 12 - HP 5500dn | HP Designjet 5500 series printers - Quick Reference Pocket Guide - Page 49
material unloading the roll from the take-up reel To unload the roll from the take-up reel, perform the following procedure. 1. Ensure that the ink is dry. 2. Press the LOAD/UNLOAD MEDIA key on the front panel. unloading the roll from the take-up reel 3. The front panel displays: 4. Important - HP 5500dn | HP Designjet 5500 series printers - Quick Reference Pocket Guide - Page 50
48 Friday, June 28, 2002 4:31 PM 48 - load and unload material 5. Press the wind button shown below to wind the printing material hanging down from the printer onto the take-up reel. unloading the roll from the take-up reel 6. Press Enter on the printer's front panel. The printer will now cut the - HP 5500dn | HP Designjet 5500 series printers - Quick Reference Pocket Guide - Page 51
pocket.book Page 49 Friday, June 28, 2002 4:31 PM 49 - load and unload material 7. Press the wind button again. unloading the roll from the take-up reel 8. The printing material hanging down will be wound onto the core tube. LOAD AND UNLOAD MATERIAL - HP 5500dn | HP Designjet 5500 series printers - Quick Reference Pocket Guide - Page 52
-up reel. unloading the roll from the take-up reel 10. Remove the take-up reel spindle. 11. Unlock and remove the left-hand spindle guide from the take-up reel spindle. - HP 5500dn | HP Designjet 5500 series printers - Quick Reference Pocket Guide - Page 53
pocket.book Page 51 Friday, June 28, 2002 4:31 PM 51 - load and unload material 12. Remove the core tube from the spindle. Take-up reel spindle Take-up reel core tube (with paper) unloading the roll from the take-up reel LOAD AND UNLOAD MATERIAL - HP 5500dn | HP Designjet 5500 series printers - Quick Reference Pocket Guide - Page 54
. removing the roll from the printer 3. Turn the blue media stop by hand, until the printing material is fully removed from inside the printer. 4. Press the Enter key. NOTE: If the media length tracking feature is switched on, the printer will print how much printing material you have remaining on - HP 5500dn | HP Designjet 5500 series printers - Quick Reference Pocket Guide - Page 55
pocket.book Page 53 Friday, June 28, 2002 4:31 PM 53 - load and unload material 5. Remove the roll from the printer by pulling on the roll as indicated by the arrows. removing the roll from the printer LOAD AND UNLOAD MATERIAL - HP 5500dn | HP Designjet 5500 series printers - Quick Reference Pocket Guide - Page 56
June 28, 2002 4:31 PM 54 - load and unload material loading sheets 3. The front panel displays: NOTE: Any loaded roll must be removed from the printer before you can proceed with this procedure. 1. Make sure that the front panel displays the 'Ready for media' message. Shown here is an example of - HP 5500dn | HP Designjet 5500 series printers - Quick Reference Pocket Guide - Page 57
pocket.book Page 55 Friday, June 28, 2002 4:31 PM 55 - load and unload material 6. Lift the media load lever. 7. The front panel now displays: loading sheets 8. Insert the sheet into the printer as shown below. LOAD AND UNLOAD MATERIAL - HP 5500dn | HP Designjet 5500 series printers - Quick Reference Pocket Guide - Page 58
pocket.book Page 56 Friday, June 28, 2002 4:31 PM 56 - load and unload material 9. Insert the sheet until it reappears from the printer as shown below. 10. Pull the sheet out from the top. loading sheets - HP 5500dn | HP Designjet 5500 series printers - Quick Reference Pocket Guide - Page 59
with the line as shown below. 12. Lower the media load lever. loading sheets 13. The front panel will display the following message if the window is open: 14. Lower the window. LOAD AND UNLOAD MATERIAL - HP 5500dn | HP Designjet 5500 series printers - Quick Reference Pocket Guide - Page 60
vendor of the material you are using. Press the Enter key. 16. The front panel displays various printing materials: This list includes only a selection of the available printing materials. The Using Your Printer CD has a more complete list. 17. Select the material you are using and press the Enter - HP 5500dn | HP Designjet 5500 series printers - Quick Reference Pocket Guide - Page 61
, June 28, 2002 4:31 PM 59 - load and unload material unloading sheets To unload a single sheet from the printer, press the Load/ Unload Media key located on the front panel. To give the ink time to dry, the printer holds the sheet for some time. (Refer to Drying Time in the 'Using Your - HP 5500dn | HP Designjet 5500 series printers - Quick Reference Pocket Guide - Page 62
about nine minutes to print a sample, depending on the print mode and the printing material. RGB sample hp or 3M If you choose HP or 3M, you will be shown a list of printing materials. Whichever you select, a media profile is already available to define to the printer the precise characteristics of - HP 5500dn | HP Designjet 5500 series printers - Quick Reference Pocket Guide - Page 63
, 2002 4:31 PM 61 - load and unload material In some cases it may be possible to select Production mode although the non-HP printing material is not compatible with Production mode. In such cases the printer will print in Productivity mode. using non-hp printing materials LOAD AND UNLOAD MATERIAL - HP 5500dn | HP Designjet 5500 series printers - Quick Reference Pocket Guide - Page 64
PM 62 - load and unload material media length tracking 2. The front panel displays: There is a function in the printer that enables the printer to register through the front panel how much printing material is left on the roll you are using. This is called the media length tracking function. to - HP 5500dn | HP Designjet 5500 series printers - Quick Reference Pocket Guide - Page 65
pocket.book Page 63 Friday, June 28, 2002 4:31 PM 63 - load and unload material 5. Select "Media length tracking". Press the Enter key. media length tracking 8. Press the Top key to return to the main menu. 6. The front panel displays: 7. Select Yes and press the Enter key. The front panel - HP 5500dn | HP Designjet 5500 series printers - Quick Reference Pocket Guide - Page 66
pocket.book Page 64 Friday, June 28, 2002 4:31 PM 64 - load and unload material media length tracking - HP 5500dn | HP Designjet 5500 series printers - Quick Reference Pocket Guide - Page 67
maintain the ink system 3 ink cartridge statistics, 66 ink cartridge removal, 67 ink cartridge installation, 69 printhead statistics, 71 printhead removal, 73 printhead installation, 77 printhead cleaner removal, 80 printhead cleaner installation, 83 after replacing a printhead and printhead cleaner - HP 5500dn | HP Designjet 5500 series printers - Quick Reference Pocket Guide - Page 68
the Enter key. The information supplied is: I The make of the ink cartridge (HP No. 81 or HP No. 83 are recommended) I The percentage of ink remaining in the cartridge I The original capacity of the ink cartridge in milliliters I The re-order part number of the ink cartridge I The month and year - HP 5500dn | HP Designjet 5500 series printers - Quick Reference Pocket Guide - Page 69
locked (the brake lever is pressed down) to prevent the printer from moving. There are two types of ink cartridge removal. I The ink cartridge is very low and you want to replace the ink cartridge with a full one for unattended printing, with the view to replacing it again and using until empty - HP 5500dn | HP Designjet 5500 series printers - Quick Reference Pocket Guide - Page 70
color by pushing the dimpled recess in the ink cartridge inward and upward, as indicated by the arrow shown below. ink cartridge removal 5. This releases the ink cartridge; you can then pull it out horizontally. NOTE: Avoid touching the end of the ink cartridge that is inserted into the printer - HP 5500dn | HP Designjet 5500 series printers - Quick Reference Pocket Guide - Page 71
PM 69 - maintain the ink system ink cartridge installation NOTE: Each ink cartridge slot has a colored label above it. This should match the colored label on the new ink cartridge. 1. Pick up the new ink cartridge and find the label identifying the ink color. Hold the ink cartridge so that you can - HP 5500dn | HP Designjet 5500 series printers - Quick Reference Pocket Guide - Page 72
recess on the front of the ink cartridge, inwards and then downwards, as indicated by the arrow shown below, until the ink cartridge clicks into place. ink cartridge installation 6. Press the Enter key to continue. NOTE: Avoid storing partially used ink cartridges on their ends. 5. The front panel - HP 5500dn | HP Designjet 5500 series printers - Quick Reference Pocket Guide - Page 73
pocket.book Page 71 Friday, June 28, 2002 4:31 PM 71 - maintain the ink system printhead statistics 1. To get information on your printheads, press the Top key on the front panel to go to the top of the menu system. printhead statistics 3. Press the ↑ or ↓ key until the front panel highlights ' - HP 5500dn | HP Designjet 5500 series printers - Quick Reference Pocket Guide - Page 74
information supplied is: I The status of the printhead warranty I The make of the printheads (HP No.81 or HP No. 83 are recommended) I The current status of the printhead I The re-order part number of the printhead I The time that the printhead has been operating in the printer I How much ink has - HP 5500dn | HP Designjet 5500 series printers - Quick Reference Pocket Guide - Page 75
maintain the ink system printhead removal WARNING Make sure the printer wheels are locked (the brake lever is pressed down) to prevent the printer from moving. Printhead replacement must be performed with the printer switched on at the power isolation switch. 1. Select the Printhead menu on the - HP 5500dn | HP Designjet 5500 series printers - Quick Reference Pocket Guide - Page 76
pocket.book Page 74 Friday, June 28, 2002 4:31 PM 74 - maintain the ink system 5. Lift the flap above the carriage assembly. printhead removal 6. Pull up and release the latch on top of the carriage assembly. - HP 5500dn | HP Designjet 5500 series printers - Quick Reference Pocket Guide - Page 77
pocket.book Page 75 Friday, June 28, 2002 4:31 PM 75 - maintain the ink system 7. Lift up the cover. This will now give you access to the printheads. printhead removal 8. To remove a printhead, lift up the blue handle. MAINTAIN THE INK SYSTEM - HP 5500dn | HP Designjet 5500 series printers - Quick Reference Pocket Guide - Page 78
pocket.book Page 76 Friday, June 28, 2002 4:31 PM 76 - maintain the ink system 9. Place your index finger through the loop of the blue handle. printhead removal 10. Gently pull the blue handle upward until the printhead is released from the carriage assembly. 11. The front panel displays: - HP 5500dn | HP Designjet 5500 series printers - Quick Reference Pocket Guide - Page 79
assembly position. Blue protective cap The printhead is designed to prevent you from accidentally inserting it into the wrong position. Check that the colored label on the printhead matches the colored label of the carriage assembly position into which the printhead is to be inserted. MAINTAIN THE - HP 5500dn | HP Designjet 5500 series printers - Quick Reference Pocket Guide - Page 80
the ink system 3. Push down as indicated by the arrow shown below. printhead installation 4. When installing the new printhead there may printheads have been inserted correctly and accepted by the printer, will the printer "beep". NOTE: If the printer does not "beep" when you insert the printhead - HP 5500dn | HP Designjet 5500 series printers - Quick Reference Pocket Guide - Page 81
the window. The front panel displays: 8. Now replace the printhead cleaners for any printheads that have been changed. See the next page for details. CAUTION Leaving the old printhead cleaner in the printer will shorten the new printhead's life and possibly damage the printer. MAINTAIN THE INK - HP 5500dn | HP Designjet 5500 series printers - Quick Reference Pocket Guide - Page 82
out. I Always handle and store the replaced printhead cleaner upright to avoid spilling any ink. WARNING Make sure the printer wheels are locked (the brake lever is pressed down) to prevent the printer from moving. 1. After you have replaced a printhead, the front panel will prompt you to replace - HP 5500dn | HP Designjet 5500 series printers - Quick Reference Pocket Guide - Page 83
pocket.book Page 81 Friday, June 28, 2002 4:31 PM 81 - maintain the ink system 3. Open the service station door to access the printhead cleaners. printhead cleaner removal 5. Each printhead cleaner has a handle on the front. To remove, press inward and upward as indicated by the arrow shown here, - HP 5500dn | HP Designjet 5500 series printers - Quick Reference Pocket Guide - Page 84
the ink system 6. Lift the printhead cleaner up to remove it from the slots and slide the printhead cleaner out horizontally as shown below. CAUTION When replacing a printhead, always replace the corresponding printhead cleaner. Leaving the old printhead cleaner in the printer will seriously - HP 5500dn | HP Designjet 5500 series printers - Quick Reference Pocket Guide - Page 85
PM 83 - maintain the ink system printhead cleaner installation The plastic bag in which the new printhead cleaner comes can be used to dispose of the old printhead and printhead cleaner. 1. Insert each printhead cleaner into the correct color slot location, in the service station, in the direction - HP 5500dn | HP Designjet 5500 series printers - Quick Reference Pocket Guide - Page 86
system 3. When you have inserted the printhead cleaner(s) into the printer, close the door. NOTE: The printer needs all the ink cartridges, printheads, and printhead cleaners to be installed before it can continue. 4. If no printing material is loaded, the front panel will instruct you to load some - HP 5500dn | HP Designjet 5500 series printers - Quick Reference Pocket Guide - Page 87
or D-size paper size. When the front panel displays Ready, you are ready to print. NOTE: Make sure the printer window and the right-hand door are closed after you replace the supplies. The printer will not print while these are open. after replacing a printhead and printhead cleaner MAINTAIN THE - HP 5500dn | HP Designjet 5500 series printers - Quick Reference Pocket Guide - Page 88
pocket.book Page 86 Friday, June 28, 2002 4:31 PM 86 - maintain the ink system after replacing a printhead and printhead cleaner - HP 5500dn | HP Designjet 5500 series printers - Quick Reference Pocket Guide - Page 89
pocket.book Page 87 Friday, June 28, 2002 4:31 PM change the ink system 4 ink system removal, 88 ink system installation, 104 turning on after the ink system has been replaced, 111 troubleshooting, 119 using the printheads and ink tubes containers, 123 CHANGE THE INK SYSTEM - HP 5500dn | HP Designjet 5500 series printers - Quick Reference Pocket Guide - Page 90
you must replace the whole ink system from one type to the other (ink tubes, printheads, printhead cleaners, and ink cartridges). Make sure all the components of the ink system you are going to install have the same identification symbol. WARNING Make sure the printer wheels are locked (the brake - HP 5500dn | HP Designjet 5500 series printers - Quick Reference Pocket Guide - Page 91
Page 89 Friday, June 28, 2002 4:31 PM 89 - change the ink system removing the ink supplies Use the following procedure to remove the ink supplies from your printer. 1. Press the TOP key on the front panel to go to the main menu. 2. Select the Printer Setup menu on the front panel by using the ↑ and - HP 5500dn | HP Designjet 5500 series printers - Quick Reference Pocket Guide - Page 92
pocket.book Page 90 Friday, June 28, 2002 4:31 PM 90 - change the ink system 7. Lift the window and locate the carriage assembly. Window Carriage ink system removal 8. Lift the flap above the carriage assembly. - HP 5500dn | HP Designjet 5500 series printers - Quick Reference Pocket Guide - Page 93
pocket.book Page 91 Friday, June 28, 2002 4:31 PM 91 - change the ink system 9. Pull up and release the latch on top of the carriage assembly. ink system removal 10. Lift up the cover. This will give you access to the printheads. CHANGE THE INK SYSTEM - HP 5500dn | HP Designjet 5500 series printers - Quick Reference Pocket Guide - Page 94
pocket.book Page 92 Friday, June 28, 2002 4:31 PM 92 - change the ink system 11. To remove a printhead, lift up the blue handle. ink system removal 12. Place your index finger through the loop of the blue handle. - HP 5500dn | HP Designjet 5500 series printers - Quick Reference Pocket Guide - Page 95
Page 93 Friday, June 28, 2002 4:31 PM 93 - change the ink system 13. Gently pull the blue handle upward until the printhead is released from the carriage assembly. ink system removal 14. When you remove the light cyan printhead the display changes from REMOVE to OK. 15. Repeat steps 10 through - HP 5500dn | HP Designjet 5500 series printers - Quick Reference Pocket Guide - Page 96
- change the ink system 17. Close the cover on the carriage. 18. Close the flap above the carriage assembly. 20. The front panel displays: ink system removal 21. The printhead cleaners are located in the slots behind the right-hand door, at the front of the printer. 19. Close the window. Right - HP 5500dn | HP Designjet 5500 series printers - Quick Reference Pocket Guide - Page 97
pocket.book Page 95 Friday, June 28, 2002 4:31 PM 95 - change the ink system 22. Open the right-hand door to access the printhead cleaners. ink system removal 24. Each printhead cleaner has a handle on the front. To remove, press inward and upward as indicated by the arrow shown below, until the - HP 5500dn | HP Designjet 5500 series printers - Quick Reference Pocket Guide - Page 98
do this until you have installed the supplies that are already in the container into the printer. 26. When all the printhead cleaners have been removed, close the right-hand door. 28. Remove the ink cartridges by pushing the dimpled recess in the ink cartridge inward and upward, as indicated by the - HP 5500dn | HP Designjet 5500 series printers - Quick Reference Pocket Guide - Page 99
4:31 PM 97 - change the ink system 29. This releases the ink cartridge; you can then pull it out horizontally. ink system removal 30. Ensure that you remove all of the ink cartridges. CAUTION Wait. At this point in the procedure the printer prepares for an ink system change. 31. Wait until the - HP 5500dn | HP Designjet 5500 series printers - Quick Reference Pocket Guide - Page 100
tubes Use the following procedure to remove the ink tubes from your printer. 1. Switch the printer off using the switch at the back of the printer. But leave the power cable plugged in. ink system removal NOTE: Do not use the support bar to hold the window open because it will make the removal of - HP 5500dn | HP Designjet 5500 series printers - Quick Reference Pocket Guide - Page 101
pocket.book Page 99 Friday, June 28, 2002 4:31 PM 99 - change the ink system 3. Push in the two retaining clips either side of the printhead tube connector. ink system removal 4. Pull the printhead tube connector towards you. CHANGE THE INK SYSTEM - HP 5500dn | HP Designjet 5500 series printers - Quick Reference Pocket Guide - Page 102
, June 28, 2002 4:31 PM 100 - change the ink system ink system removal 5. Push down on the gray button and slide it to the left to release the clip securing the tubes to the carriage, as shown below in the top view of the printer. 6. Pull the printhead tube connector between the two tube guides. - HP 5500dn | HP Designjet 5500 series printers - Quick Reference Pocket Guide - Page 103
pocket.book Page 101 Friday, June 28, 2002 4:31 PM 101 - change the ink system 7. Release the retaining clip by pulling it away from the holding brackets. ink system removal 8. Open the door at the back of the left-hand cover. NOTE: Working from the rear of the printer. CHANGE THE INK SYSTEM - HP 5500dn | HP Designjet 5500 series printers - Quick Reference Pocket Guide - Page 104
pocket.book Page 102 Friday, June 28, 2002 4:31 PM 102 - change the ink system ink system removal 9. Remove the air tube from the rear of the ink cartridge tube connector by pushing down on the button and pulling the tube away to the side. CAUTION Do not attempt to disconnect any of the - HP 5500dn | HP Designjet 5500 series printers - Quick Reference Pocket Guide - Page 105
. This will release the complete assembly. ink system removal 12. Remove the ink cartridge tube connector from the rear of the left hand side. 13. The complete assembly can now be removed from the printer. NOTE: Carefully place the removed tubes in the open window until you can store them in the - HP 5500dn | HP Designjet 5500 series printers - Quick Reference Pocket Guide - Page 106
. I Install the tubes first at the back of the printer then work your way to the carriage. I If you are installing tubes that have already been used, they must be the same ink type as the printheads, printhead cleaners, and ink cartridges that you are also installing. All the components must have - HP 5500dn | HP Designjet 5500 series printers - Quick Reference Pocket Guide - Page 107
4:31 PM 105 - change the ink system 2. Install the ink cartridge tube connector into the rear of the left-hand side. CAUTION Make sure it is correctly seated on its guides. ink system installation 3. Rotate the three latches at the rear of the ink cartridge tube connector. This will lock the - HP 5500dn | HP Designjet 5500 series printers - Quick Reference Pocket Guide - Page 108
106 Friday, June 28, 2002 4:31 PM 106 - change the ink system 4. Connect the air tube to the rear of the ink cartridge tube connector by pushing down on the latch and inserting the tube. ink system installation 5. Connect the electrical connector into the rear of the ink cartridge tube connector. - HP 5500dn | HP Designjet 5500 series printers - Quick Reference Pocket Guide - Page 109
.book Page 107 Friday, June 28, 2002 4:31 PM 107 - change the ink system 6. Install the ink system tubes between the two tube guides. CAUTION Do not install the tubes twisted or you could damage your printer. ink system installation 7. Install the tubes retaining clip by pushing it onto the - HP 5500dn | HP Designjet 5500 series printers - Quick Reference Pocket Guide - Page 110
book Page 108 Friday, June 28, 2002 4:31 PM 108 - change the ink system 8. Carefully adjust the routing of the ink tubes to ensure they are correctly positioned in the tube guide. ink system installation 9. Route the tubes over the top of the printer. Ink tube guides Ink tubes correctly routed in - HP 5500dn | HP Designjet 5500 series printers - Quick Reference Pocket Guide - Page 111
10. Close the door at the back of the left-hand cover. ink system installation CAUTION It is very important to the correct operation of the printer that the tubes are not twisted and are correctly positioned in the tube guides. The tubes must be installed so that they do not interfere with - HP 5500dn | HP Designjet 5500 series printers - Quick Reference Pocket Guide - Page 112
assembly to the right until it is locked to the the carriage ink system installation 12. Install the printhead tube connector onto the carriage assembly. 13. Carefully place the previously removed ink tubes in the ink tubes container (see using the printheads and ink tubes containers on page 123). - HP 5500dn | HP Designjet 5500 series printers - Quick Reference Pocket Guide - Page 113
has been replaced ink system installation The printheads and printhead cleaners that you are going to install are all in the printhead storage container (see troubleshooting on page 119). 1. Ensure that the window is closed. 2. Switch the power isolator switch at the back of the printer to the on - HP 5500dn | HP Designjet 5500 series printers - Quick Reference Pocket Guide - Page 114
displays: 6. Select the "Replace printhead" option by using the ↑ and ↓ keys, and then and press the ENTER key. 7. The printer moves the carriage into the correct position. When this is finished the front panel displays: ink system installation 8. Lift the window and locate the carriage assembly - HP 5500dn | HP Designjet 5500 series printers - Quick Reference Pocket Guide - Page 115
pocket.book Page 113 Friday, June 28, 2002 4:31 PM 113 - change the ink system 9. Lift the flat above the carriage assembly. ink system installation 10. Pull up and release the latch on top of the carriage assembly. CHANGE THE INK SYSTEM - HP 5500dn | HP Designjet 5500 series printers - Quick Reference Pocket Guide - Page 116
into the correct carriage assembly position. ink system installation 12. Push down as indicated by the arrow shown below. 13. Insert all the printheads and close the cover. Only when all the printheads have been inserted correctly and accepted by the printer, will the printer "beep". NOTE: If the - HP 5500dn | HP Designjet 5500 series printers - Quick Reference Pocket Guide - Page 117
, 2002 4:31 PM 115 - change the ink system 14. Close the flap over the carriage assembly. 15. When you have closed the cover over the printheads and closed the window, the front panel displays: 16. Open the service station door to access the printhead cleaners. ink system installation CHANGE THE - HP 5500dn | HP Designjet 5500 series printers - Quick Reference Pocket Guide - Page 118
has been opened the front panel displays: 18. Insert each printhead cleaner into the correct color slot location, in the service station, in the direction indicated by the arrow shown below. ink system installation 19. When the printhead cleaner has been pushed all the way in, press inwards and - HP 5500dn | HP Designjet 5500 series printers - Quick Reference Pocket Guide - Page 119
system 20. When you have inserted the printhead cleaner(s) into the printer, close the door. ink system installation 22. Pick up the ink cartridge and find the label identifying the ink color. Hold the ink cartridge so that you can see the identifying colored label at the top of the side facing you - HP 5500dn | HP Designjet 5500 series printers - Quick Reference Pocket Guide - Page 120
the arrow shown below, until the ink cartridge clicks into place. ink system installation 29. If paper is not loaded, the front panel will instruct you to load the paper. 30. Store all the previously removed printheads and printhead cleaners in the printhead storage container. 26. Repeat steps 22 - HP 5500dn | HP Designjet 5500 series printers - Quick Reference Pocket Guide - Page 121
. Problem The front panel displays the following message after completing its initialization process: WARNING Switch power off Check printhead path Reason and solution You have installed the ink tubes twisted, not attached, or not correctly positioned in the tube guide. a Switch off the printer - HP 5500dn | HP Designjet 5500 series printers - Quick Reference Pocket Guide - Page 122
system troubleshooting Problem The front panel displays the following message after completing its initialization process: WARNING Incorrect type of Tubes System switch power off The front panel displays the following message when you try to print: 0a0000 00000002 Contact HP Representative Reason - HP 5500dn | HP Designjet 5500 series printers - Quick Reference Pocket Guide - Page 123
When you try to insert printheads you keep getting the following message for one or more of the printheads on the front panel: XX02 Reseat Reason and solution You have not locked the three latches at the rear of the ink cartridge tube connector. a Switch off the printer. b Open the door at the - HP 5500dn | HP Designjet 5500 series printers - Quick Reference Pocket Guide - Page 124
the ink system troubleshooting Problem After you have inserted printhead cleaners the front panel displays the following message: XX05 Replace You cannot insert a printhead into the carriage assembly labelled with the same color. You cannot insert an ink cartridge into the ink cartridge slot - HP 5500dn | HP Designjet 5500 series printers - Quick Reference Pocket Guide - Page 125
store the ink tubes and ink supplies you have removed from the printer in their respective storage containers. The ink cartridges do not have a specific storage container so they should be stored in accordance with instructions given on their packaging. ink supplies The printhead storage container - HP 5500dn | HP Designjet 5500 series printers - Quick Reference Pocket Guide - Page 126
4:31 PM 124 - change the ink system using the printheads and ink tubes containers ink tubes The ink tubes container is used to store the ink tubes you have removed from the printer. Whenever you remove the ink tubes from the printer you must store them in the ink tubes container so that they do - HP 5500dn | HP Designjet 5500 series printers - Quick Reference Pocket Guide - Page 127
pocket.book Page 125 Friday, June 28, 2002 4:31 PM 125 - change the ink system 60 inch/1.5 m using the printheads and ink tubes containers CHANGE THE INK SYSTEM - HP 5500dn | HP Designjet 5500 series printers - Quick Reference Pocket Guide - Page 128
pocket.book Page 126 Friday, June 28, 2002 4:31 PM 126 - change the ink system using the printheads and ink tubes containers - HP 5500dn | HP Designjet 5500 series printers - Quick Reference Pocket Guide - Page 129
pocket.book Page 127 Friday, June 28, 2002 4:31 PM manage the prints 5 webaccess, 128 pages printing or drying, 131 managing the queue, 132 nesting pages, 136 MANAGE THE PRINTS - HP 5500dn | HP Designjet 5500 series printers - Quick Reference Pocket Guide - Page 130
jobs I Send files directly to the printer I Store jobs permanently in the printer for repeated printing I Download firmware upgrades and media profiles I Request e-mail alerts whenever an error condition occurs I Access HP Instant Support to troubleshoot any problem you may have For more details - HP 5500dn | HP Designjet 5500 series printers - Quick Reference Pocket Guide - Page 131
. 4. Set the job options. 5. Press the Print button. save a file in the permanent storage 1. Open your browser. 2. Go to the Submit job page. 3. Browse your computer and select the file to print. 4. In the job options, check the Store job in the printer option. 5. Set the the rest of the job options - HP 5500dn | HP Designjet 5500 series printers - Quick Reference Pocket Guide - Page 132
you all the information regarding the jobs printed by the printer. check the status of the printer's supplies 1. Open your browser. 2. Go to the Supplies page. The Supplies page shows you all the information regarding loaded printing material and ink levels. webaccess periodically track the usage - HP 5500dn | HP Designjet 5500 series printers - Quick Reference Pocket Guide - Page 133
or drying RTL and HP-GL/2 jobs are single-page jobs, but a single PostScript job may have more than one page. Where we talk about the print paper, the term page means a single output page. cancelling a page 1. Press Cancel on the front panel. pages printing or drying The printer advances the paper - HP 5500dn | HP Designjet 5500 series printers - Quick Reference Pocket Guide - Page 134
prints managing the queue The information included here only applies if you are using HP drivers. printer may stop halfway through a print to process data. This setting is not recommended for complex images with dense color. optimized (default) This setting calculates the best time to begin printing - HP 5500dn | HP Designjet 5500 series printers - Quick Reference Pocket Guide - Page 135
138. I You may have "wait for preview" selected in your printer driver. This is a function you can use to check that the image is the one you want. You can check the preview in the WebAccess tool, then select "Start print". managing the queue identifying a job in the queue In Queueing & Nesting - HP 5500dn | HP Designjet 5500 series printers - Quick Reference Pocket Guide - Page 136
prioritizing a job in the queue To make any job in the queue the next one to be printed, select it and choose Move to top. If nesting is turned on, (see queue as more files are sent. However, if you have sent a file in error, and want to avoid any chance of it being reprinted, you can simply delete - HP 5500dn | HP Designjet 5500 series printers - Quick Reference Pocket Guide - Page 137
a page not yet printed means you will get the one original and one copy. The maximum is 99. The setting you specify in this option overrides any value set by your software. Note that, if 'Rotate' was On when you sent the file, every copy will be rotated. See the 'Using Your Printer CD' for details - HP 5500dn | HP Designjet 5500 series printers - Quick Reference Pocket Guide - Page 138
pages side-by-side on the paper (rather than one after the other), to avoid wasting paper. Paper saved Direction of paper flow Nesting off nesting pages automatic rotation only with hp/gl-2 files rotate an image with nesting on? The printer may automatically rotate a page in nesting. It may do - HP 5500dn | HP Designjet 5500 series printers - Quick Reference Pocket Guide - Page 139
or all are grayscale. Grayscale may include a color page rendered in gray scales; see the 'Using Your Printer CD' for more details. nesting pages I All pages must have the same print quality setting (Max Quality, Productivity, Max Speed). I For HP-GL/2 only, margin sizes must be the same for all - HP 5500dn | HP Designjet 5500 series printers - Quick Reference Pocket Guide - Page 140
period is the nest wait time; the factory default nest wait time is two minutes. This means that the printer waits for up to two minutes after the last file is received before printing the final nest. You can change this waiting time using the front panel: Queuing & Nesting > Nest > In Order - HP 5500dn | HP Designjet 5500 series printers - Quick Reference Pocket Guide - Page 141
pocket.book Page 1 Friday, June 28, 2002 4:31 PM i pocket guide ! hp designjet 5500 series printers the problem is... printed in - HP 5500dn | HP Designjet 5500 series printers - Quick Reference Pocket Guide - Page 142
, June 28, 2002 4:31 PM printed on recycled paper imprimé sur du papier recyclé © 2002 Hewlett-Packard Company Hewlett-Packard Company, Inkjet Commercial Division, Avenida Graells, 501, 08190 Sant Cugat del Valles, Barcelona Spain See the other side of this Pocket Guide for information about other - HP 5500dn | HP Designjet 5500 series printers - Quick Reference Pocket Guide - Page 143
pocket.book Page 1 Friday, June 28, 2002 4:31 PM front-panel messages 6 status code interpretation, 2 front-panel messages, 4 printhead status messages, 19 ink cartridge error messages, 23 printhead cleaner error messages, 26 system error messages, 27 FRONT-PANEL MESSAGES - HP 5500dn | HP Designjet 5500 series printers - Quick Reference Pocket Guide - Page 144
the example shown here, one or more of the printheads have a replace message displayed. To find out which printhead has the error, select the printhead icon. You will see the status of all the printheads at once. status code interpretation Status code The consumable Ink Color The action message - HP 5500dn | HP Designjet 5500 series printers - Quick Reference Pocket Guide - Page 145
and contact your support representative. To check whether it is in warranty refer to printhead statistics on page 71 in the reverse of this guide. For detailed warranty information, refer to the Legal Information document that came with your printer. status codes status code interpretation The - HP 5500dn | HP Designjet 5500 series printers - Quick Reference Pocket Guide - Page 146
error code that comes with this message, and which calibration failed, and contact your support representative. If the printer was performing a calibration to correct an internal error the correct functioning of the printer may be affected. Press Enter to continue. You can continue to print - HP 5500dn | HP Designjet 5500 series printers - Quick Reference Pocket Guide - Page 147
may be because the firmware/software you are attempting to download is older than the version you already have, or the version is not compatible with your printer. You are about to delete the profile that you have in the printer for a specific printing material. The internal sensor on the carriage - HP 5500dn | HP Designjet 5500 series printers - Quick Reference Pocket Guide - Page 148
Full ink cartridges needed Have ink tube replaced or risk printer damage Contact HP Description The ink system startup must have full cartridges to enable the initialization of the complete ink system. The internal ink system tubes need replacing urgently. Procedure Remove the ink cartridges that - HP 5500dn | HP Designjet 5500 series printers - Quick Reference Pocket Guide - Page 149
is running low or empty. Printing with an empty ink supply may seriously damage your printhead, ink tubes, and printer. Any damage resulting from use of this supply or non-HewlettPackard ink is not covered under your printer warranty. Select Yes to replace your cartridge with a genuine HP No. 81/83 - HP 5500dn | HP Designjet 5500 series printers - Quick Reference Pocket Guide - Page 150
Status Ink tube maintenance advised Ink tube maintenance required now Insert Insert cleaner Insert ink cartridges Insert printhead front-panel messages Description The internal ink system tubes need replacing. The need to change the ink tubes may affect the performance of the printer. There - HP 5500dn | HP Designjet 5500 series printers - Quick Reference Pocket Guide - Page 151
You have selected Replace Printhead and the front panel is guiding you through the procedure. The printer is prompting you to lift its window so that you can install 'normal' printheads. You must remove the setup printheads only after you have initialized the printer. The printing material is mis - HP 5500dn | HP Designjet 5500 series printers - Quick Reference Pocket Guide - Page 152
loading roll guidelines on page 30 in the reverse of this guide. The printing material you are attempting to load is too small for the printer to print the file. This means that the printing material has not been fed into the printer straight. In the case of an internal calibration, remember to - HP 5500dn | HP Designjet 5500 series printers - Quick Reference Pocket Guide - Page 153
and switch the printer off using the switch at the back. Switch on again. If the problem persists, call your support representative. OK The ink system is working correctly Preparing printheads Your printer is servicing the printheads to maintain optimum print quality. Preventative maintenance - HP 5500dn | HP Designjet 5500 series printers - Quick Reference Pocket Guide - Page 154
ensure the temperature is above 15 °C and turn the printer off and on again. Printing will continue after expanding the data, but it will be slower than usual. If you have problems printing refer to the "Using Your Printer CD". The printer will compress the file while it continues to receive the - HP 5500dn | HP Designjet 5500 series printers - Quick Reference Pocket Guide - Page 155
messages on page 19. The printer is designed so that when you replace a printhead you must also replace the printhead cleaner. See printhead cleaner removal on page 80 in the reverse of this guide for details. This is an ink cartridge removal instruction. See ink cartridge removal on page 67 in - HP 5500dn | HP Designjet 5500 series printers - Quick Reference Pocket Guide - Page 156
' printheads. Reload the printing material making sure that the edges are parallel and that it is straight when you feed it in. Align the material coming out from the printer with the material going into the printer. See loading a roll into the printer on page 34 in the reverse of this guide. To - HP 5500dn | HP Designjet 5500 series printers - Quick Reference Pocket Guide - Page 157
jam in the printer. Switch power off Check printhead path There is a printing material jam in the printer. Switch power off Restart printer startup with all ink cartridges System error XXXXXX Switch off/on If problem persists contact HP support This media type supports Production PQ level - HP 5500dn | HP Designjet 5500 series printers - Quick Reference Pocket Guide - Page 158
process of nesting. The printer's ink cartridges are working correctly. You should remove them only if you are printing a large image unattended and there is insufficient ink remaining to finish the image. Procedure See nesting pages on page 136 in the reverse of this guide for an explanation of - HP 5500dn | HP Designjet 5500 series printers - Quick Reference Pocket Guide - Page 159
... supply ink level? (Error code 8x09) See user manual. front-panel messages Description Procedure If you choose to continue printing with this ink supply you will not have an ink level indicator. You may not know when the ink supply is running low or empty. Printing with an empty ink supply - HP 5500dn | HP Designjet 5500 series printers - Quick Reference Pocket Guide - Page 160
! Tubes System has reached its END OF LIFE. Contact HP Representative. Replace Tubes System. WARNING!!! You are going to reset the WebAccess Passwd. You need to cut this media manually Description The internal ink system inside your printer has reached the end of its life. You have a security - HP 5500dn | HP Designjet 5500 series printers - Quick Reference Pocket Guide - Page 161
Status code XX ranges from 00 - 55 XX02 Reseat XX06 Reseat XX08 Reseat XX10 Reseat XX03 Replace XX04 Replace XX05 Replace Printhead message description Procedure The printhead may only be badly seated. This means there is a bad electrical connection between the printhead and the printer carriage - HP 5500dn | HP Designjet 5500 series printers - Quick Reference Pocket Guide - Page 162
installed an incorrect type of printhead. The printer detects that the printhead does not match the rest of the ink consumable items. Remove the printhead(s). Remove the printhead(s) and replace with setup printhead(s). Ensure that you have HP No. 81 or 83 printheads installed. Ensure that all the - HP 5500dn | HP Designjet 5500 series printers - Quick Reference Pocket Guide - Page 163
messages Status code XX ranges from 00 - 55 XX13 Replace XX14 Replace XX15 Replace XX16 Replace XX17 Replace XX18 Replace Printhead message description Procedure The smart chip inside the printhead contains incorrect information. The printer cannot print with this printhead. The printhead has an - HP 5500dn | HP Designjet 5500 series printers - Quick Reference Pocket Guide - Page 164
image quality. However, this is the first symptom of an aging printhead. 1. If the quality of your prints is fine, try a manual recovery and/or re-insertion. After this the printer may detect a recovery and will accept the printhead. 2. If after a recovery the message persists and the quality of - HP 5500dn | HP Designjet 5500 series printers - Quick Reference Pocket Guide - Page 165
an incorrect ink cartridge The printer detects that the ink cartridge does not match the rest of the ink system already installed. 1. Remove the ink cartridge and re-insert. 2. Replace the ink cartridge. 1. Remove the ink cartridge and re-install. 2. Replace the ink cartridge Ensure it is an HP No - HP 5500dn | HP Designjet 5500 series printers - Quick Reference Pocket Guide - Page 166
PM 24 - front-panel messages Status code XX ranges from 60 - 85 XX08 Unknown ink cartridge error messages Ink cartridge message description Procedure Use genuine HP components for excellent image quality from your printer. If you choose to continue printing with this ink supply you may not have - HP 5500dn | HP Designjet 5500 series printers - Quick Reference Pocket Guide - Page 167
Procedure ink cartridge error messages If you choose to continue printing with this ink supply you will not have an ink level indicator. You may not know when the ink supply is running low or empty. Printing with an empty ink supply may seriously damage your printhead, ink tubes, and printer. See - HP 5500dn | HP Designjet 5500 series printers - Quick Reference Pocket Guide - Page 168
cleaner error messages Status code XX ranges from A0 - B5 XX03 Replace XX05 Replace XX06 Replace Printhead cleaner message description Procedure The printhead cleaner installed is not recognized by the printer. The printhead detects that the printhead cleaner does not match the rest of the ink - HP 5500dn | HP Designjet 5500 series printers - Quick Reference Pocket Guide - Page 169
have the message and the system error code ready with you to quote. system error messages non-continuable Turn the printer off and then on again, using the switch at the rear of the printer; the error may disappear. If the problem persists, contact your support representative and arrange an on-site - HP 5500dn | HP Designjet 5500 series printers - Quick Reference Pocket Guide - Page 170
pocket.book Page 28 Friday, June 28, 2002 4:31 PM 28 - front-panel messages system error messages - HP 5500dn | HP Designjet 5500 series printers - Quick Reference Pocket Guide - Page 171
4:31 PM image quality 7 correcting the configuration, 30 using the image quality print, 31 color accuracy, 37 printhead recovery procedure, 40 accuracy calibration, 41 calibrating the color output, 42 aligning the printheads, 43 ink marks on the printing material, 44 other sources of information - HP 5500dn | HP Designjet 5500 series printers - Quick Reference Pocket Guide - Page 172
mode for maximum print quality. 5. For Non-HP drivers, set media settings to match the printing material loaded in the printer. See the documentation that came with your software for information. correcting the configuration 6. If your image quality problem is related to color accuracy, go to color - HP 5500dn | HP Designjet 5500 series printers - Quick Reference Pocket Guide - Page 173
page 73 in the reverse of this guide and replace the printhead. using the image quality print recovering If the printhead needs recovering, go to printhead recovery procedure on page 40. how to print the image quality print Before you print the Image Quality Print you must ensure that you have A2 - HP 5500dn | HP Designjet 5500 series printers - Quick Reference Pocket Guide - Page 174
in the same order as they appear on the printer as if you are facing it: light cyan first and black last. Each pair of colors is printed by only one printhead. So it's easy to find the root cause of the image quality problem. This array of colored stripes is designed to check for certain defects in - HP 5500dn | HP Designjet 5500 series printers - Quick Reference Pocket Guide - Page 175
printhead of the same color. The colored stripes are in the same order as they appear on the printer as if you are facing it: light cyan first and black last. using the image quality print For example, the image quality print shown below was printed with a printer that has a cyan printhead problem - HP 5500dn | HP Designjet 5500 series printers - Quick Reference Pocket Guide - Page 176
can be guaranteed only if you use supported HP materials. In high quality modes, due to the amount of ink used, media advance problems may not appear as lines of banding, they may appear grainy instead. The banding or graininess will appear in all the colors. corrective action 1. If the image is - HP 5500dn | HP Designjet 5500 series printers - Quick Reference Pocket Guide - Page 177
quality plot 2: color to color alignment If the printer has color-to-color alignment problems then the Image Quality Print in plot 2 (shown below) has misaligned colors. using the image quality print plot 3: bidirectional alignment If a printer has bidirectional alignment problems, lines are fuzzy - HP 5500dn | HP Designjet 5500 series printers - Quick Reference Pocket Guide - Page 178
problems, listed below are some things to check: I The print mode in the printer may be incorrect. See print mode selection on page 8 in the reverse of this guide. I Check the driver you are using to print with, if it is a non-HP driver, go to http://www.designjet.hp.com/ and download the correct HP - HP 5500dn | HP Designjet 5500 series printers - Quick Reference Pocket Guide - Page 179
when troubleshooting a color accuracy problem: configuration Check the color emulation selected in the driver (or in the front panel if no driver is being used). Make sure the color information is adjusted for the current color setup. See color accuracy configuration on page 38. color consistency - HP 5500dn | HP Designjet 5500 series printers - Quick Reference Pocket Guide - Page 180
printer and software for best color accuracy. Location of Setting Printer front-panel menu Non-HP drivers (external software or hardware RIPs) Setting Description Selection Select media type Set to match the printing material loaded in the printer. Ink emulation mode: RGB or CMYK (PS printers - HP 5500dn | HP Designjet 5500 series printers - Quick Reference Pocket Guide - Page 181
printer. I The online documentation for the drivers shipped with your printer. non-PostScript Remember that your printer may be configured to use one of its internal pen palettes instead of your software's palette (which is the default). See the Using Your Printer CD. IMAGE QUALITY color accuracy - HP 5500dn | HP Designjet 5500 series printers - Quick Reference Pocket Guide - Page 182
pocket.book Page 40 Friday, June 28, 2002 4:31 PM 40 - image quality printhead recovery procedure Recovering the printhead(s) means that the printer automatically cleans and tests the printhead(s). To recover the printhead perform the following procedure: 1. Using the ↑ or ↓ keys select the - HP 5500dn | HP Designjet 5500 series printers - Quick Reference Pocket Guide - Page 183
. The front panel will confirm that the printer re-calibrated successfully. If there is an error with the calibration, the front panel will display an error message and an error code. Make a note of the error code and contact your support representative. to restore the factory's calibration If - HP 5500dn | HP Designjet 5500 series printers - Quick Reference Pocket Guide - Page 184
image quality calibrating the color output Color calibration improves color consistency between prints, and from one printer to another. The printer calibrates the color by printing a 'calibration strip' and then scanning the strip with a built-in optical sensor. The printer will then calculate the - HP 5500dn | HP Designjet 5500 series printers - Quick Reference Pocket Guide - Page 185
an alignment error. Refer to using the image quality print on page 31. The printer will automatically perform an alignment when printheads are replaced, unless you have turned off this behavior from the front panel: Internal RIP Setting > Align Calibration > Off. calibrating the color output IMAGE - HP 5500dn | HP Designjet 5500 series printers - Quick Reference Pocket Guide - Page 186
tips, troubleshooting, printing compatibility and new product information, visit our Web site at: http://www.designjet.hp.com/ warped lines The printing material itself may be warped. This can happen if it has been used or stored in an extreme environment. For all environmental specifications, see - HP 5500dn | HP Designjet 5500 series printers - Quick Reference Pocket Guide - Page 187
extended margins (see the Using Your Printer CD), or try to increase the print margins by relocating the image in the page from your software application. I If you are using 'Media Saving Options' from the advanced section of the HP- GL/2 driver, try disabling one or both of the options 'auto rotate - HP 5500dn | HP Designjet 5500 series printers - Quick Reference Pocket Guide - Page 188
at the edges of the printing material can be caused by accumulated ink deposits on the platen transferring to the printing material. The ink deposits can be seen mostly in the areas where the edge of your material rests on the platen. The printer routinely removes these ink deposits every time you - HP 5500dn | HP Designjet 5500 series printers - Quick Reference Pocket Guide - Page 189
from the platen. However, do not wipe the platen wheels with this cloth. 3. With the same dry brush, remove the ink deposits from the platen surface. CAUTION Do not use commercial cleaners or abrasive cleaners. Do not wet the platen directly because you will leave too - HP 5500dn | HP Designjet 5500 series printers - Quick Reference Pocket Guide - Page 190
48 Friday, June 28, 2002 4:31 PM 48 - image quality 5. Clean the cutter ramp as shown below with the damp cloth. ink marks on the printing material 6. Clean the exposed part of the wheels as shown below with a slightly-damp absorbent lint-free cloth. It is important that the cloth is not too - HP 5500dn | HP Designjet 5500 series printers - Quick Reference Pocket Guide - Page 191
panel. 9. Select Utilities > Clean Platen > Clean Now > Manual. 10. Open the printer window. 11. Use the ↓ & ↑ keys to move the wheels through a fifth of a turn. WARNING Do not touch the rotating wheels directly with your hands. 12. Clean the exposed part of the wheels. 13. Repeat steps 11 and 12 - HP 5500dn | HP Designjet 5500 series printers - Quick Reference Pocket Guide - Page 192
on page 30 in the reverse of this guide. prints do not stack properly in the bin I The printer may be too close to the end of the roll. The natural curl near the end of the roll can cause stacking problems. Load a new roll or remove prints manually as they are completed. I If you are - HP 5500dn | HP Designjet 5500 series printers - Quick Reference Pocket Guide - Page 193
from your software application to the printer. For example, the online and printed documentation included in the following drivers supplied with your printer: - PostScript® drivers for Macintosh® - PostScript® drivers for Microsoft® Windows™ 9x/NT 4.0/2000/XP - HP-GL/2 drivers for Windows 9x/NT - HP 5500dn | HP Designjet 5500 series printers - Quick Reference Pocket Guide - Page 194
pocket.book Page 52 Friday, June 28, 2002 4:31 PM 52 - image quality other sources of information - HP 5500dn | HP Designjet 5500 series printers - Quick Reference Pocket Guide - Page 195
pocket.book Page 53 Friday, June 28, 2002 4:31 PM the ink supply 8 ink system error/status messages, 54 recovery procedure, 56 solving ink supply problems, 57 THE INK SUPPLY - HP 5500dn | HP Designjet 5500 series printers - Quick Reference Pocket Guide - Page 196
to keep you informed of the status of your ink supplies. The example below shows a printhead with an error. To find out exactly which printhead has the error, select the printhead icon as shown below. Error code The consumable Ink Color The action message The front-panel display will change - HP 5500dn | HP Designjet 5500 series printers - Quick Reference Pocket Guide - Page 197
with a new one. Since the only action that you can do is to remove and replace with a new part or the correct part, the error code is given mainly for use by a support technician. For the removal procedure, see printhead removal on page 73 in the reverse of this guide. (error code) Reseat The Reseat - HP 5500dn | HP Designjet 5500 series printers - Quick Reference Pocket Guide - Page 198
, June 28, 2002 4:31 PM 56 - ink supply recovery procedure Recovering the printhead(s) means that the printer automatically cleans and tests the printhead(s). To recover the printhead perform the following procedure: 1. Using the ↑ or ↓ keys select the printhead icon in the front panel. 3. Press - HP 5500dn | HP Designjet 5500 series printers - Quick Reference Pocket Guide - Page 199
ink supply problems solving ink supply problems I Replace the printhead with a new one. Most of the problems that you could encounter when working with the HP No. 81 or 83 supplies are solved with guidance from the front panel. A full list of front panel messages is supplied, see status code - HP 5500dn | HP Designjet 5500 series printers - Quick Reference Pocket Guide - Page 200
2002 4:31 PM 58 - ink supply solving ink supply problems problems inserting the printhead cleaner 1. Ensure that you have the correct HP No. 81/83 printhead cleaner. 2. Ensure that the printhead cleaner is the correct color for that slot. 3. Ensure that the printhead cleaner is correctly oriented - HP 5500dn | HP Designjet 5500 series printers - Quick Reference Pocket Guide - Page 201
Page 59 Friday, June 28, 2002 4:31 PM 59 - ink supply NOTE: After waiting a few moments to allow both connectors to dry, replace the printhead into the carriage assembly. Use the procedures in printhead removal on page 73 in the reverse of this guide. NOTE: Do not touch, wipe, or attempt to clean - HP 5500dn | HP Designjet 5500 series printers - Quick Reference Pocket Guide - Page 202
pocket.book Page 60 Friday, June 28, 2002 4:31 PM 60 - ink supply 4. Close the carriage interconnect wiper trapping the sponge in place. solving ink supply problems 6. Insert the carriage interconnect wiper into the printhead slot at the back. Wipe the electrical contacts by inserting the tool - HP 5500dn | HP Designjet 5500 series printers - Quick Reference Pocket Guide - Page 203
Rub the sponge against the contacts with a light force along the entire depth of the flex connector as allowed by the mechanical stop on the tool. solving ink supply problems 8. Take special care to clean all contacts thoroughly, including the ones at the lowest point of the connector. INK SUPPLY - HP 5500dn | HP Designjet 5500 series printers - Quick Reference Pocket Guide - Page 204
62 - ink supply solving ink supply problems 9. Using the same sponge, clean the electrical contacts on the printhead. Do not printhead into the printhead carriage as instructed by the Printhead Installation procedure. NOTE: If the problem still persists, replace the printhead or call your support - HP 5500dn | HP Designjet 5500 series printers - Quick Reference Pocket Guide - Page 205
pocket.book Page 63 Friday, June 28, 2002 4:31 PM 63 - ink supply 12. Remove the soiled sponge from the carriage interconnect wiper. solving ink supply problems 13. Dispose of the soiled sponge in a safe place to prevent the transfer of ink onto hands and clothing. INK SUPPLY - HP 5500dn | HP Designjet 5500 series printers - Quick Reference Pocket Guide - Page 206
pocket.book Page 64 Friday, June 28, 2002 4:31 PM 64 - ink supply solving ink supply problems - HP 5500dn | HP Designjet 5500 series printers - Quick Reference Pocket Guide - Page 207
pocket.book Page 65 Friday, June 28, 2002 4:31 PM printing material jam 9 clearing a printing material jam, 66 PRINTING MATERIAL JAM - HP 5500dn | HP Designjet 5500 series printers - Quick Reference Pocket Guide - Page 208
Internal error code The "Switch Power Off" message is usually shown when there is a printing material jam. The printer must be cleared before the printer can operate again. There are two types of printing material jams: I A jam that prevents the carriage from moving from one side of the printer to - HP 5500dn | HP Designjet 5500 series printers - Quick Reference Pocket Guide - Page 209
Friday, June 28, 2002 4:31 PM 67 - printing material jam check printhead path 1. Switch the printer off at the rear of the printer and open the window. 2. Look in the area where the printer was printing at the time of the jam, this is where the printing material is most likely to be jammed. 3. Lift - HP 5500dn | HP Designjet 5500 series printers - Quick Reference Pocket Guide - Page 210
pocket.book Page 68 Friday, June 28, 2002 4:31 PM 68 - printing material jam clearing a printing material jam
-
 1
1 -
 2
2 -
 3
3 -
 4
4 -
 5
5 -
 6
6 -
 7
7 -
8
-
9
-
10
-
11
-
12
-
13
-
14
-
15
-
16
-
17
-
18
-
19
-
20
-
21
-
22
-
23
-
24
-
25
-
26
-
27
-
28
-
29
-
30
-
31
-
32
-
33
-
34
-
35
-
36
-
37
-
38
-
39
-
40
-
41
-
42
-
43
-
44
-
45
-
46
-
47
-
48
-
49
-
50
-
51
-
52
-
53
-
54
-
55
-
56
-
57
-
58
-
59
-
60
-
61
-
62
-
63
-
64
-
65
-
66
-
67
-
68
-
69
-
70
-
71
-
72
-
73
-
74
-
75
-
76
-
77
-
78
-
79
-
80
-
81
-
82
-
83
-
84
-
85
-
86
-
87
-
88
-
89
-
90
-
91
-
92
-
93
-
94
-
95
-
96
-
97
-
98
-
99
-
100
-
101
-
102
-
103
-
104
-
105
-
106
-
107
-
108
-
109
-
110
-
111
-
112
-
113
-
114
-
115
-
116
-
117
-
118
-
119
-
120
-
121
-
122
-
123
-
124
-
125
-
126
-
127
-
128
-
129
-
130
-
131
-
132
-
133
-
134
-
135
-
136
-
137
-
138
-
139
-
140
-
141
-
142
-
143
-
144
-
145
-
146
-
147
-
148
-
149
-
150
-
151
-
152
-
153
-
154
-
155
-
156
-
157
-
158
-
159
-
160
-
161
-
162
-
163
-
164
-
165
-
166
-
167
-
168
-
169
-
170
-
171
-
172
-
173
-
174
-
175
-
176
-
177
-
178
-
179
-
180
-
181
-
182
-
183
-
184
-
185
-
186
-
187
-
188
-
189
-
190
-
191
-
192
-
193
-
194
-
195
-
196
-
197
-
198
-
199
-
200
-
201
-
202
-
203
-
204
-
205
-
206
-
207
-
208
-
209
-
210
 |
 |
pocket guide
i
how do I...
?
hp
designjet 5500
series printers
pocket.book
Page 1
Friday, June 28, 2002
4:31 PM