HP 5500dn HP Designjet 5500 series printers - Quick Reference Pocket Guide - Page 34
loading a roll onto the spindle
 |
View all HP 5500dn manuals
Add to My Manuals
Save this manual to your list of manuals |
Page 34 highlights
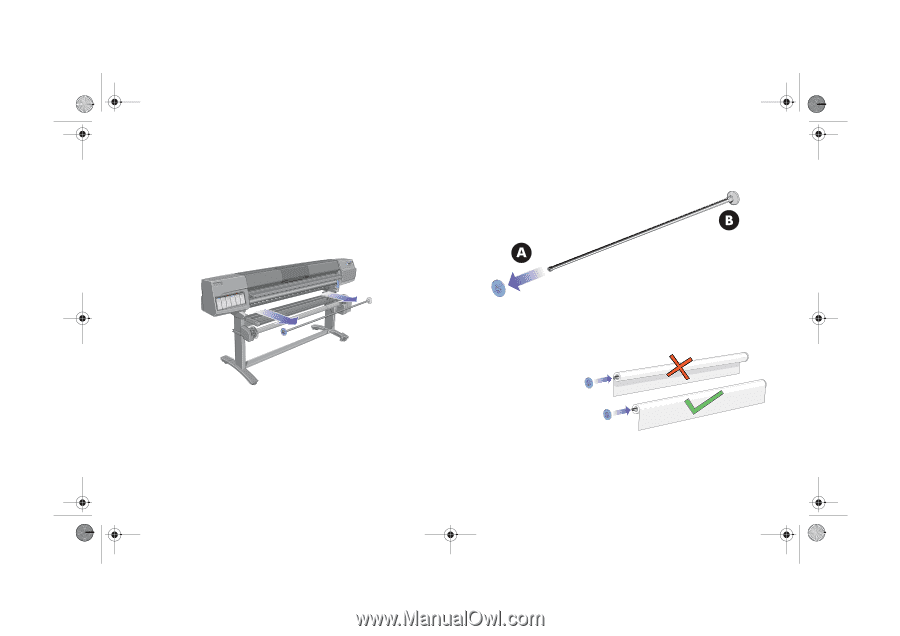
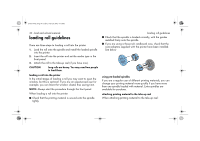
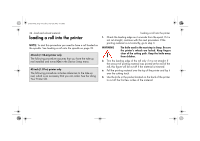
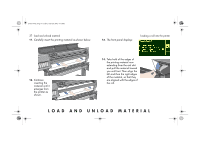
pocket.book Page 32 Friday, June 28, 2002 4:31 PM 32 - load and unload material loading a roll onto the spindle 1. Make sure the printer wheels are locked (the brake lever is pressed down) to prevent the printer from moving. 2. Remove the empty spindle by pulling firmly on each end A and then B as indicated below. loading a roll onto the spindle 3. Remove the removable stop (A) from the left-hand end of the spindle. The spindle has a stop at each end to keep the roll in position. The stop at the left-hand end can be removed to mount a new roll, it slides along the spindle to hold rolls of different widths. 4. The roll may be very long; rest the spindle horizontally on a table and load the roll on the table. Bear in mind that you may need two people to handle it. 5. Slide the new roll onto the spindle. Make sure the printing material is oriented as shown. If it is not, remove the roll, turn it 180 degrees and slide it back on to the spindle.
-
 1
1 -
2
-
3
-
4
-
5
-
6
-
7
-
8
-
9
-
10
-
11
-
12
-
13
-
14
-
15
-
16
-
17
-
18
-
19
-
20
-
21
-
22
-
23
-
24
-
25
-
26
-
27
-
28
-
 29
29 -
 30
30 -
 31
31 -
 32
32 -
 33
33 -
 34
34 -
 35
35 -
 36
36 -
 37
37 -
 38
38 -
 39
39 -
40
-
41
-
42
-
43
-
44
-
45
-
46
-
47
-
48
-
49
-
50
-
51
-
52
-
53
-
54
-
55
-
56
-
57
-
58
-
59
-
60
-
61
-
62
-
63
-
64
-
65
-
66
-
67
-
68
-
69
-
70
-
71
-
72
-
73
-
74
-
75
-
76
-
77
-
78
-
79
-
80
-
81
-
82
-
83
-
84
-
85
-
86
-
87
-
88
-
89
-
90
-
91
-
92
-
93
-
94
-
95
-
96
-
97
-
98
-
99
-
100
-
101
-
102
-
103
-
104
-
105
-
106
-
107
-
108
-
109
-
110
-
111
-
112
-
113
-
114
-
115
-
116
-
117
-
118
-
119
-
120
-
121
-
122
-
123
-
124
-
125
-
126
-
127
-
128
-
129
-
130
-
131
-
132
-
133
-
134
-
135
-
136
-
137
-
138
-
139
-
140
-
141
-
142
-
143
-
144
-
145
-
146
-
147
-
148
-
149
-
150
-
151
-
152
-
153
-
154
-
155
-
156
-
157
-
158
-
159
-
160
-
161
-
162
-
163
-
164
-
165
-
166
-
167
-
168
-
169
-
170
-
171
-
172
-
173
-
174
-
175
-
176
-
177
-
178
-
179
-
180
-
181
-
182
-
183
-
184
-
185
-
186
-
187
-
188
-
189
-
190
-
191
-
192
-
193
-
194
-
195
-
196
-
197
-
198
-
199
-
200
-
201
-
202
-
203
-
204
-
205
-
206
-
207
-
208
-
209
-
210
 |
 |