HP 5500dn HP Designjet 5500 series printers - Quick Reference Pocket Guide - Page 71
ink cartridge installation
 |
View all HP 5500dn manuals
Add to My Manuals
Save this manual to your list of manuals |
Page 71 highlights
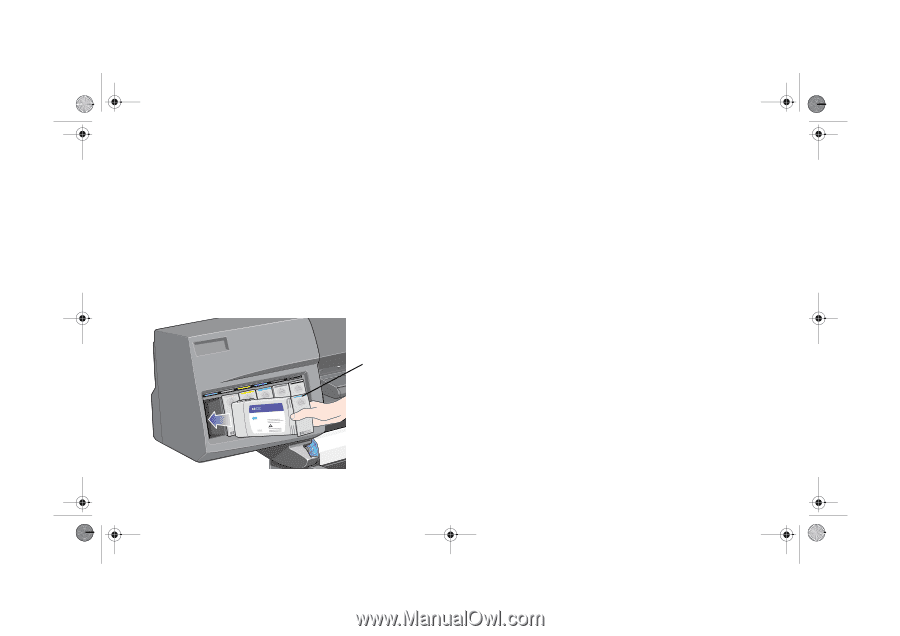
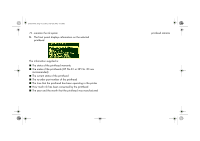
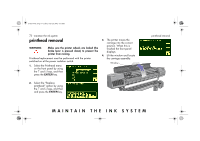
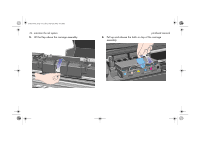
pocket.book Page 69 Friday, June 28, 2002 4:31 PM 69 - maintain the ink system ink cartridge installation NOTE: Each ink cartridge slot has a colored label above it. This should match the colored label on the new ink cartridge. 1. Pick up the new ink cartridge and find the label identifying the ink color. Hold the ink cartridge so that you can see the identifying colored label at the top of the side facing you. 2. Insert the ink cartridge into the ink cartridge slot labelled with the same color. ink cartridge installation NOTE: The ink cartridge is designed to prevent you from inserting the wrong ink type or into the wrong color slot. If you have difficulty inserting the ink cartridge, do not attempt to force it. Check again that the color of the ink cartridge matches the color of the ink cartridge slot, also that the colored marker is at the top of the ink cartridge. 3. Slide the ink cartridge into the slot until you feel some resistance, then stop. Color identifier at the top of the ink cartridge MAINTAIN THE INK SYSTEM
-
 1
1 -
2
-
3
-
4
-
5
-
6
-
7
-
8
-
9
-
10
-
11
-
12
-
13
-
14
-
15
-
16
-
17
-
18
-
19
-
20
-
21
-
22
-
23
-
24
-
25
-
26
-
27
-
28
-
29
-
30
-
31
-
32
-
33
-
34
-
35
-
36
-
37
-
38
-
39
-
40
-
41
-
42
-
43
-
44
-
45
-
46
-
47
-
48
-
49
-
50
-
51
-
52
-
53
-
54
-
55
-
56
-
57
-
58
-
59
-
60
-
61
-
62
-
63
-
64
-
65
-
 66
66 -
 67
67 -
 68
68 -
 69
69 -
 70
70 -
 71
71 -
 72
72 -
 73
73 -
 74
74 -
 75
75 -
 76
76 -
77
-
78
-
79
-
80
-
81
-
82
-
83
-
84
-
85
-
86
-
87
-
88
-
89
-
90
-
91
-
92
-
93
-
94
-
95
-
96
-
97
-
98
-
99
-
100
-
101
-
102
-
103
-
104
-
105
-
106
-
107
-
108
-
109
-
110
-
111
-
112
-
113
-
114
-
115
-
116
-
117
-
118
-
119
-
120
-
121
-
122
-
123
-
124
-
125
-
126
-
127
-
128
-
129
-
130
-
131
-
132
-
133
-
134
-
135
-
136
-
137
-
138
-
139
-
140
-
141
-
142
-
143
-
144
-
145
-
146
-
147
-
148
-
149
-
150
-
151
-
152
-
153
-
154
-
155
-
156
-
157
-
158
-
159
-
160
-
161
-
162
-
163
-
164
-
165
-
166
-
167
-
168
-
169
-
170
-
171
-
172
-
173
-
174
-
175
-
176
-
177
-
178
-
179
-
180
-
181
-
182
-
183
-
184
-
185
-
186
-
187
-
188
-
189
-
190
-
191
-
192
-
193
-
194
-
195
-
196
-
197
-
198
-
199
-
200
-
201
-
202
-
203
-
204
-
205
-
206
-
207
-
208
-
209
-
210
 |
 |