HP 5500dn HP Designjet 5500 series printers - Quick Reference Pocket Guide - Page 209
Printing Material Jam
 |
View all HP 5500dn manuals
Add to My Manuals
Save this manual to your list of manuals |
Page 209 highlights
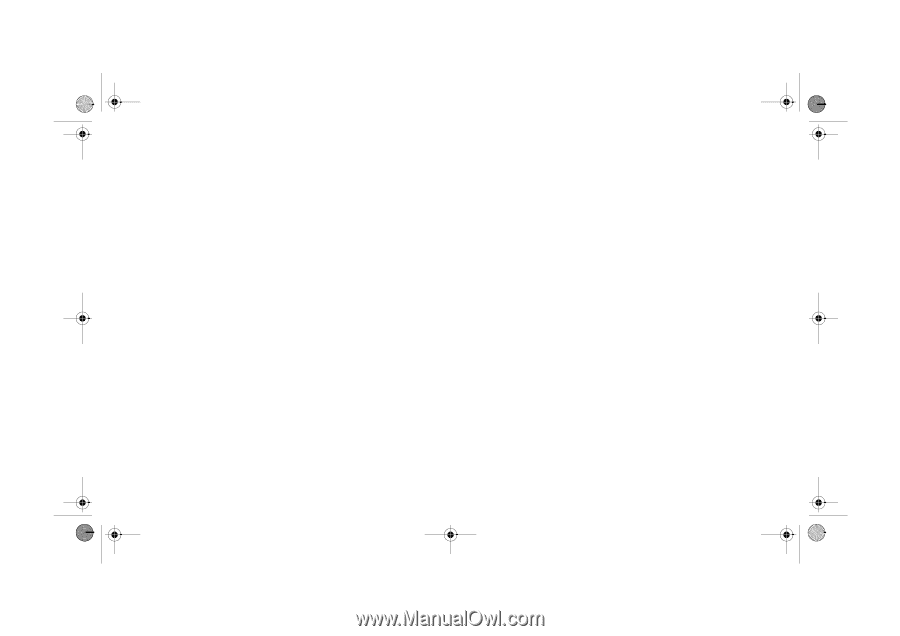
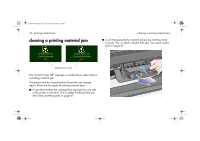
pocket.book Page 67 Friday, June 28, 2002 4:31 PM 67 - printing material jam check printhead path 1. Switch the printer off at the rear of the printer and open the window. 2. Look in the area where the printer was printing at the time of the jam, this is where the printing material is most likely to be jammed. 3. Lift the media load lever. 4. Carefully remove any of the jammed printing material that you can lift up and out from the top of the printer. 5. Carefully pull the rest of the roll or sheet down and out of the printer. 6. If you are using a roll, trim the printing material with a knife as shown in loading a roll into the printer on page 34 in the reverse of this guide. 7. Reload the roll; see loading a roll into the printer on page 34 in the reverse of this guide. 8. Switch the printer on. 9. If there is some printing material left behind in the media path, loading paper can become difficult. This can be clearing a printing material jam cleared by loading a rigid paper type through the printer media path. 10. If you have image quality problems after a paper jam, this could indicate that the printheads have been moved from their correct position in the carriage. To correct this, perform aligning the printheads on page 43. check media path 1. Switch the printer off at the rear of the printer. 2. Check that the roll has not almost finished and is stuck to the empty cardboard core. 3. Load a new roll contact your support representative If after performing all of these procedures the front panel displays the "Switch Power Off" message again, make a note of the message with the error code and contact your support representative. PRINTING MATERIAL JAM
-
 1
1 -
2
-
3
-
4
-
5
-
6
-
7
-
8
-
9
-
10
-
11
-
12
-
13
-
14
-
15
-
16
-
17
-
18
-
19
-
20
-
21
-
22
-
23
-
24
-
25
-
26
-
27
-
28
-
29
-
30
-
31
-
32
-
33
-
34
-
35
-
36
-
37
-
38
-
39
-
40
-
41
-
42
-
43
-
44
-
45
-
46
-
47
-
48
-
49
-
50
-
51
-
52
-
53
-
54
-
55
-
56
-
57
-
58
-
59
-
60
-
61
-
62
-
63
-
64
-
65
-
66
-
67
-
68
-
69
-
70
-
71
-
72
-
73
-
74
-
75
-
76
-
77
-
78
-
79
-
80
-
81
-
82
-
83
-
84
-
85
-
86
-
87
-
88
-
89
-
90
-
91
-
92
-
93
-
94
-
95
-
96
-
97
-
98
-
99
-
100
-
101
-
102
-
103
-
104
-
105
-
106
-
107
-
108
-
109
-
110
-
111
-
112
-
113
-
114
-
115
-
116
-
117
-
118
-
119
-
120
-
121
-
122
-
123
-
124
-
125
-
126
-
127
-
128
-
129
-
130
-
131
-
132
-
133
-
134
-
135
-
136
-
137
-
138
-
139
-
140
-
141
-
142
-
143
-
144
-
145
-
146
-
147
-
148
-
149
-
150
-
151
-
152
-
153
-
154
-
155
-
156
-
157
-
158
-
159
-
160
-
161
-
162
-
163
-
164
-
165
-
166
-
167
-
168
-
169
-
170
-
171
-
172
-
173
-
174
-
175
-
176
-
177
-
178
-
179
-
180
-
181
-
182
-
183
-
184
-
185
-
186
-
187
-
188
-
189
-
190
-
191
-
192
-
193
-
194
-
195
-
196
-
197
-
198
-
199
-
200
-
201
-
202
-
203
-
 204
204 -
 205
205 -
 206
206 -
 207
207 -
 208
208 -
 209
209 -
 210
210
 |
 |