HP 5500dn HP Designjet 5500 series printers - Quick Reference Pocket Guide - Page 75
printhead removal
 |
View all HP 5500dn manuals
Add to My Manuals
Save this manual to your list of manuals |
Page 75 highlights
pocket.book Page 73 Friday, June 28, 2002 4:31 PM 73 - maintain the ink system printhead removal WARNING Make sure the printer wheels are locked (the brake lever is pressed down) to prevent the printer from moving. Printhead replacement must be performed with the printer switched on at the power isolation switch. 1. Select the Printhead menu on the front panel by using the ↑ and ↓ keys, and then press the ENTER key. 3. The printer moves the carriage into the correct position. When this is finished the front panel displays: 4. Lift the window and locate the carriage assembly. Window 2. Select the "Replace printhead" option by using the ↑ and ↓ keys, and then and press the ENTER key. printhead removal MAINTAIN THE INK SYSTEM
-
 1
1 -
2
-
3
-
4
-
5
-
6
-
7
-
8
-
9
-
10
-
11
-
12
-
13
-
14
-
15
-
16
-
17
-
18
-
19
-
20
-
21
-
22
-
23
-
24
-
25
-
26
-
27
-
28
-
29
-
30
-
31
-
32
-
33
-
34
-
35
-
36
-
37
-
38
-
39
-
40
-
41
-
42
-
43
-
44
-
45
-
46
-
47
-
48
-
49
-
50
-
51
-
52
-
53
-
54
-
55
-
56
-
57
-
58
-
59
-
60
-
61
-
62
-
63
-
64
-
65
-
66
-
67
-
68
-
69
-
 70
70 -
 71
71 -
 72
72 -
 73
73 -
 74
74 -
 75
75 -
 76
76 -
 77
77 -
 78
78 -
 79
79 -
 80
80 -
81
-
82
-
83
-
84
-
85
-
86
-
87
-
88
-
89
-
90
-
91
-
92
-
93
-
94
-
95
-
96
-
97
-
98
-
99
-
100
-
101
-
102
-
103
-
104
-
105
-
106
-
107
-
108
-
109
-
110
-
111
-
112
-
113
-
114
-
115
-
116
-
117
-
118
-
119
-
120
-
121
-
122
-
123
-
124
-
125
-
126
-
127
-
128
-
129
-
130
-
131
-
132
-
133
-
134
-
135
-
136
-
137
-
138
-
139
-
140
-
141
-
142
-
143
-
144
-
145
-
146
-
147
-
148
-
149
-
150
-
151
-
152
-
153
-
154
-
155
-
156
-
157
-
158
-
159
-
160
-
161
-
162
-
163
-
164
-
165
-
166
-
167
-
168
-
169
-
170
-
171
-
172
-
173
-
174
-
175
-
176
-
177
-
178
-
179
-
180
-
181
-
182
-
183
-
184
-
185
-
186
-
187
-
188
-
189
-
190
-
191
-
192
-
193
-
194
-
195
-
196
-
197
-
198
-
199
-
200
-
201
-
202
-
203
-
204
-
205
-
206
-
207
-
208
-
209
-
210
 |
 |
MAINTAIN THE INK SYSTEM
73 - maintain the ink system
printhead removal
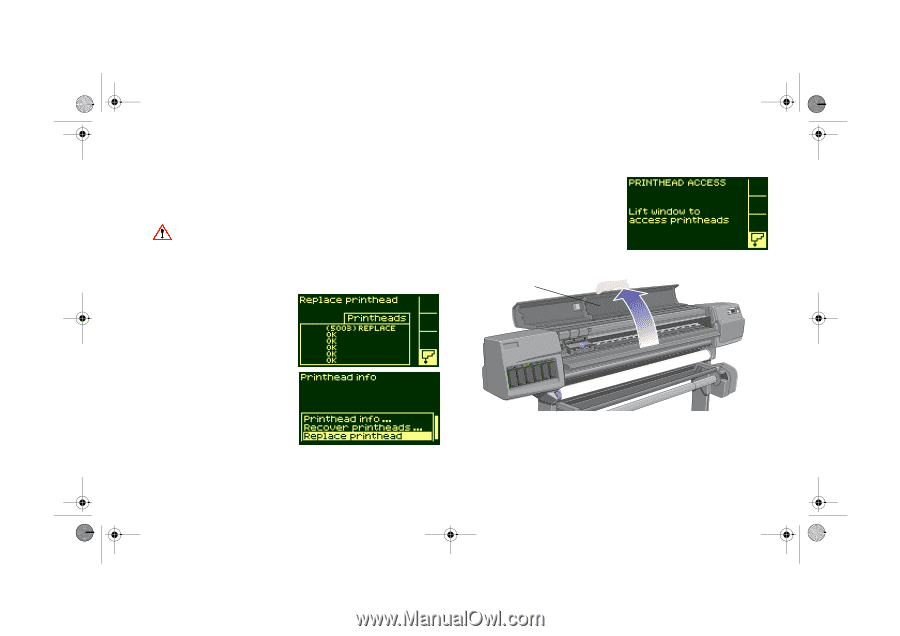
printhead removal
WARNING
Make sure the printer wheels are locked (the
brake lever is pressed down) to prevent the
printer from moving.
Printhead replacement must be performed with the printer
switched on at the power isolation switch.
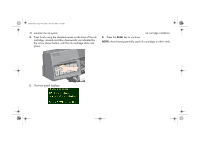
1.
Select the Printhead menu
on the front panel by using
the
↑
and
↓
keys, and then
press the
ENTER
key.
2.
Select the
“
Replace
printhead
”
option by using
the
↑
and
↓
keys, and then
and press the
ENTER
key.
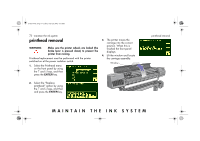
3.
The printer moves the
carriage into the correct
position. When this is
finished the front panel
displays:
4.
Lift the window and locate
the carriage assembly.
Window
pocket.book
Page 73
Friday, June 28, 2002
4:31 PM