HP 5500dn HP Designjet 5500 series printers - Quick Reference Pocket Guide - Page 82
printhead cleaner removal
 |
View all HP 5500dn manuals
Add to My Manuals
Save this manual to your list of manuals |
Page 82 highlights
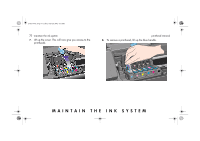
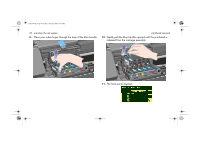
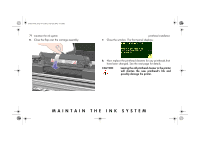
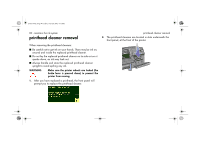
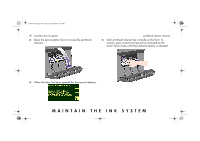
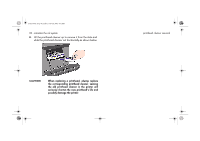
pocket.book Page 80 Friday, June 28, 2002 4:31 PM 80 - maintain the ink system printhead cleaner removal When removing the printhead cleaners: I Be careful not to get ink on your hands. There may be ink on, around and inside the replaced printhead cleaner. I Do not lay the replaced printhead cleaner on its side or turn it upside down, as ink may leak out. I Always handle and store the replaced printhead cleaner upright to avoid spilling any ink. WARNING Make sure the printer wheels are locked (the brake lever is pressed down) to prevent the printer from moving. 1. After you have replaced a printhead, the front panel will prompt you to replace the printhead cleaner. printhead cleaner removal 2. The printhead cleaners are located in slots underneath the front panel, at the front of the printer.
-
 1
1 -
2
-
3
-
4
-
5
-
6
-
7
-
8
-
9
-
10
-
11
-
12
-
13
-
14
-
15
-
16
-
17
-
18
-
19
-
20
-
21
-
22
-
23
-
24
-
25
-
26
-
27
-
28
-
29
-
30
-
31
-
32
-
33
-
34
-
35
-
36
-
37
-
38
-
39
-
40
-
41
-
42
-
43
-
44
-
45
-
46
-
47
-
48
-
49
-
50
-
51
-
52
-
53
-
54
-
55
-
56
-
57
-
58
-
59
-
60
-
61
-
62
-
63
-
64
-
65
-
66
-
67
-
68
-
69
-
70
-
71
-
72
-
73
-
74
-
75
-
76
-
 77
77 -
 78
78 -
 79
79 -
 80
80 -
 81
81 -
 82
82 -
 83
83 -
 84
84 -
 85
85 -
 86
86 -
 87
87 -
88
-
89
-
90
-
91
-
92
-
93
-
94
-
95
-
96
-
97
-
98
-
99
-
100
-
101
-
102
-
103
-
104
-
105
-
106
-
107
-
108
-
109
-
110
-
111
-
112
-
113
-
114
-
115
-
116
-
117
-
118
-
119
-
120
-
121
-
122
-
123
-
124
-
125
-
126
-
127
-
128
-
129
-
130
-
131
-
132
-
133
-
134
-
135
-
136
-
137
-
138
-
139
-
140
-
141
-
142
-
143
-
144
-
145
-
146
-
147
-
148
-
149
-
150
-
151
-
152
-
153
-
154
-
155
-
156
-
157
-
158
-
159
-
160
-
161
-
162
-
163
-
164
-
165
-
166
-
167
-
168
-
169
-
170
-
171
-
172
-
173
-
174
-
175
-
176
-
177
-
178
-
179
-
180
-
181
-
182
-
183
-
184
-
185
-
186
-
187
-
188
-
189
-
190
-
191
-
192
-
193
-
194
-
195
-
196
-
197
-
198
-
199
-
200
-
201
-
202
-
203
-
204
-
205
-
206
-
207
-
208
-
209
-
210
 |
 |
