HP 5500dn HP Designjet 5500 series printers - Quick Reference Pocket Guide - Page 95
Put the removed printheads in a safe place until you can
 |
View all HP 5500dn manuals
Add to My Manuals
Save this manual to your list of manuals |
Page 95 highlights
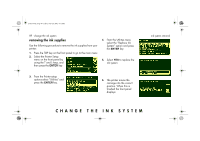
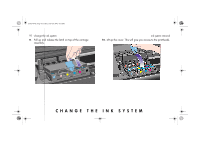
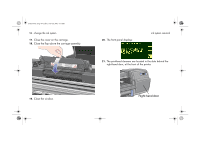
pocket.book Page 93 Friday, June 28, 2002 4:31 PM 93 - change the ink system 13. Gently pull the blue handle upward until the printhead is released from the carriage assembly. ink system removal 14. When you remove the light cyan printhead the display changes from REMOVE to OK. 15. Repeat steps 10 through 12 for the other five printheads. NOTE: Put the removed printheads in a safe place until you can store them in the printhead storage container. You will not be able to do this until you have installed the supplies that are already in the container into the printer. 16. When all the printheads have been removed the front panel displays: CHANGE THE INK SYSTEM
-
 1
1 -
2
-
3
-
4
-
5
-
6
-
7
-
8
-
9
-
10
-
11
-
12
-
13
-
14
-
15
-
16
-
17
-
18
-
19
-
20
-
21
-
22
-
23
-
24
-
25
-
26
-
27
-
28
-
29
-
30
-
31
-
32
-
33
-
34
-
35
-
36
-
37
-
38
-
39
-
40
-
41
-
42
-
43
-
44
-
45
-
46
-
47
-
48
-
49
-
50
-
51
-
52
-
53
-
54
-
55
-
56
-
57
-
58
-
59
-
60
-
61
-
62
-
63
-
64
-
65
-
66
-
67
-
68
-
69
-
70
-
71
-
72
-
73
-
74
-
75
-
76
-
77
-
78
-
79
-
80
-
81
-
82
-
83
-
84
-
85
-
86
-
87
-
88
-
89
-
 90
90 -
 91
91 -
 92
92 -
 93
93 -
 94
94 -
 95
95 -
 96
96 -
 97
97 -
 98
98 -
 99
99 -
 100
100 -
101
-
102
-
103
-
104
-
105
-
106
-
107
-
108
-
109
-
110
-
111
-
112
-
113
-
114
-
115
-
116
-
117
-
118
-
119
-
120
-
121
-
122
-
123
-
124
-
125
-
126
-
127
-
128
-
129
-
130
-
131
-
132
-
133
-
134
-
135
-
136
-
137
-
138
-
139
-
140
-
141
-
142
-
143
-
144
-
145
-
146
-
147
-
148
-
149
-
150
-
151
-
152
-
153
-
154
-
155
-
156
-
157
-
158
-
159
-
160
-
161
-
162
-
163
-
164
-
165
-
166
-
167
-
168
-
169
-
170
-
171
-
172
-
173
-
174
-
175
-
176
-
177
-
178
-
179
-
180
-
181
-
182
-
183
-
184
-
185
-
186
-
187
-
188
-
189
-
190
-
191
-
192
-
193
-
194
-
195
-
196
-
197
-
198
-
199
-
200
-
201
-
202
-
203
-
204
-
205
-
206
-
207
-
208
-
209
-
210
 |
 |
CHANGE THE INK SYSTEM
93 - change the ink system
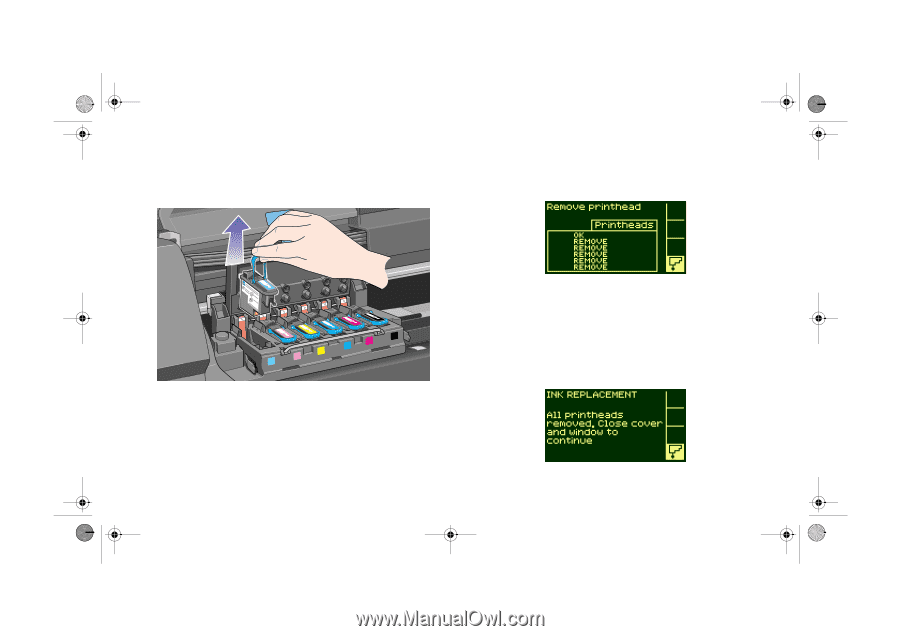
ink system removal
13.
Gently pull the blue handle upward until the printhead is
released from the carriage assembly.
14.
When you remove the light cyan printhead the display
changes from REMOVE to OK.
15.
Repeat steps 10 through 12 for the other five printheads.
NOTE:
Put the removed printheads in a safe place until you can
store them in the printhead storage container. You will not be able
to do this until you have installed the supplies that are already in
the container into the printer.
16.
When all the printheads have been removed the front panel
displays:
pocket.book
Page 93
Friday, June 28, 2002
4:31 PM