HP 5500dn HP Designjet 5500 series printers - Quick Reference Pocket Guide - Page 200
problems inserting the printhead cleaner, carriage interconnect wiper
 |
View all HP 5500dn manuals
Add to My Manuals
Save this manual to your list of manuals |
Page 200 highlights
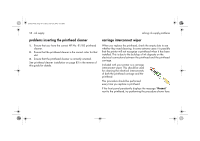
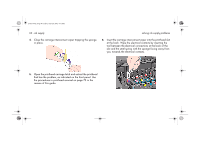
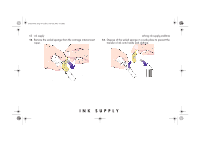
pocket.book Page 58 Friday, June 28, 2002 4:31 PM 58 - ink supply solving ink supply problems problems inserting the printhead cleaner 1. Ensure that you have the correct HP No. 81/83 printhead cleaner. 2. Ensure that the printhead cleaner is the correct color for that slot. 3. Ensure that the printhead cleaner is correctly oriented. See printhead cleaner installation on page 83 in the reverse of this guide for details. carriage interconnect wiper When you replace the printhead, check the empty slots to see whether they need cleaning. In some extreme cases it is possible that the printer will not recognize a printhead when it has been installed. This is due to the build-up of ink deposits on the electrical connections between the printhead and the printhead carriage. Included with your printer is a carriage interconnect wiper. This should be used for cleaning the electrical interconnects of both the printhead carriage and the printhead. This procedure should be performed every time you replace a printhead. If the front panel persistently displays the message "Reseat" next to the printhead, try performing the procedure shown here.
-
 1
1 -
2
-
3
-
4
-
5
-
6
-
7
-
8
-
9
-
10
-
11
-
12
-
13
-
14
-
15
-
16
-
17
-
18
-
19
-
20
-
21
-
22
-
23
-
24
-
25
-
26
-
27
-
28
-
29
-
30
-
31
-
32
-
33
-
34
-
35
-
36
-
37
-
38
-
39
-
40
-
41
-
42
-
43
-
44
-
45
-
46
-
47
-
48
-
49
-
50
-
51
-
52
-
53
-
54
-
55
-
56
-
57
-
58
-
59
-
60
-
61
-
62
-
63
-
64
-
65
-
66
-
67
-
68
-
69
-
70
-
71
-
72
-
73
-
74
-
75
-
76
-
77
-
78
-
79
-
80
-
81
-
82
-
83
-
84
-
85
-
86
-
87
-
88
-
89
-
90
-
91
-
92
-
93
-
94
-
95
-
96
-
97
-
98
-
99
-
100
-
101
-
102
-
103
-
104
-
105
-
106
-
107
-
108
-
109
-
110
-
111
-
112
-
113
-
114
-
115
-
116
-
117
-
118
-
119
-
120
-
121
-
122
-
123
-
124
-
125
-
126
-
127
-
128
-
129
-
130
-
131
-
132
-
133
-
134
-
135
-
136
-
137
-
138
-
139
-
140
-
141
-
142
-
143
-
144
-
145
-
146
-
147
-
148
-
149
-
150
-
151
-
152
-
153
-
154
-
155
-
156
-
157
-
158
-
159
-
160
-
161
-
162
-
163
-
164
-
165
-
166
-
167
-
168
-
169
-
170
-
171
-
172
-
173
-
174
-
175
-
176
-
177
-
178
-
179
-
180
-
181
-
182
-
183
-
184
-
185
-
186
-
187
-
188
-
189
-
190
-
191
-
192
-
193
-
194
-
 195
195 -
 196
196 -
 197
197 -
 198
198 -
 199
199 -
 200
200 -
 201
201 -
 202
202 -
 203
203 -
 204
204 -
 205
205 -
206
-
207
-
208
-
209
-
210
 |
 |