HP 5500dn HP Designjet 5500 series printers - Quick Reference Pocket Guide - Page 173
using the image quality print
 |
View all HP 5500dn manuals
Add to My Manuals
Save this manual to your list of manuals |
Page 173 highlights
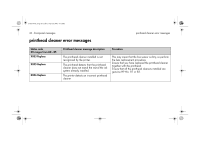
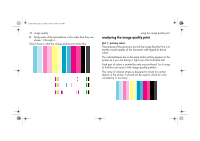
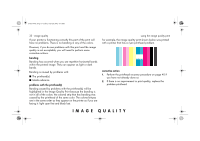
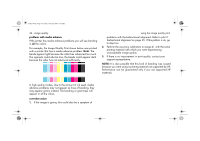
pocket.book Page 31 Friday, June 28, 2002 4:31 PM 31 - image quality using the image quality print The image quality print helps you determine whether you have an image quality problem, and if you do, what the cause of the problem is and how to resolve it. The print contains patterns designed to highlight any image quality problems. Before printing and analyzing the Image Quality Print, it is recommended that you check the following: printhead status check Check the printhead status in the front panel. Using the up and down keys, select the printhead icon; the front panel will then display the printhead status. replacing If the printhead needs replacing, go to printhead removal on page 73 in the reverse of this guide and replace the printhead. using the image quality print recovering If the printhead needs recovering, go to printhead recovery procedure on page 40. how to print the image quality print Before you print the Image Quality Print you must ensure that you have A2- or C-size printing material (or larger) loaded into the printer. To print the Image Quality Print use the front panel. Go to Utilities > Test Prints > Image Quality, select which of the four prints you want (see the following pages), and press the Enter key. how to use the image quality print 1. Use the same printing material and image quality setting as you were using when you discovered the image quality problem. IMAGE QUALITY
-
 1
1 -
2
-
3
-
4
-
5
-
6
-
7
-
8
-
9
-
10
-
11
-
12
-
13
-
14
-
15
-
16
-
17
-
18
-
19
-
20
-
21
-
22
-
23
-
24
-
25
-
26
-
27
-
28
-
29
-
30
-
31
-
32
-
33
-
34
-
35
-
36
-
37
-
38
-
39
-
40
-
41
-
42
-
43
-
44
-
45
-
46
-
47
-
48
-
49
-
50
-
51
-
52
-
53
-
54
-
55
-
56
-
57
-
58
-
59
-
60
-
61
-
62
-
63
-
64
-
65
-
66
-
67
-
68
-
69
-
70
-
71
-
72
-
73
-
74
-
75
-
76
-
77
-
78
-
79
-
80
-
81
-
82
-
83
-
84
-
85
-
86
-
87
-
88
-
89
-
90
-
91
-
92
-
93
-
94
-
95
-
96
-
97
-
98
-
99
-
100
-
101
-
102
-
103
-
104
-
105
-
106
-
107
-
108
-
109
-
110
-
111
-
112
-
113
-
114
-
115
-
116
-
117
-
118
-
119
-
120
-
121
-
122
-
123
-
124
-
125
-
126
-
127
-
128
-
129
-
130
-
131
-
132
-
133
-
134
-
135
-
136
-
137
-
138
-
139
-
140
-
141
-
142
-
143
-
144
-
145
-
146
-
147
-
148
-
149
-
150
-
151
-
152
-
153
-
154
-
155
-
156
-
157
-
158
-
159
-
160
-
161
-
162
-
163
-
164
-
165
-
166
-
167
-
 168
168 -
 169
169 -
 170
170 -
 171
171 -
 172
172 -
 173
173 -
 174
174 -
 175
175 -
 176
176 -
 177
177 -
 178
178 -
179
-
180
-
181
-
182
-
183
-
184
-
185
-
186
-
187
-
188
-
189
-
190
-
191
-
192
-
193
-
194
-
195
-
196
-
197
-
198
-
199
-
200
-
201
-
202
-
203
-
204
-
205
-
206
-
207
-
208
-
209
-
210
 |
 |