HP 5500dn HP Designjet 5500 series printers - Quick Reference Pocket Guide - Page 44
attaching the roll to the take-up reel
 |
View all HP 5500dn manuals
Add to My Manuals
Save this manual to your list of manuals |
Page 44 highlights
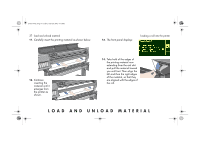
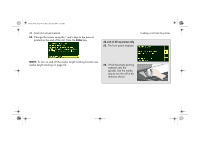
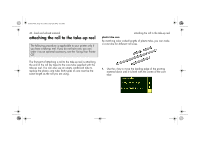
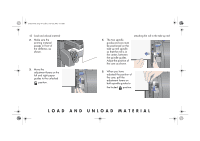
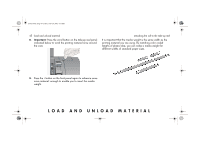
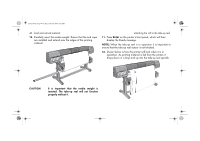
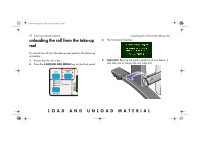
pocket.book Page 42 Friday, June 28, 2002 4:31 PM 42 - load and unload material attaching the roll to the take-up reel The following procedure is applicable to your printer only if you have a take-up reel. If you do not have one, you can order it as an optional accessory; see the 'Using Your Printer CD'. The first part of attaching a roll to the take-up reel is attaching the end of the roll (by tape) to the core tube supplied with the take-up reel. You can also use an empty cardboard tube to replace the plastic core tube. Both types of core must be the same length as the roll you are using. attaching the roll to the take-up reel plastic tube core By matching color coded lengths of plastic tube, you can make a core tube for different roll sizes. 1. Use the ↓ key to move the leading edge of the printing material down until it is level with the centre of the core tube.
-
 1
1 -
2
-
3
-
4
-
5
-
6
-
7
-
8
-
9
-
10
-
11
-
12
-
13
-
14
-
15
-
16
-
17
-
18
-
19
-
20
-
21
-
22
-
23
-
24
-
25
-
26
-
27
-
28
-
29
-
30
-
31
-
32
-
33
-
34
-
35
-
36
-
37
-
38
-
 39
39 -
 40
40 -
 41
41 -
 42
42 -
 43
43 -
 44
44 -
 45
45 -
 46
46 -
 47
47 -
 48
48 -
 49
49 -
50
-
51
-
52
-
53
-
54
-
55
-
56
-
57
-
58
-
59
-
60
-
61
-
62
-
63
-
64
-
65
-
66
-
67
-
68
-
69
-
70
-
71
-
72
-
73
-
74
-
75
-
76
-
77
-
78
-
79
-
80
-
81
-
82
-
83
-
84
-
85
-
86
-
87
-
88
-
89
-
90
-
91
-
92
-
93
-
94
-
95
-
96
-
97
-
98
-
99
-
100
-
101
-
102
-
103
-
104
-
105
-
106
-
107
-
108
-
109
-
110
-
111
-
112
-
113
-
114
-
115
-
116
-
117
-
118
-
119
-
120
-
121
-
122
-
123
-
124
-
125
-
126
-
127
-
128
-
129
-
130
-
131
-
132
-
133
-
134
-
135
-
136
-
137
-
138
-
139
-
140
-
141
-
142
-
143
-
144
-
145
-
146
-
147
-
148
-
149
-
150
-
151
-
152
-
153
-
154
-
155
-
156
-
157
-
158
-
159
-
160
-
161
-
162
-
163
-
164
-
165
-
166
-
167
-
168
-
169
-
170
-
171
-
172
-
173
-
174
-
175
-
176
-
177
-
178
-
179
-
180
-
181
-
182
-
183
-
184
-
185
-
186
-
187
-
188
-
189
-
190
-
191
-
192
-
193
-
194
-
195
-
196
-
197
-
198
-
199
-
200
-
201
-
202
-
203
-
204
-
205
-
206
-
207
-
208
-
209
-
210
 |
 |