HP 5500dn HP Designjet 5500 series printers - Quick Reference Pocket Guide - Page 36
loading a roll into the printer
 |
View all HP 5500dn manuals
Add to My Manuals
Save this manual to your list of manuals |
Page 36 highlights
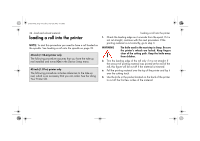
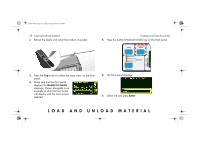
pocket.book Page 34 Friday, June 28, 2002 4:31 PM 34 - load and unload material loading a roll into the printer NOTE: To start this procedure you need to have a roll loaded on the spindle. See loading a roll onto the spindle on page 32. 60-inch (1.52-m) printer only The following procedure assumes that you have the take-up reel installed and turned On in the Device Setup menu. 42-inch (1.07-m) printer only The following procedure includes references to the take-up reel, which is an accessory that you can order. See the Using Your Printer CD. loading a roll into the printer 1. Check the leading edge as it unwinds from the spool. If it is not cut straight, continue with the next procedure. If the printing material is cut correctly, go to step 3. WARNING The knife used in the next step is sharp. Be sure the printer's wheels are locked. Keep fingers clear of the cutting path. Keep the knife away from children. 2. Trim the leading edge of the roll only if it is not straight. If the amount of printing material was printed at the end of the roll, this figure will be cut off if the material is trimmed. a Pull the printing material over the top of the printer and lay it over the cutting track. b Use the knife in the pocket located on the back of the printer to cut off the first few inches of the material.
-
 1
1 -
2
-
3
-
4
-
5
-
6
-
7
-
8
-
9
-
10
-
11
-
12
-
13
-
14
-
15
-
16
-
17
-
18
-
19
-
20
-
21
-
22
-
23
-
24
-
25
-
26
-
27
-
28
-
29
-
30
-
 31
31 -
 32
32 -
 33
33 -
 34
34 -
 35
35 -
 36
36 -
 37
37 -
 38
38 -
 39
39 -
 40
40 -
 41
41 -
42
-
43
-
44
-
45
-
46
-
47
-
48
-
49
-
50
-
51
-
52
-
53
-
54
-
55
-
56
-
57
-
58
-
59
-
60
-
61
-
62
-
63
-
64
-
65
-
66
-
67
-
68
-
69
-
70
-
71
-
72
-
73
-
74
-
75
-
76
-
77
-
78
-
79
-
80
-
81
-
82
-
83
-
84
-
85
-
86
-
87
-
88
-
89
-
90
-
91
-
92
-
93
-
94
-
95
-
96
-
97
-
98
-
99
-
100
-
101
-
102
-
103
-
104
-
105
-
106
-
107
-
108
-
109
-
110
-
111
-
112
-
113
-
114
-
115
-
116
-
117
-
118
-
119
-
120
-
121
-
122
-
123
-
124
-
125
-
126
-
127
-
128
-
129
-
130
-
131
-
132
-
133
-
134
-
135
-
136
-
137
-
138
-
139
-
140
-
141
-
142
-
143
-
144
-
145
-
146
-
147
-
148
-
149
-
150
-
151
-
152
-
153
-
154
-
155
-
156
-
157
-
158
-
159
-
160
-
161
-
162
-
163
-
164
-
165
-
166
-
167
-
168
-
169
-
170
-
171
-
172
-
173
-
174
-
175
-
176
-
177
-
178
-
179
-
180
-
181
-
182
-
183
-
184
-
185
-
186
-
187
-
188
-
189
-
190
-
191
-
192
-
193
-
194
-
195
-
196
-
197
-
198
-
199
-
200
-
201
-
202
-
203
-
204
-
205
-
206
-
207
-
208
-
209
-
210
 |
 |
