HP 5500dn HP Designjet 5500 series printers - Quick Reference Pocket Guide - Page 202
at the back. Wipe the electrical contacts by inserting
 |
View all HP 5500dn manuals
Add to My Manuals
Save this manual to your list of manuals |
Page 202 highlights
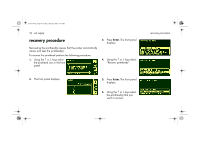
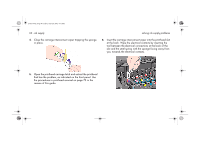
pocket.book Page 60 Friday, June 28, 2002 4:31 PM 60 - ink supply 4. Close the carriage interconnect wiper trapping the sponge in place. solving ink supply problems 6. Insert the carriage interconnect wiper into the printhead slot at the back. Wipe the electrical contacts by inserting the tool between the electrical connections at the back of the slot and the steel spring with the sponge facing away from you, towards the electrical contacts. 5. Open the printhead carriage latch and extract the printhead that has the problem, as indicated on the front panel. Use the procedures in printhead removal on page 73 in the reverse of this guide.
-
 1
1 -
2
-
3
-
4
-
5
-
6
-
7
-
8
-
9
-
10
-
11
-
12
-
13
-
14
-
15
-
16
-
17
-
18
-
19
-
20
-
21
-
22
-
23
-
24
-
25
-
26
-
27
-
28
-
29
-
30
-
31
-
32
-
33
-
34
-
35
-
36
-
37
-
38
-
39
-
40
-
41
-
42
-
43
-
44
-
45
-
46
-
47
-
48
-
49
-
50
-
51
-
52
-
53
-
54
-
55
-
56
-
57
-
58
-
59
-
60
-
61
-
62
-
63
-
64
-
65
-
66
-
67
-
68
-
69
-
70
-
71
-
72
-
73
-
74
-
75
-
76
-
77
-
78
-
79
-
80
-
81
-
82
-
83
-
84
-
85
-
86
-
87
-
88
-
89
-
90
-
91
-
92
-
93
-
94
-
95
-
96
-
97
-
98
-
99
-
100
-
101
-
102
-
103
-
104
-
105
-
106
-
107
-
108
-
109
-
110
-
111
-
112
-
113
-
114
-
115
-
116
-
117
-
118
-
119
-
120
-
121
-
122
-
123
-
124
-
125
-
126
-
127
-
128
-
129
-
130
-
131
-
132
-
133
-
134
-
135
-
136
-
137
-
138
-
139
-
140
-
141
-
142
-
143
-
144
-
145
-
146
-
147
-
148
-
149
-
150
-
151
-
152
-
153
-
154
-
155
-
156
-
157
-
158
-
159
-
160
-
161
-
162
-
163
-
164
-
165
-
166
-
167
-
168
-
169
-
170
-
171
-
172
-
173
-
174
-
175
-
176
-
177
-
178
-
179
-
180
-
181
-
182
-
183
-
184
-
185
-
186
-
187
-
188
-
189
-
190
-
191
-
192
-
193
-
194
-
195
-
196
-
 197
197 -
 198
198 -
 199
199 -
 200
200 -
 201
201 -
 202
202 -
 203
203 -
 204
204 -
 205
205 -
 206
206 -
 207
207 -
208
-
209
-
210
 |
 |
60 - ink supply
solving ink supply problems
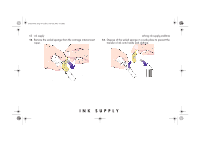
4.
Close the carriage interconnect wiper trapping the sponge
in place.
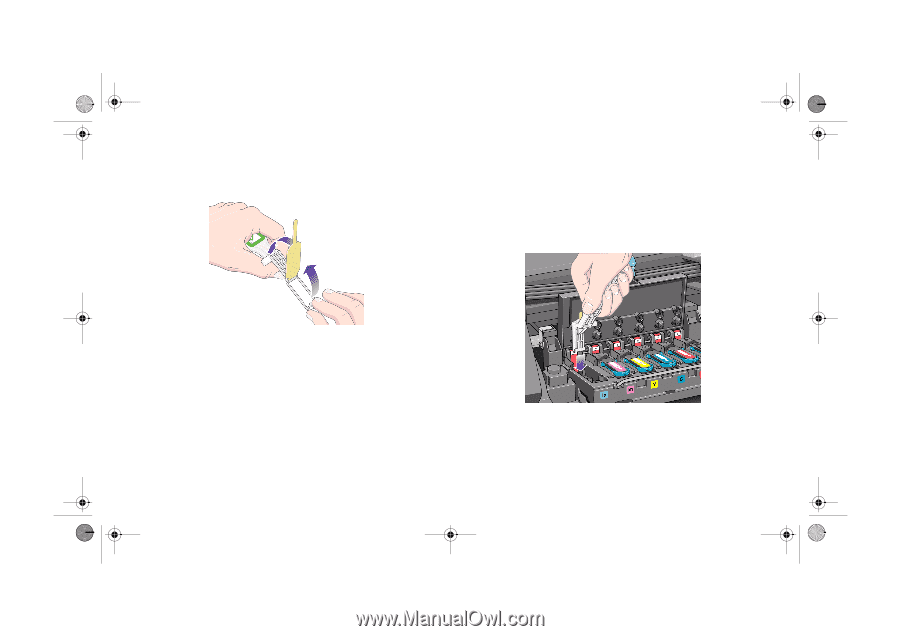
5.
Open the printhead carriage latch and extract the printhead
that has the problem, as indicated on the front panel. Use
the procedures in
printhead removal
on page 73 in the
reverse of this guide.
6.
Insert the carriage interconnect wiper into the printhead slot
at the back. Wipe the electrical contacts by inserting the
tool between the electrical connections at the back of the
slot and the steel spring with the sponge facing away from
you, towards the electrical contacts.
pocket.book
Page 60
Friday, June 28, 2002
4:31 PM