HP 5500dn HP Designjet 5500 series printers - Quick Reference Pocket Guide - Page 201
Open the carriage
 |
View all HP 5500dn manuals
Add to My Manuals
Save this manual to your list of manuals |
Page 201 highlights
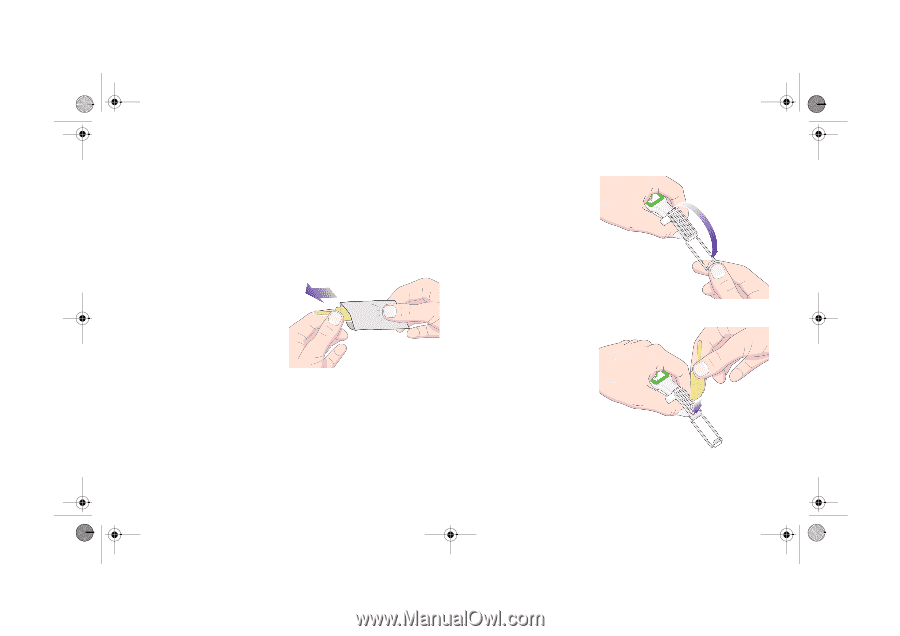
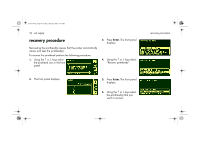
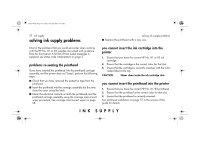
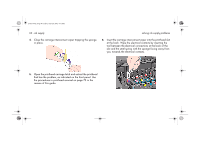
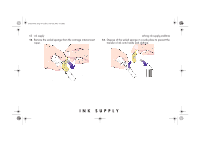
pocket.book Page 59 Friday, June 28, 2002 4:31 PM 59 - ink supply NOTE: After waiting a few moments to allow both connectors to dry, replace the printhead into the carriage assembly. Use the procedures in printhead removal on page 73 in the reverse of this guide. NOTE: Do not touch, wipe, or attempt to clean the printhead nozzles. This can damage the printhead and reduce print quality. 1. To clean the carriage electrical interconnect, remove a new premoistened replacement sponge from its pouch. A supply of sponges is included in the box with the tool. If all sponges have been used, more can be obtained by contacting your customer service representative. 2. Open the carriage interconnect wiper. 3. Load the sponge into the carriage interconnect wiper by positioning the sponge on the face of the carriage interconnect wiper with the shorter tab in the locating slot. solving ink supply problems INK SUPPLY
-
 1
1 -
2
-
3
-
4
-
5
-
6
-
7
-
8
-
9
-
10
-
11
-
12
-
13
-
14
-
15
-
16
-
17
-
18
-
19
-
20
-
21
-
22
-
23
-
24
-
25
-
26
-
27
-
28
-
29
-
30
-
31
-
32
-
33
-
34
-
35
-
36
-
37
-
38
-
39
-
40
-
41
-
42
-
43
-
44
-
45
-
46
-
47
-
48
-
49
-
50
-
51
-
52
-
53
-
54
-
55
-
56
-
57
-
58
-
59
-
60
-
61
-
62
-
63
-
64
-
65
-
66
-
67
-
68
-
69
-
70
-
71
-
72
-
73
-
74
-
75
-
76
-
77
-
78
-
79
-
80
-
81
-
82
-
83
-
84
-
85
-
86
-
87
-
88
-
89
-
90
-
91
-
92
-
93
-
94
-
95
-
96
-
97
-
98
-
99
-
100
-
101
-
102
-
103
-
104
-
105
-
106
-
107
-
108
-
109
-
110
-
111
-
112
-
113
-
114
-
115
-
116
-
117
-
118
-
119
-
120
-
121
-
122
-
123
-
124
-
125
-
126
-
127
-
128
-
129
-
130
-
131
-
132
-
133
-
134
-
135
-
136
-
137
-
138
-
139
-
140
-
141
-
142
-
143
-
144
-
145
-
146
-
147
-
148
-
149
-
150
-
151
-
152
-
153
-
154
-
155
-
156
-
157
-
158
-
159
-
160
-
161
-
162
-
163
-
164
-
165
-
166
-
167
-
168
-
169
-
170
-
171
-
172
-
173
-
174
-
175
-
176
-
177
-
178
-
179
-
180
-
181
-
182
-
183
-
184
-
185
-
186
-
187
-
188
-
189
-
190
-
191
-
192
-
193
-
194
-
195
-
 196
196 -
 197
197 -
 198
198 -
 199
199 -
 200
200 -
 201
201 -
 202
202 -
 203
203 -
 204
204 -
 205
205 -
 206
206 -
207
-
208
-
209
-
210
 |
 |