HP 5500dn HP Designjet 5500 series printers - Quick Reference Pocket Guide - Page 105
The complete assembly can now be removed from
 |
View all HP 5500dn manuals
Add to My Manuals
Save this manual to your list of manuals |
Page 105 highlights
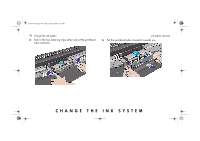
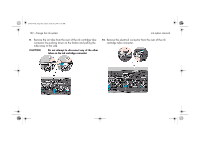
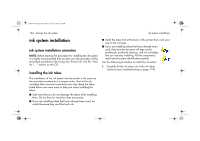
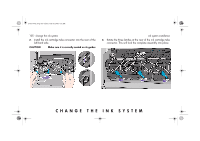
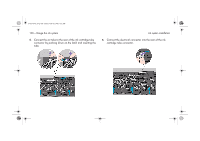
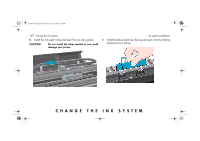
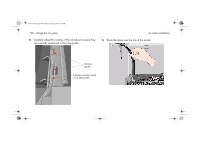
pocket.book Page 103 Friday, June 28, 2002 4:31 PM 103 - change the ink system 11. Rotate the three latches at the rear of the ink cartridge tube connector. This will release the complete assembly. ink system removal 12. Remove the ink cartridge tube connector from the rear of the left hand side. 13. The complete assembly can now be removed from the printer. NOTE: Carefully place the removed tubes in the open window until you can store them in the ink tubes container. You will not be able to do this until you have put the ink tubes that are already in the container into the printer. CHANGE THE INK SYSTEM
-
 1
1 -
2
-
3
-
4
-
5
-
6
-
7
-
8
-
9
-
10
-
11
-
12
-
13
-
14
-
15
-
16
-
17
-
18
-
19
-
20
-
21
-
22
-
23
-
24
-
25
-
26
-
27
-
28
-
29
-
30
-
31
-
32
-
33
-
34
-
35
-
36
-
37
-
38
-
39
-
40
-
41
-
42
-
43
-
44
-
45
-
46
-
47
-
48
-
49
-
50
-
51
-
52
-
53
-
54
-
55
-
56
-
57
-
58
-
59
-
60
-
61
-
62
-
63
-
64
-
65
-
66
-
67
-
68
-
69
-
70
-
71
-
72
-
73
-
74
-
75
-
76
-
77
-
78
-
79
-
80
-
81
-
82
-
83
-
84
-
85
-
86
-
87
-
88
-
89
-
90
-
91
-
92
-
93
-
94
-
95
-
96
-
97
-
98
-
99
-
 100
100 -
 101
101 -
 102
102 -
 103
103 -
 104
104 -
 105
105 -
 106
106 -
 107
107 -
 108
108 -
 109
109 -
 110
110 -
111
-
112
-
113
-
114
-
115
-
116
-
117
-
118
-
119
-
120
-
121
-
122
-
123
-
124
-
125
-
126
-
127
-
128
-
129
-
130
-
131
-
132
-
133
-
134
-
135
-
136
-
137
-
138
-
139
-
140
-
141
-
142
-
143
-
144
-
145
-
146
-
147
-
148
-
149
-
150
-
151
-
152
-
153
-
154
-
155
-
156
-
157
-
158
-
159
-
160
-
161
-
162
-
163
-
164
-
165
-
166
-
167
-
168
-
169
-
170
-
171
-
172
-
173
-
174
-
175
-
176
-
177
-
178
-
179
-
180
-
181
-
182
-
183
-
184
-
185
-
186
-
187
-
188
-
189
-
190
-
191
-
192
-
193
-
194
-
195
-
196
-
197
-
198
-
199
-
200
-
201
-
202
-
203
-
204
-
205
-
206
-
207
-
208
-
209
-
210
 |
 |
CHANGE THE INK SYSTEM
103 - change the ink system
ink system removal
11.
Rotate the three latches at the rear of the ink cartridge tube
connector. This will release the complete assembly.
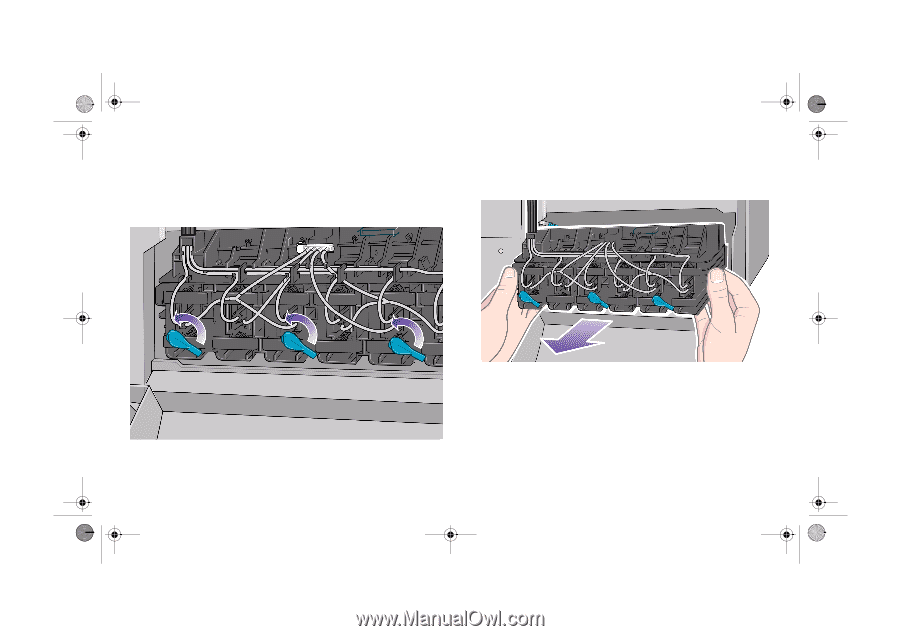
12.
Remove the ink cartridge tube connector from the rear of the
left hand side.
13.
The complete assembly can now be removed from the
printer.
NOTE:
Carefully place the removed tubes in the open window
until you can store them in the ink tubes container. You will not be
able to do this until you have put the ink tubes that are already in
the container into the printer.
pocket.book
Page 103
Friday, June 28, 2002
4:31 PM