Samsung SGH-I957 User Manual (user Manual) (ver.f5) (English) - Page 79
Share via, Set as, Delete, Cancel, Go to Gallery, Camera, Camcorder, Picasa, Social Hub - root
 |
View all Samsung SGH-I957 manuals
Add to My Manuals
Save this manual to your list of manuals |
Page 79 highlights
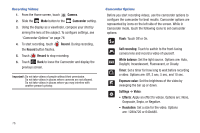
3. Touch the screen with two fingers or double-tap on the screen to zoom all the way in or out. For more information, refer to "Pinch" on page 19. 4. Sweep across the screen to display the next or previous photo. The current photo is outlined in the thumbnails at the bottom of the screen. Touch a thumbnail to view the photo it represents. 5. Touch Share via to use AllShare, Bluetooth, Email, Gmail, Picasa, Social Hub, or Wi-Fi Direct to share the photo. 6. Touch Set as to assign the photo as a Contact photo, Lock screen wallpaper, or Wallpaper. 7. Touch Delete to delete the photo being displayed. Touch OK to delete the photo or Cancel to exit. 8. Touch Go to Gallery to open the current photo in the Gallery, which offers additional photo management options. For more information, refer to "Gallery" on page 78. Note: Photos are stored in the /Root/DCIM/Camera folder as jpg files. 9. Press photos. Camcorder Back to return to the Camera to take more Use your device's built-in Camcorder to record high-definition video in 720p resolution. 1. From the Home screen, touch Camera. 2. Slide the Mode button to the Camcorder setting. The Camcorder screen displays. Current or Elapsed Time Mode Record Options Image Viewer Multimedia 75
-
 1
1 -
2
-
3
-
4
-
5
-
6
-
7
-
8
-
9
-
10
-
11
-
12
-
13
-
14
-
15
-
16
-
17
-
18
-
19
-
20
-
21
-
22
-
23
-
24
-
25
-
26
-
27
-
28
-
29
-
30
-
31
-
32
-
33
-
34
-
35
-
36
-
37
-
38
-
39
-
40
-
41
-
42
-
43
-
44
-
45
-
46
-
47
-
48
-
49
-
50
-
51
-
52
-
53
-
54
-
55
-
56
-
57
-
58
-
59
-
60
-
61
-
62
-
63
-
64
-
65
-
66
-
67
-
68
-
69
-
70
-
71
-
72
-
73
-
 74
74 -
 75
75 -
 76
76 -
 77
77 -
 78
78 -
 79
79 -
 80
80 -
 81
81 -
 82
82 -
 83
83 -
 84
84 -
85
-
86
-
87
-
88
-
89
-
90
-
91
-
92
-
93
-
94
-
95
-
96
-
97
-
98
-
99
-
100
-
101
-
102
-
103
-
104
-
105
-
106
-
107
-
108
-
109
-
110
-
111
-
112
-
113
-
114
-
115
-
116
-
117
-
118
-
119
-
120
-
121
-
122
-
123
-
124
-
125
-
126
-
127
-
128
-
129
-
130
-
131
-
132
-
133
-
134
-
135
-
136
-
137
-
138
-
139
-
140
-
141
-
142
-
143
-
144
-
145
-
146
-
147
-
148
-
149
-
150
-
151
-
152
-
153
-
154
-
155
-
156
-
157
-
158
-
159
-
160
-
161
-
162
-
163
-
164
-
165
-
166
-
167
-
168
-
169
-
170
-
171
-
172
-
173
-
174
-
175
-
176
 |
 |
