Samsung SM-N900A User Manual At&t Wireless Sm-n900a Galaxy Note 3 Jb Engli - Page 19
Configuring your Phone, Creating a Samsung Account, AT&T Ready2Go
 |
View all Samsung SM-N900A manuals
Add to My Manuals
Save this manual to your list of manuals |
Page 19 highlights
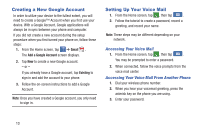
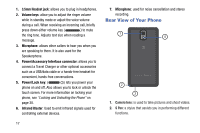
Warning! Please note that a touch screen responds best to a light touch from the pad of your finger. Using excessive force or a metallic object when pressing on the touch screen may damage the tempered glass surface and void the warranty. For more information, refer to "Standard Limited Warranty" on page 231. Configuring your Phone When you first turn on your phone, you will need to set up a few things. 1. When you first turn on your phone, the Let's set up your device! screen displays. 2. The default language for your phone is English. If you would like to select Spanish, tap Español on the bottom right-hand side of the screen. 3. Tap Terms & Conditions, read the End User License Agreement for Ready2Go, then tap Back. 4. Tap get started. - or - Touch Remind Later to configure your phone later. You can access Ready2Go from the Home screen by tapping Applications ➔ AT&T Ready2Go . 5. Read and follow the instructions on each screen to set up your phone. Creating a Samsung Account An active Samsung account is required to begin accessing applications such as ChatON and Samsung Hub. If you did not create a Samsung account when you first set up your phone, follow these steps: 1. From the home screen, tap ➔ Settings ➔ General General ➔ Accounts ➔ Add account. 2. Tap Samsung account. 3. Tap Create new account. 4. Follow the on-screen instructions to create and activate your account. Getting Started 12
-
 1
1 -
2
-
3
-
4
-
5
-
6
-
7
-
8
-
9
-
10
-
11
-
12
-
13
-
 14
14 -
 15
15 -
 16
16 -
 17
17 -
 18
18 -
 19
19 -
 20
20 -
 21
21 -
 22
22 -
 23
23 -
 24
24 -
25
-
26
-
27
-
28
-
29
-
30
-
31
-
32
-
33
-
34
-
35
-
36
-
37
-
38
-
39
-
40
-
41
-
42
-
43
-
44
-
45
-
46
-
47
-
48
-
49
-
50
-
51
-
52
-
53
-
54
-
55
-
56
-
57
-
58
-
59
-
60
-
61
-
62
-
63
-
64
-
65
-
66
-
67
-
68
-
69
-
70
-
71
-
72
-
73
-
74
-
75
-
76
-
77
-
78
-
79
-
80
-
81
-
82
-
83
-
84
-
85
-
86
-
87
-
88
-
89
-
90
-
91
-
92
-
93
-
94
-
95
-
96
-
97
-
98
-
99
-
100
-
101
-
102
-
103
-
104
-
105
-
106
-
107
-
108
-
109
-
110
-
111
-
112
-
113
-
114
-
115
-
116
-
117
-
118
-
119
-
120
-
121
-
122
-
123
-
124
-
125
-
126
-
127
-
128
-
129
-
130
-
131
-
132
-
133
-
134
-
135
-
136
-
137
-
138
-
139
-
140
-
141
-
142
-
143
-
144
-
145
-
146
-
147
-
148
-
149
-
150
-
151
-
152
-
153
-
154
-
155
-
156
-
157
-
158
-
159
-
160
-
161
-
162
-
163
-
164
-
165
-
166
-
167
-
168
-
169
-
170
-
171
-
172
-
173
-
174
-
175
-
176
-
177
-
178
-
179
-
180
-
181
-
182
-
183
-
184
-
185
-
186
-
187
-
188
-
189
-
190
-
191
-
192
-
193
-
194
-
195
-
196
-
197
-
198
-
199
-
200
-
201
-
202
-
203
-
204
-
205
-
206
-
207
-
208
-
209
-
210
-
211
-
212
-
213
-
214
-
215
-
216
-
217
-
218
-
219
-
220
-
221
-
222
-
223
-
224
-
225
-
226
-
227
-
228
-
229
-
230
-
231
-
232
-
233
-
234
-
235
-
236
-
237
-
238
-
239
-
240
-
241
-
242
-
243
-
244
-
245
-
246
-
247
-
248
-
249
-
250
-
251
-
252
-
253
-
254
-
255
-
256
-
257
-
258
-
259
-
260
 |
 |
