Samsung SM-N900A User Manual At&t Wireless Sm-n900a Galaxy Note 3 Jb Engli - Page 27
Scrap booker, S Pen button, Screen, Write, My Files, storage, Pictures, Screenshots, S Finder
 |
View all Samsung SM-N900A manuals
Add to My Manuals
Save this manual to your list of manuals |
Page 27 highlights
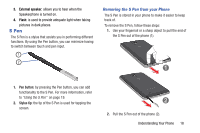
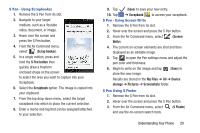
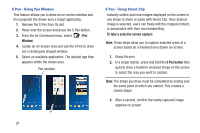
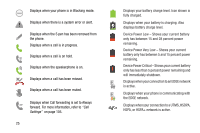
S Pen - Using Scrapbooker 1. Remove the S Pen from its slot. 2. Navigate to your target medium, such as a Youtube video, document, or image. 3. Hover over the screen and press the S Pen button. 4. From the Air Command menu, select (Scrap booker). 5. In a single motion, press and hold the S Pen button then quickly draw a freeform enclosed shape on the screen to select the area you want to capture into your Scrapbook. 6. Select the Scrapbook option. The image is copied into your clipboard. 7. From the top drop-down menu, select the target scrapbook into which to place the current selection. 8. Enter a memo and tag that can be assigned/attached to your selection. 9. Tap (Save) to save your new entry. 10. Tap ➔ Scrapbook to access your scrapbook. S Pen - Using Screen Write 1. Remove the S Pen from its slot. 2. Hover over the screen and press the S Pen button. 3. From the Air Command menu, select (Screen Write). 4. The current on-screen elements are shot and then displayed as an editable image. 5. Tap to open the Pen settings menu and adjust the pen color and thickness. 6. Begin to write on the image and tap (Save) to store the new image. Results are stored in the My Files ➔ All ➔ Device storage ➔ Pictures ➔ Screenshots folder. S Pen Using S Finder 1. Remove the S Pen from its slot. 2. Hover over the screen and press the S Pen button. 3. From the Air Command menu, select (S Finder) and use the on-screen search tools. Understanding Your Phone 20
-
 1
1 -
2
-
3
-
4
-
5
-
6
-
7
-
8
-
9
-
10
-
11
-
12
-
13
-
14
-
15
-
16
-
17
-
18
-
19
-
20
-
21
-
 22
22 -
 23
23 -
 24
24 -
 25
25 -
 26
26 -
 27
27 -
 28
28 -
 29
29 -
 30
30 -
 31
31 -
 32
32 -
33
-
34
-
35
-
36
-
37
-
38
-
39
-
40
-
41
-
42
-
43
-
44
-
45
-
46
-
47
-
48
-
49
-
50
-
51
-
52
-
53
-
54
-
55
-
56
-
57
-
58
-
59
-
60
-
61
-
62
-
63
-
64
-
65
-
66
-
67
-
68
-
69
-
70
-
71
-
72
-
73
-
74
-
75
-
76
-
77
-
78
-
79
-
80
-
81
-
82
-
83
-
84
-
85
-
86
-
87
-
88
-
89
-
90
-
91
-
92
-
93
-
94
-
95
-
96
-
97
-
98
-
99
-
100
-
101
-
102
-
103
-
104
-
105
-
106
-
107
-
108
-
109
-
110
-
111
-
112
-
113
-
114
-
115
-
116
-
117
-
118
-
119
-
120
-
121
-
122
-
123
-
124
-
125
-
126
-
127
-
128
-
129
-
130
-
131
-
132
-
133
-
134
-
135
-
136
-
137
-
138
-
139
-
140
-
141
-
142
-
143
-
144
-
145
-
146
-
147
-
148
-
149
-
150
-
151
-
152
-
153
-
154
-
155
-
156
-
157
-
158
-
159
-
160
-
161
-
162
-
163
-
164
-
165
-
166
-
167
-
168
-
169
-
170
-
171
-
172
-
173
-
174
-
175
-
176
-
177
-
178
-
179
-
180
-
181
-
182
-
183
-
184
-
185
-
186
-
187
-
188
-
189
-
190
-
191
-
192
-
193
-
194
-
195
-
196
-
197
-
198
-
199
-
200
-
201
-
202
-
203
-
204
-
205
-
206
-
207
-
208
-
209
-
210
-
211
-
212
-
213
-
214
-
215
-
216
-
217
-
218
-
219
-
220
-
221
-
222
-
223
-
224
-
225
-
226
-
227
-
228
-
229
-
230
-
231
-
232
-
233
-
234
-
235
-
236
-
237
-
238
-
239
-
240
-
241
-
242
-
243
-
244
-
245
-
246
-
247
-
248
-
249
-
250
-
251
-
252
-
253
-
254
-
255
-
256
-
257
-
258
-
259
-
260
 |
 |
