Netgear M5300-52G3 Web Management User Guide - Page 253
Iftransit Delay Interval, Dead Interval
 |
View all Netgear M5300-52G3 manuals
Add to My Manuals
Save this manual to your list of manuals |
Page 253 highlights
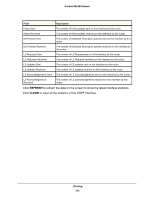
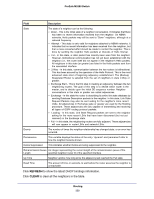
ProSafe M5300 Switch 3. Use Hello Interval to enter the OSPF hello interval for the specified interface in seconds. This parameter must be the same for all routers attached to a network. Valid values range from 1 to 65,535. The default is 10 seconds. 4. Use Dead Interval to enter the OSPF dead interval for the specified interface in seconds. This specifies how long a router will wait to see a neighbor router's Hello packets before declaring that the router is down. This parameter must be the same for all routers attached to a network. This value should a multiple of the Hello Interval, e.g., 4. Valid values range from 1 to 2147483647. The default is 40. 5. Use Iftransit Delay Interval to enter the OSPF Transit Delay for the specified interface. This specifies the estimated number of seconds it takes to transmit a link state update packet over the selected interface. Valid values range from 1 to 3600 seconds (1 hour). The default value is 1 second. 6. Use Retransmit Interval to enter the OSPF retransmit interval for the specified interface. This is the number of seconds between link-state advertisements for adjacencies belonging to this router interface. This value is also used when retransmitting database descriptions and link-state request packets. Valid values range from 1 to 3600 seconds (1 hour). The default is 5 seconds. 7. Use Authentication Type to select an authentication type other than none by clicking on the 'Configure Authentication' button. You will then see a new screen, where you can select the authentication type from the pull-down menu. The choices are: • None - This is the initial interface state. If you select this option from the pull-down menu on the second screen you will be returned to the first screen. • Simple - If you select 'Simple' you will be prompted to enter an authentication key. This key will be included, in the clear, in the OSPF header of all packets sent on the network. All routers on the network must be configured with the same key. • Encrypt - If you select 'Encrypt' you will be prompted to enter both an authentication key and an authentication ID. Encryption uses the MD5 Message-Digest algorithm. All routers on the network must be configured with the same key and ID. 8. Use Authentication Key to enter the OSPF Authentication Key for the specified interface. If you do not choose to use authentication you will not be prompted to enter a key. If you choose 'simple' authentication you cannot use a key of more than eight octets. If you choose 'encrypt' the key may be up to 16 octets long. The key value will only be displayed if you are logged on with Read/Write privileges, otherwise it will be displayed as asterisks. 9. Use Authentication ID to enter the ID to be used for authentication. You will only be prompted to enter an ID when you select 'Encrypt' as the authentication type. The ID is a number between 0 ad 255, inclusive. 10. Click ADD to add a new virtual link to the switch. 11. Click DELETE to remove the specified virtual link from the switch configuration. Routing 253
-
 1
1 -
2
-
3
-
4
-
5
-
6
-
7
-
8
-
9
-
10
-
11
-
12
-
13
-
14
-
15
-
16
-
17
-
18
-
19
-
20
-
21
-
22
-
23
-
24
-
25
-
26
-
27
-
28
-
29
-
30
-
31
-
32
-
33
-
34
-
35
-
36
-
37
-
38
-
39
-
40
-
41
-
42
-
43
-
44
-
45
-
46
-
47
-
48
-
49
-
50
-
51
-
52
-
53
-
54
-
55
-
56
-
57
-
58
-
59
-
60
-
61
-
62
-
63
-
64
-
65
-
66
-
67
-
68
-
69
-
70
-
71
-
72
-
73
-
74
-
75
-
76
-
77
-
78
-
79
-
80
-
81
-
82
-
83
-
84
-
85
-
86
-
87
-
88
-
89
-
90
-
91
-
92
-
93
-
94
-
95
-
96
-
97
-
98
-
99
-
100
-
101
-
102
-
103
-
104
-
105
-
106
-
107
-
108
-
109
-
110
-
111
-
112
-
113
-
114
-
115
-
116
-
117
-
118
-
119
-
120
-
121
-
122
-
123
-
124
-
125
-
126
-
127
-
128
-
129
-
130
-
131
-
132
-
133
-
134
-
135
-
136
-
137
-
138
-
139
-
140
-
141
-
142
-
143
-
144
-
145
-
146
-
147
-
148
-
149
-
150
-
151
-
152
-
153
-
154
-
155
-
156
-
157
-
158
-
159
-
160
-
161
-
162
-
163
-
164
-
165
-
166
-
167
-
168
-
169
-
170
-
171
-
172
-
173
-
174
-
175
-
176
-
177
-
178
-
179
-
180
-
181
-
182
-
183
-
184
-
185
-
186
-
187
-
188
-
189
-
190
-
191
-
192
-
193
-
194
-
195
-
196
-
197
-
198
-
199
-
200
-
201
-
202
-
203
-
204
-
205
-
206
-
207
-
208
-
209
-
210
-
211
-
212
-
213
-
214
-
215
-
216
-
217
-
218
-
219
-
220
-
221
-
222
-
223
-
224
-
225
-
226
-
227
-
228
-
229
-
230
-
231
-
232
-
233
-
234
-
235
-
236
-
237
-
238
-
239
-
240
-
241
-
242
-
243
-
244
-
245
-
246
-
247
-
 248
248 -
 249
249 -
 250
250 -
 251
251 -
 252
252 -
 253
253 -
 254
254 -
 255
255 -
 256
256 -
 257
257 -
 258
258 -
259
-
260
-
261
-
262
-
263
-
264
-
265
-
266
-
267
-
268
-
269
-
270
-
271
-
272
-
273
-
274
-
275
-
276
-
277
-
278
-
279
-
280
-
281
-
282
-
283
-
284
-
285
-
286
-
287
-
288
-
289
-
290
-
291
-
292
-
293
-
294
-
295
-
296
-
297
-
298
-
299
-
300
-
301
-
302
-
303
-
304
-
305
-
306
-
307
-
308
-
309
-
310
-
311
-
312
-
313
-
314
-
315
-
316
-
317
-
318
-
319
-
320
-
321
-
322
-
323
-
324
-
325
-
326
-
327
-
328
-
329
-
330
-
331
-
332
-
333
-
334
-
335
-
336
-
337
-
338
-
339
-
340
-
341
-
342
-
343
-
344
-
345
-
346
-
347
-
348
-
349
-
350
-
351
-
352
-
353
-
354
-
355
-
356
-
357
-
358
-
359
-
360
-
361
-
362
-
363
-
364
-
365
-
366
-
367
-
368
-
369
-
370
-
371
-
372
-
373
-
374
-
375
-
376
-
377
-
378
-
379
-
380
-
381
-
382
-
383
-
384
-
385
-
386
-
387
-
388
-
389
-
390
-
391
-
392
-
393
-
394
-
395
-
396
-
397
-
398
-
399
-
400
-
401
-
402
-
403
-
404
-
405
-
406
-
407
-
408
-
409
-
410
-
411
-
412
-
413
-
414
-
415
-
416
-
417
-
418
-
419
-
420
-
421
-
422
-
423
-
424
-
425
-
426
-
427
-
428
-
429
-
430
-
431
-
432
-
433
-
434
-
435
-
436
-
437
-
438
-
439
-
440
-
441
-
442
-
443
-
444
-
445
-
446
-
447
-
448
-
449
-
450
-
451
-
452
-
453
-
454
-
455
-
456
-
457
-
458
-
459
-
460
-
461
-
462
-
463
-
464
-
465
-
466
-
467
-
468
-
469
-
470
-
471
-
472
-
473
-
474
-
475
-
476
-
477
-
478
-
479
-
480
-
481
-
482
-
483
-
484
-
485
-
486
-
487
-
488
-
489
-
490
-
491
-
492
-
493
-
494
-
495
-
496
-
497
-
498
-
499
-
500
-
501
-
502
-
503
-
504
-
505
-
506
-
507
-
508
-
509
-
510
-
511
-
512
-
513
-
514
-
515
-
516
-
517
-
518
-
519
-
520
-
521
-
522
-
523
-
524
-
525
-
526
-
527
-
528
-
529
-
530
 |
 |