Oki MB471 Users Manual Advanced - Page 165
Changing Settings on EtherTalk (for Mac OS only) (MB451/MB451w/MB471/MB471w/ MB491/MB491+/MB491+LP/ES4191 MFP/ MPS4200mb/MPS4700mb Only), Changing EtherTalk Machine Name, Changing EtherTalk Zone
 |
View all Oki MB471 manuals
Add to My Manuals
Save this manual to your list of manuals |
Page 165 highlights
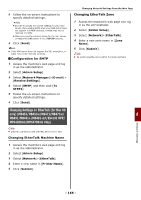
5 Follow the on-screen instructions to specify detailed settings. Memo Be sure to specify the correct settings for your mail server. If you enable APOP when your mail server does not support the APOP protocol, e-mails may not be received correctly. When you specify a domain name for the mail server, configure the DNS server in the [TCP/IP] setting. 6 Click [Send]. Memo If the POP server does not support the SSL encryption, emails may not be received correctly. Configuration for SMTP 1 Access the machine's web page and log in as the administrator. 2 Select [Admin Setup]. 3 Select [Network Manager]>[E-mail] > [Receive Settings]. 4 Select [SMTP] and then click [To STEP2]. 5 Follow the on-screen instructions to specify detailed settings. 6 Click [Send]. Changing Settings on EtherTalk (for Mac OS only) (MB451/MB451w/MB471/MB471w/ MB491/MB491+/MB491+LP/ES4191 MFP/ MPS4200mb/MPS4700mb Only) Note EtherTalk cannot be used with Mac OS X 10.6 or later. Changing EtherTalk Machine Name 1 Access the machine's web page and log in as the administrator. 2 Select [Admin Setup]. 3 Select [Network]>[EtherTalk]. 4 Enter a new name in [Printer Name]. 5 Click [Submit]. Changing Network Settings From the Web Page Changing EtherTalk Zone 1 Access the machine's web page and log in as the administrator. 2 Select [Admin Setup]. 3 Select [Network]>[EtherTalk]. 4 Enter a new zone name in [Zone Name]. 5 Click [Submit]. Note Be sure to specify a zone within the same segment. 8 Network Settings - 165 -
-
 1
1 -
2
-
3
-
4
-
5
-
6
-
7
-
8
-
9
-
10
-
11
-
12
-
13
-
14
-
15
-
16
-
17
-
18
-
19
-
20
-
21
-
22
-
23
-
24
-
25
-
26
-
27
-
28
-
29
-
30
-
31
-
32
-
33
-
34
-
35
-
36
-
37
-
38
-
39
-
40
-
41
-
42
-
43
-
44
-
45
-
46
-
47
-
48
-
49
-
50
-
51
-
52
-
53
-
54
-
55
-
56
-
57
-
58
-
59
-
60
-
61
-
62
-
63
-
64
-
65
-
66
-
67
-
68
-
69
-
70
-
71
-
72
-
73
-
74
-
75
-
76
-
77
-
78
-
79
-
80
-
81
-
82
-
83
-
84
-
85
-
86
-
87
-
88
-
89
-
90
-
91
-
92
-
93
-
94
-
95
-
96
-
97
-
98
-
99
-
100
-
101
-
102
-
103
-
104
-
105
-
106
-
107
-
108
-
109
-
110
-
111
-
112
-
113
-
114
-
115
-
116
-
117
-
118
-
119
-
120
-
121
-
122
-
123
-
124
-
125
-
126
-
127
-
128
-
129
-
130
-
131
-
132
-
133
-
134
-
135
-
136
-
137
-
138
-
139
-
140
-
141
-
142
-
143
-
144
-
145
-
146
-
147
-
148
-
149
-
150
-
151
-
152
-
153
-
154
-
155
-
156
-
157
-
158
-
159
-
 160
160 -
 161
161 -
 162
162 -
 163
163 -
 164
164 -
 165
165 -
 166
166 -
 167
167 -
 168
168 -
 169
169 -
 170
170 -
171
-
172
-
173
-
174
-
175
-
176
-
177
-
178
-
179
-
180
-
181
-
182
 |
 |
