Oki MB471 Users Manual Advanced - Page 54
For Windows PS Printer Driver, PostScript Custom Size
 |
View all Oki MB471 manuals
Add to My Manuals
Save this manual to your list of manuals |
Page 54 highlights
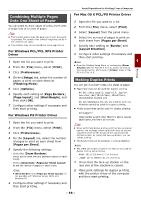
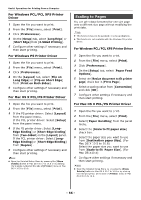
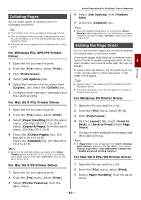
Useful Operations for Printing From a Computer 3 On the [Setup] tab, click [Paper Feed Options]. 4 Click [Custom Size]. 5 Enter a name and the dimensions. a) Enter a name for the new size in the [Name] box. b) Enter its dimensions in the [Width] and [Length] boxes. 6 Click [Add] to save the custom paper size to the list and then click [OK]. You can save up to 32 custom sizes. 7 Press [OK] until the [Printing Preferences] dialog box is closed. 8 Open the file you want to print. 9 Select the registered paper size and start printing on the print dialog. Reference For how to specify paper in the printer driver, refer to User's Manual Basic. For Windows PS Printer Driver 1 Click [Start] and select [Devices and Printers]. 2 Right-click the OKI MB491 icon and select [Printing preferences]>[OKI MB491(PS)]. 3 On the [Layout] tab, click [Advanced]. 4 Click [Paper Size] and select [PostScript Custom Page Size] from the drop-down list. 5 Enter the dimensions in the [Width] and [Height] boxes, and press [OK]. Note [Offset for Paper Feeder Size] is not available. 6 Press [OK] until the [Print Setup] dialog box is closed. 7 Open the file you want to print from the application. 8 Select [PostScript Custom Page Size] for a paper size and start printing on the printer driver. Reference For how to specify paper in the printer driver, refer to User's Manual Basic. For Windows PCL XPS Printer Driver 1 Click [Start] and select [Devices and Printers]. 2 Click a printer icon in [Printers and Faxes] and then click [Print server properties] on the top bar. 3 Select the [Forms] tab. 4 Select the [Create a new form] check box. 5 Enter the values in the [Form name], [Paper size], and [Printer area margins]. Click [Save Form]. 6 Click [Close]. 7 Open the file you want to print from the application. 8 Select the registered paper size and start printing on the printer driver. Reference For how to specify paper in the printer driver, refer to User's Manual Basic. For Mac OS X PCL/PS Printer Driver Note In the Mac OS X printer driver, paper size out of the available range can be set, however, image is not correctly printed. set paper size within available range. 1 Open the file you want to print. 2 From the [File] menu, select [Page Setup]. 3 Select [Manage Custom Sizes] from [Paper Size] 4 Click [+] to add an item to the list of custom paper sizes. 5 Double-click [Untitled] and enter a name for the custom paper size. 6 Enter the dimensions in the [Width] and [Height] boxes. 7 Click [OK]. 8 Click [OK]. 9 From the [File] menu, select [Print]. 10 Configure other settings if necessary and then start printing. Memo Open the Detailed Setup Menu by pressing the [Show Details] button in Max OS X 10.7 to 10.8 or by clicking the triangle symbol at the side of [Printer] menu in Max OS X 10.5 to 10.6. - 54 -
-
 1
1 -
2
-
3
-
4
-
5
-
6
-
7
-
8
-
9
-
10
-
11
-
12
-
13
-
14
-
15
-
16
-
17
-
18
-
19
-
20
-
21
-
22
-
23
-
24
-
25
-
26
-
27
-
28
-
29
-
30
-
31
-
32
-
33
-
34
-
35
-
36
-
37
-
38
-
39
-
40
-
41
-
42
-
43
-
44
-
45
-
46
-
47
-
48
-
 49
49 -
 50
50 -
 51
51 -
 52
52 -
 53
53 -
 54
54 -
 55
55 -
 56
56 -
 57
57 -
 58
58 -
 59
59 -
60
-
61
-
62
-
63
-
64
-
65
-
66
-
67
-
68
-
69
-
70
-
71
-
72
-
73
-
74
-
75
-
76
-
77
-
78
-
79
-
80
-
81
-
82
-
83
-
84
-
85
-
86
-
87
-
88
-
89
-
90
-
91
-
92
-
93
-
94
-
95
-
96
-
97
-
98
-
99
-
100
-
101
-
102
-
103
-
104
-
105
-
106
-
107
-
108
-
109
-
110
-
111
-
112
-
113
-
114
-
115
-
116
-
117
-
118
-
119
-
120
-
121
-
122
-
123
-
124
-
125
-
126
-
127
-
128
-
129
-
130
-
131
-
132
-
133
-
134
-
135
-
136
-
137
-
138
-
139
-
140
-
141
-
142
-
143
-
144
-
145
-
146
-
147
-
148
-
149
-
150
-
151
-
152
-
153
-
154
-
155
-
156
-
157
-
158
-
159
-
160
-
161
-
162
-
163
-
164
-
165
-
166
-
167
-
168
-
169
-
170
-
171
-
172
-
173
-
174
-
175
-
176
-
177
-
178
-
179
-
180
-
181
-
182
 |
 |
