Oki MB471 Users Manual Advanced - Page 166
Other Operations, Initializing Network Settings, Using DHCP, Configuring DHCP Server
 |
View all Oki MB471 manuals
Add to My Manuals
Save this manual to your list of manuals |
Page 166 highlights
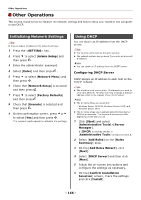
Other Operations Other Operations This section explains how to initialize the network settings and how to setup your machine and computer to use DHCP. Initializing Network Settings Note This procedure initializes all the network settings. 1 Press the key. 2 Press to select [Admin Setup] and then press . OK 3 Enter the administrator password. 4 Select [Enter] and then press . OK 5 Press to select [Network Menu] and then press . OK 6 Check that [Network Setup] is selected and then press . OK 7 Press to select [Factory Defaults] and then press . OK 8 Check that [Execute] is selected and then press . OK 9 On the confirmation screen, press or to select [Yes] and then press . OK The network card reboots to initialize the settings. Using DHCP You can obtain an IP address from the DHCP server. Note You must be authorized as the administrator. The network system may go down if you enter an incorrect IP address. Memo You can obtain an IP address from the BOOTP server. Configuring DHCP Server DHCP assigns an IP address to each host on the TCP/IP network. Note The machine must have a static IP address if you want to print via a network. For details on how to assign a static IP address, refer to the manual of your DHCP server. Memo The following OSes are supported: - Windows Server 2008 R2, Windows Server 2008, and Windows Server 2003 The following steps are explained using Windows Server 2008 as an example. The steps and menus may differ depending on the OS you use. 1 Click [Start] and select [Administrative Tools]>[Server Manager]. If [DHCP] is already shown in [Administrative Tools] continue to step 8. 2 Select [Add Roles] on the [Roles Summary] area. 3 On the [Add Roles Wizard], click [Next]. 4 Select [DHCP Server] and then click [Next]. 5 Follow the on-screen instructions and configure the settings as necessary. 6 On the [Confirm Installation Selection] screen, check the settings and click [Install]. - 166 -
-
 1
1 -
2
-
3
-
4
-
5
-
6
-
7
-
8
-
9
-
10
-
11
-
12
-
13
-
14
-
15
-
16
-
17
-
18
-
19
-
20
-
21
-
22
-
23
-
24
-
25
-
26
-
27
-
28
-
29
-
30
-
31
-
32
-
33
-
34
-
35
-
36
-
37
-
38
-
39
-
40
-
41
-
42
-
43
-
44
-
45
-
46
-
47
-
48
-
49
-
50
-
51
-
52
-
53
-
54
-
55
-
56
-
57
-
58
-
59
-
60
-
61
-
62
-
63
-
64
-
65
-
66
-
67
-
68
-
69
-
70
-
71
-
72
-
73
-
74
-
75
-
76
-
77
-
78
-
79
-
80
-
81
-
82
-
83
-
84
-
85
-
86
-
87
-
88
-
89
-
90
-
91
-
92
-
93
-
94
-
95
-
96
-
97
-
98
-
99
-
100
-
101
-
102
-
103
-
104
-
105
-
106
-
107
-
108
-
109
-
110
-
111
-
112
-
113
-
114
-
115
-
116
-
117
-
118
-
119
-
120
-
121
-
122
-
123
-
124
-
125
-
126
-
127
-
128
-
129
-
130
-
131
-
132
-
133
-
134
-
135
-
136
-
137
-
138
-
139
-
140
-
141
-
142
-
143
-
144
-
145
-
146
-
147
-
148
-
149
-
150
-
151
-
152
-
153
-
154
-
155
-
156
-
157
-
158
-
159
-
160
-
 161
161 -
 162
162 -
 163
163 -
 164
164 -
 165
165 -
 166
166 -
 167
167 -
 168
168 -
 169
169 -
 170
170 -
 171
171 -
172
-
173
-
174
-
175
-
176
-
177
-
178
-
179
-
180
-
181
-
182
 |
 |