Oki MB471 Users Manual Advanced - Page 55
Combining Multiple s Onto One Sheet of Paper, For Windows PCL/PCL XPS Printer Driver
 |
View all Oki MB471 manuals
Add to My Manuals
Save this manual to your list of manuals |
Page 55 highlights
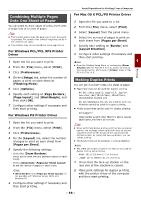
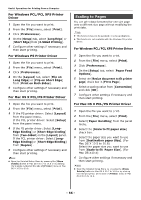
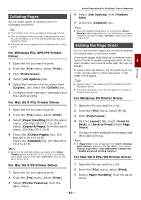
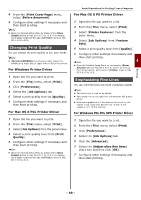
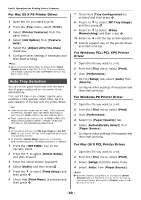
Printing Combining Multiple Pages Onto One Sheet of Paper You can print multiple pages of a document onto a single side of a sheet of paper. Note This function scales down the page size of your document for printing. The center of the printed image may not be in the center of the paper. This function may not be available in some applications. For Windows PCL/PCL XPS Printer Driver 1 Open the file you want to print. 2 From the [File] menu, select [Print]. 3 Click [Preferences]. 4 On the [Setup] tab, select the number of pages to print on each sheet at [Finishing Mode]. 5 Click [Options]. 6 Specify each setting at [Page Borders], [Page layout], and [Bind Margin], and then click [OK]. 7 Configure other settings if necessary and then start printing. For Windows PS Printer Driver 1 Open the file you want to print. 2 From the [File] menu, select [Print]. 3 Click [Preferences]. 4 On the [Layout] tab, select the number of pages to print on each sheet from [Pages per Sheet]. 5 Specify the following settings. - Select the [Draw Borders] check box to draw borders between pages on each sheet. - Select [Advanced]>[Pages per Sheet Layout] to set the layout of pages on each sheet. Note [Draw Borders] and [Pages per Sheet Layout] are not available with Windows Server 2003, and Windows XP. 6 Configure other settings if necessary and then start printing. Useful Operations for Printing From a Computer For Mac OS X PCL/PS Printer Driver 1 Open the file you want to print. 2 From the [File] menu, select [Print]. 3 Select [Layout] from the panel menu. 4 Select the number of pages to print on each sheet from [Pages per Sheet] 5 Specify each setting at [Border] and [Layout Direction]. 6 Configure other settings if necessary and then start printing. 4 Memo Open the Detailed Setup Menu by pressing the [Show Details] button in Max OS X 10.7 to 10.8 or by clicking the triangle symbol at the side of [Printer] menu in Max OS X 10.5 to 10.6. Making Duplex Prints You can print on both sides of a sheet of paper. Paper size that can be used for duplex printing A4, B5, Letter, Legal13, Legal 13.5, Legal 14, Executive, 16K (197x273mm, 195x270mm, 184x260mm) Custom size A5, A6, Statement, DL, C5, C6, Com-9, Com-10, Monarch cannot be used for duplex printing. Media weight that can be used for duplex printing 60~122g/m2 Using media weight other than the above causes paper jams, therefore do not use. Note When performing duplex printing with the face-up stacker opened, the message indicating that the face-up stacker should be closed on the display of the operator panel. At this moment, by closing the face-up stacker, you can restart printing. This function may not be available in some applications. Memo The width and length of custom size that can be used for duplex printing are as follows. - Width: 182 to 215.9mm (7.2 to 8.5 inch) - Length: 257 to 356mm (10.1 to 14.0 inch) 1 Check that the face-up stacker on the rear size of the machine is closed. 2 Make print settings for duplex printing with the printer driver of the computer and then start printing. - 55 -
-
 1
1 -
2
-
3
-
4
-
5
-
6
-
7
-
8
-
9
-
10
-
11
-
12
-
13
-
14
-
15
-
16
-
17
-
18
-
19
-
20
-
21
-
22
-
23
-
24
-
25
-
26
-
27
-
28
-
29
-
30
-
31
-
32
-
33
-
34
-
35
-
36
-
37
-
38
-
39
-
40
-
41
-
42
-
43
-
44
-
45
-
46
-
47
-
48
-
49
-
 50
50 -
 51
51 -
 52
52 -
 53
53 -
 54
54 -
 55
55 -
 56
56 -
 57
57 -
 58
58 -
 59
59 -
 60
60 -
61
-
62
-
63
-
64
-
65
-
66
-
67
-
68
-
69
-
70
-
71
-
72
-
73
-
74
-
75
-
76
-
77
-
78
-
79
-
80
-
81
-
82
-
83
-
84
-
85
-
86
-
87
-
88
-
89
-
90
-
91
-
92
-
93
-
94
-
95
-
96
-
97
-
98
-
99
-
100
-
101
-
102
-
103
-
104
-
105
-
106
-
107
-
108
-
109
-
110
-
111
-
112
-
113
-
114
-
115
-
116
-
117
-
118
-
119
-
120
-
121
-
122
-
123
-
124
-
125
-
126
-
127
-
128
-
129
-
130
-
131
-
132
-
133
-
134
-
135
-
136
-
137
-
138
-
139
-
140
-
141
-
142
-
143
-
144
-
145
-
146
-
147
-
148
-
149
-
150
-
151
-
152
-
153
-
154
-
155
-
156
-
157
-
158
-
159
-
160
-
161
-
162
-
163
-
164
-
165
-
166
-
167
-
168
-
169
-
170
-
171
-
172
-
173
-
174
-
175
-
176
-
177
-
178
-
179
-
180
-
181
-
182
 |
 |
