Sony COM-2 Operating Instructions - Page 11
Turning On the Power - POWER/HOLD Switch - us
 |
UPC - 027242720817
View all Sony COM-2 manuals
Add to My Manuals
Save this manual to your list of manuals |
Page 11 highlights
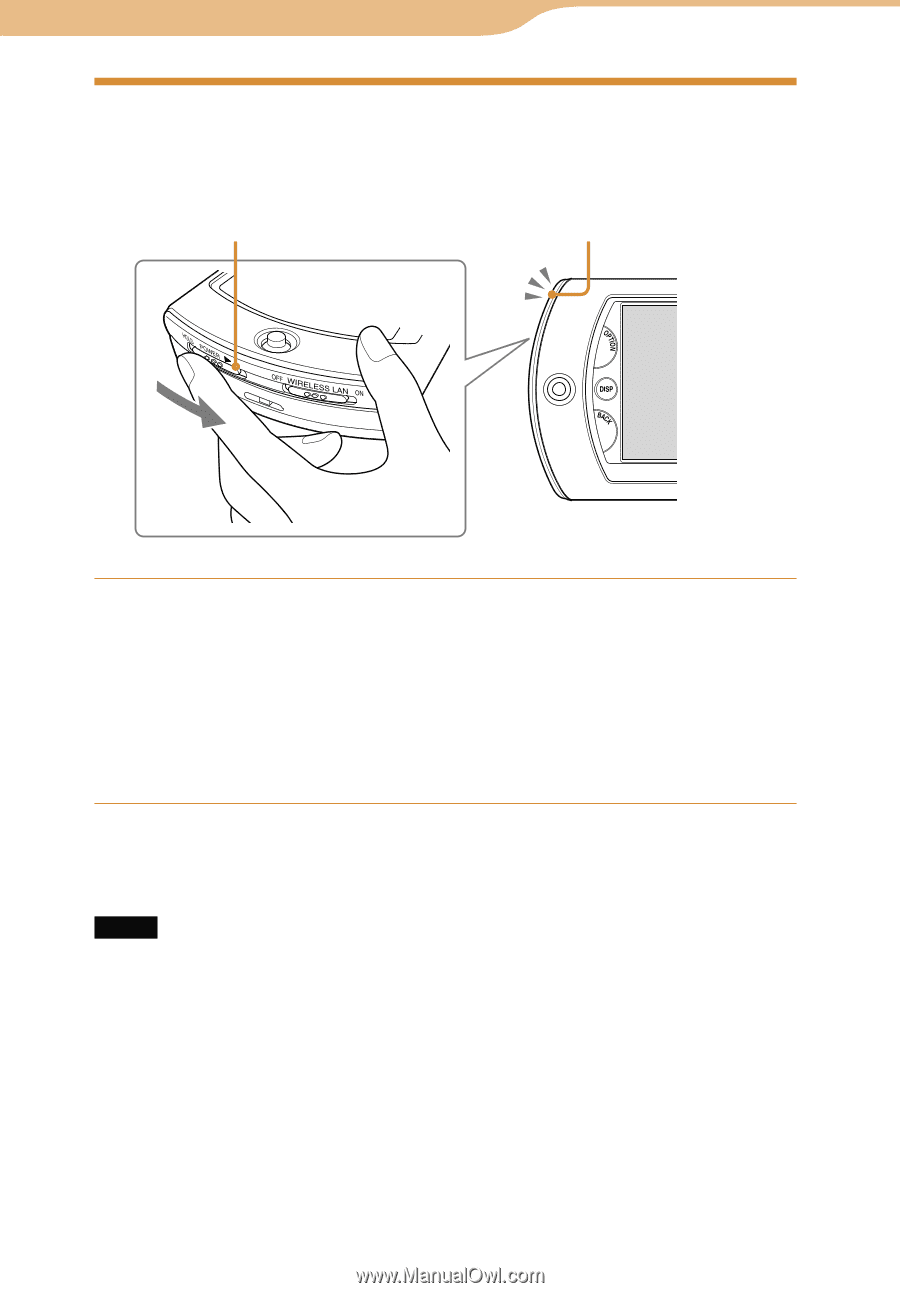
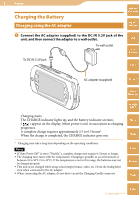
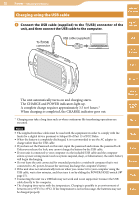
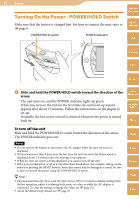
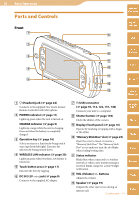
11 Power Table of Contents Turning On the Power - POWER/HOLD Switch Make sure that the battery is charged first. For how to connect the unit, refer to page 9. mylo Widget POWER/HOLD switch POWER indicator Web RSS/ Podcast AIM Skype Slide and hold the POWER/HOLD switch toward the direction of the arrow. The unit turns on, and the POWER indicator lights up green. When you turn on the unit for the first time, the initial set-up wizard appears after about 1.5 minutes. Follow the instructions on the display to set-up. Normally, the last screen viewed is restored whenever the power is turned back on. Yahoo! Messenger Google Talk Music To turn off the unit Slide and hold the POWER/HOLD switch toward the direction of the arrow. The POWER indicator goes out. Notes Do not remove the battery or disconnect the AC adapter while the start-up screen is displayed. If it has been more than 8 days since the last time the unit was used, the Home menu is displayed about 1.5 minutes after the start-up screen appears. While the start-up screen is being displayed, you cannot turn off the unit. If the power is turned on or off in a way other than stated above (for example, taking out the battery or pressing the RESET button), some data stored may be damaged or erased. Be sure to turn on and off the power using the POWER/HOLD switch. Hints This unit automatically turns itself off (Auto Power Off) in 5 minutes (default setting) from the last operation, unless it is playing back music or video, or while the AC adapter is connected. To clear the setting or change the value, see page 152. About the initial set-up wizard, see page 27. Photo Video Camera Tools Index
-
 1
1 -
2
-
3
-
4
-
5
-
 6
6 -
 7
7 -
 8
8 -
 9
9 -
 10
10 -
 11
11 -
 12
12 -
 13
13 -
 14
14 -
 15
15 -
 16
16 -
17
-
18
-
19
-
20
-
21
-
22
-
23
-
24
-
25
-
26
-
27
-
28
-
29
-
30
-
31
-
32
-
33
-
34
-
35
-
36
-
37
-
38
-
39
-
40
-
41
-
42
-
43
-
44
-
45
-
46
-
47
-
48
-
49
-
50
-
51
-
52
-
53
-
54
-
55
-
56
-
57
-
58
-
59
-
60
-
61
-
62
-
63
-
64
-
65
-
66
-
67
-
68
-
69
-
70
-
71
-
72
-
73
-
74
-
75
-
76
-
77
-
78
-
79
-
80
-
81
-
82
-
83
-
84
-
85
-
86
-
87
-
88
-
89
-
90
-
91
-
92
-
93
-
94
-
95
-
96
-
97
-
98
-
99
-
100
-
101
-
102
-
103
-
104
-
105
-
106
-
107
-
108
-
109
-
110
-
111
-
112
-
113
-
114
-
115
-
116
-
117
-
118
-
119
-
120
-
121
-
122
-
123
-
124
-
125
-
126
-
127
-
128
-
129
-
130
-
131
-
132
-
133
-
134
-
135
-
136
-
137
-
138
-
139
-
140
-
141
-
142
-
143
-
144
-
145
-
146
-
147
-
148
-
149
-
150
-
151
-
152
-
153
-
154
-
155
-
156
-
157
-
158
-
159
-
160
-
161
-
162
-
163
-
164
-
165
-
166
-
167
-
168
-
169
-
170
-
171
-
172
-
173
-
174
-
175
-
176
-
177
-
178
-
179
-
180
-
181
-
182
-
183
-
184
-
185
-
186
-
187
-
188
-
189
-
190
-
191
-
192
-
193
-
194
-
195
-
196
-
197
-
198
-
199
-
200
-
201
-
202
-
203
-
204
-
205
-
206
-
207
-
208
-
209
-
210
-
211
-
212
-
213
-
214
-
215
-
216
-
217
-
218
-
219
-
220
-
221
-
222
-
223
-
224
-
225
-
226
-
227
-
228
-
229
-
230
-
231
-
232
-
233
-
234
-
235
-
236
-
237
-
238
-
239
-
240
-
241
-
242
-
243
-
244
-
245
-
246
-
247
-
248
-
249
-
250
-
251
-
252
-
253
-
254
-
255
-
256
-
257
-
258
-
259
-
260
-
261
-
262
-
263
-
264
-
265
-
266
-
267
-
268
-
269
-
270
 |
 |